Saturday, November 8, 2014

Aerial View, Exspansion and the Town of Thunder Mesa

It's been six months since the last aerial view update and a lot has happened on the layout since then. Much progress has been made in the Big Thunder Creek area and new benchwork has been added to the Thunder Mesa section to bring it in line with the new plan. Work has also begun on a new design for the town of Thunder Mesa, along with all of the necessary wiring for the lights and sound effects in that scene. Let's stoke the boiler in our imaginary airship and take a flight high over Thunder Mesa to see what's new.

Six months ago: May 2, 2014. That pesky Calico section was just starting construction. Good thing I didn't get too much further.

This morning: November 8, 2014. Old benchwork for the Calico section has been removed and the Thunder Mesa "island" section moved out 3' from the back wall. 

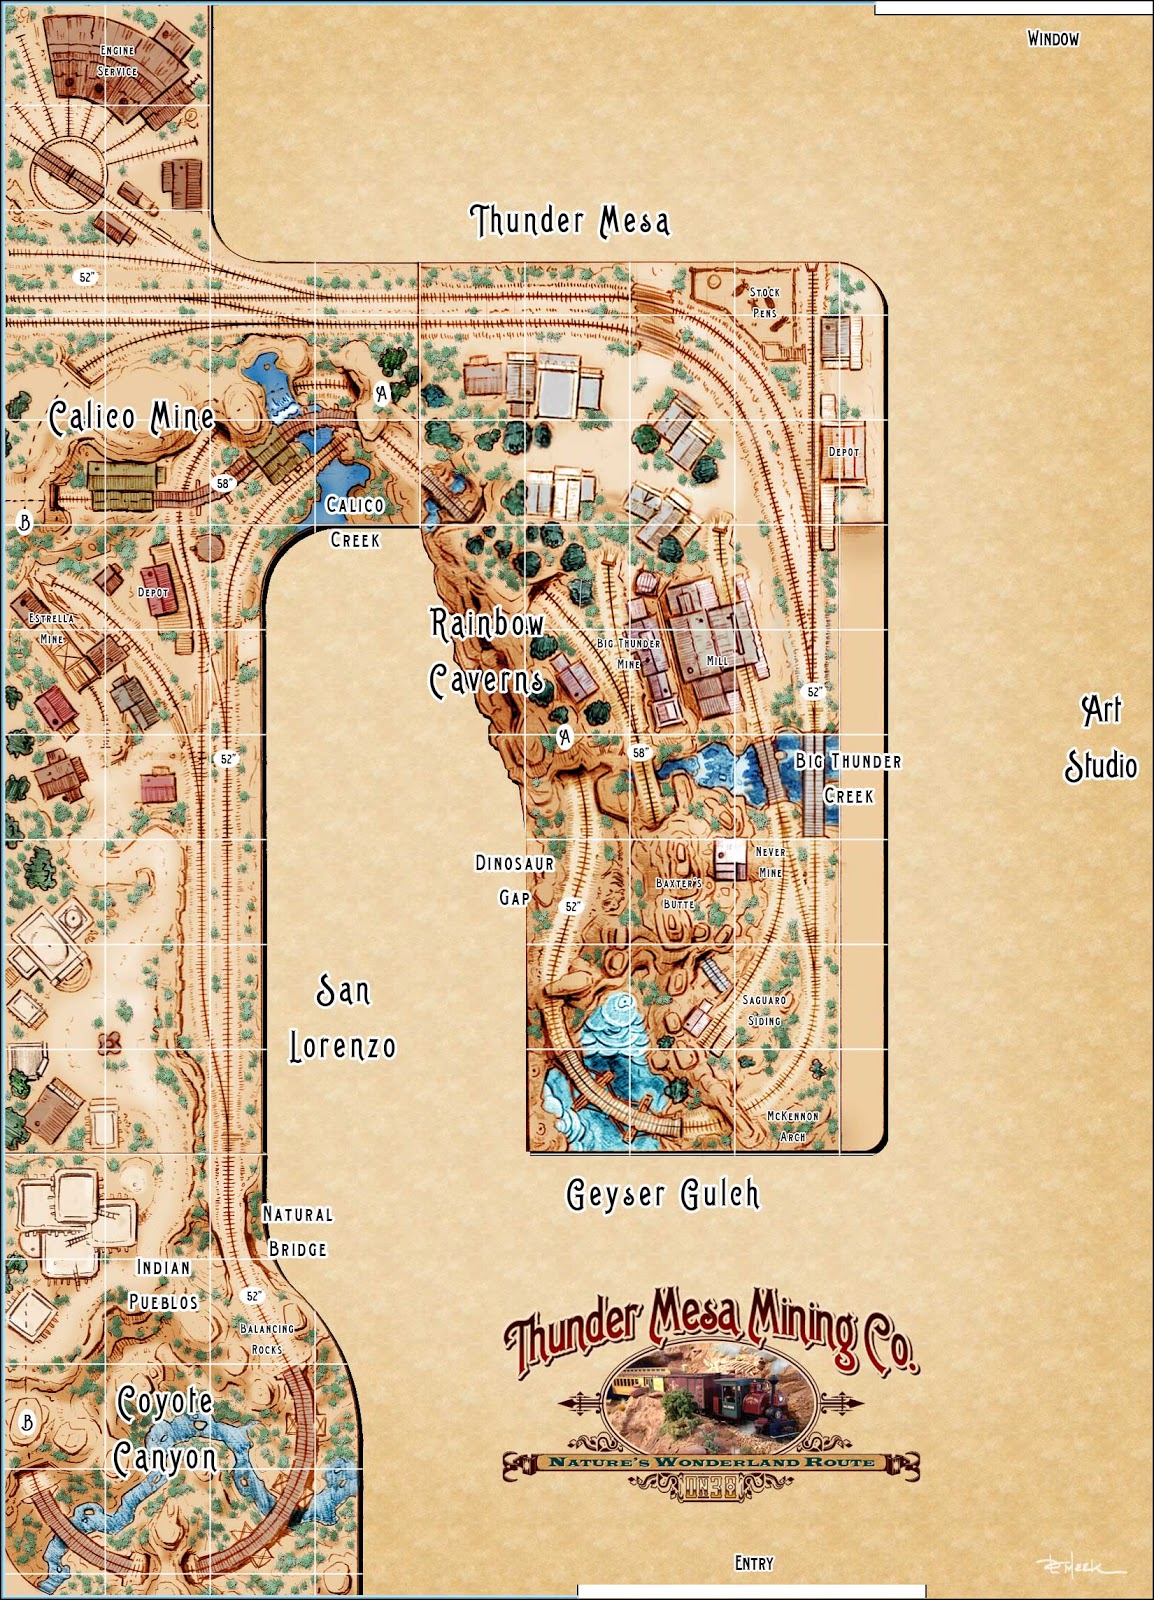
The new "folded dog-bone" style plan that I'm now working from. As well as a new layout for Calico and the addition of San Lorenzo, this plan calls for big changes in the orientation of Thunder Mesa town. For those keeping score at home, this is the third (and hopefully final) location for the town.

Moving in a little closer we can see the recent work done on the Never Mine and Big Thunder Creek. Replacing the paper model mock-up of Thunder Mesa Mill (to the right of the creek) with a finished structure is high on the list of projects to tackle soon.

Flying around the bend we get a view of the new layout for Thunder Mesa town. Six inches of new benchwork was added to the end of this section where it formerly butted against the wall. This created room for a much longer passing siding and a more visually appealing presentation of the town - while still leaving room for a 30" wide aisle.


Just a Little Bit Bigger

The original, central Thunder Mesa section of the layout is now 8.5' long by 4.5' at its widest point. If I ever have to move, that's about as big as it can get and still have any hope of being able to pick it up with a couple other guys and carry it out the door. It started out as 3' x 6' and just hasn't stopped growing. A 54" x 6" chunk of new real estate has been grafted on to the back end to make more room for the town and vastly improved operations.

Extending the benchwork 6 more inches. The rounded end will be covered by a 1/8" masonite fascia. The turntable will be relocated to a new section at the end of the aisle with an expanded yard and engine facilities. 

Here the old track and roadbed has been removed and everything scraped clean down to the plywood. I use Elmer's wood glue to affix my cork roadbed, making it easy to remove when soaked with water and pealed up with a putty knife.

New 1/2" plywood top in place. This will act as support for the town and sub-roadbed for the new tracks. The turntable hole will be covered by the base of the town module.

Midwest HO cork roadbed has been glued down and some Peco On30 flex-track laid for the new passing siding. I used Powergrab silicone based adhesive to hold the track in place. The parallel tracks heading off the layout at top will connect to the new yard and turntable section.


The Little Mining Town of Thunder Mesa

My town of Thunder Mesa is based on the little mining town that stands above the queue on Disneyland's Big Thunder Mountain Railroad; structures that were once part of the little mining town of Rainbow Ridge on the old Nature's Wonderland Mine Train. I created plans and built paper model mock-ups for the town structures several years ago when first starting this project and those mock-ups have come in very handy over time in helping to visualize the various incarnations of Thunder Mesa town. Some of the mock-ups are now a little worse for wear and tear, and all will be retired as they are replaced by detailed structure models one by one.

WED site plan for Rainbow Ridge at Big Thunder Mountain Railroad, Disneyland. © Disney. The structures at the park are tiny and built in very shallow relief - almost like movie flats. I've tried to stay true to the general layout of structures while allowing for more realistic depth and the operational needs of a model train layout.


The town is being built as a separate module, much like a stand-alone diorama that plugs into the layout. This will allow much of it to be built and detailed at the workbench and will also minimize the risk of damage should the layout ever need to be moved. Sound and lighting effects are also integral to the town's presentation and will be completely self contained within the module.

A base for the town module was cut to size from 1/4" MDF.  A box frame of 1" x 2"s was built on top to add strength and prevent warping.

A power strip was installed to bring current to the LED lights, and to the sound module in Big Thunder Saloon. A mini-plug connects the module to the layout's effects panel and a 9v power source. The red painted screws denote the positive terminal; important to keep track of when working with LEDs.

Here, the contours of town are being roughed in with 1" thick EPF (pink foam) and some foamcore for the more gradual slopes. A retaining wall along the front edge of town will separate it from the tracks below.

Overall view of the town module. A dirt road will cross the tracks at grade and then wind up through the town. Stairs and wooden boardwalks will connect the structures.

Moving the layout out from the wall has created all new vistas and photo-ops. This should make for a dramatic and compelling scene when completed with the backdrop in place.


With the town module roughed in and the new benchwork and track in place on the Thunder Mesa section, I can turn my attention to building the frames and supports for the Calico, San Lorenzo and Coyote Canyon sections. There's also still some work to do finishing up and detailing around Big Thunder Creek and, of course, many, many structures to build. Should be fun! Thanks for checking in, amigos. Adios for now!

Friday, October 31, 2014

The Never Mine: Part II ~ Happy Haunted Halloween Edition

Grim Grinning Ghosts Come Out to Socialize with the Addition of a Haunted Mine Tunnel!


Click here for part I

Welcome foolish mortals, to the Never Mine! Happy Halloween!

Just beware of hitchhiking ghosts!


At the end of September I described building the shaft house and head-frame of the spooky, abandoned Never Mine. In today's post I'll detail construction of the mine tunnel base, including the addition of a happy haunt who only comes out after dark. Then we'll finish up the scene with a tailings pile, timber crib retaining wall, and all of the final landscaping details. Follow along with the photos and captions to see how it all went together.

The base for the Never Mine was carved from two layers of 1" thick Balsa Foam laminated together with wood glue. Most of the carving was done with #2 and #11 hobby knives and a hard, 5H pencil. A random stone foundation for the shaft house was integrated into the carving. Here I'm test fitting the top beam of the timber framing for the mine adit. 

For my happy haunt, I cut some 1mm clear acrylic sheet to size and fogged the surface with fine sandpaper. Then the outline of the ghost was painted from behind with thick black acrylic paint. The acrylic sheet was cemented into place and all of the edges blended with spackle. 

A hunk of Baxter's Butte was cut away and a simple power bus made from two strips of thin brass sheet was glued in place.  Accessory power from a 9v transformer feeds this bus and all wiring leads from the model were soldered on to it. Special care was taken to keep track of the positive bus as LED lights are polarity specific and will not function if the positive diode receives a negative charge. Here a 5mm green LED has been soldered into place to illuminate the ghost.

A quick check to make sure everything would fit and work properly.

The carving was painted with acrylics to match existing rock-work on the layout and the mine adit was finished with scale 8' x 8' beams and 1" x 12' planks stained with a shoe dye and alcohol mixture. The boards were distressed and broken to look as if they have been there for some time. The nail holes were added with a sharp 5H pencil.

Here is the entire assembly installed on the layout and the lights turned on. The shaft house has a single blue LED and the hoisting shed has a flickering amber LED as described in part I.

The carved base was glued down and blended into the existing scenery with Sculptamold. The mine structures above merely sit in place and can be easily removed if required. A short length of Micro Engineering code 55 N scale bridge track was added to represent O scale 18" gauge mine car tracks emerging from the tunnel.

I had originally planned to build an abandoned ore tipple to go with the Never Mine but later decided that such an imposing trackside structure would detract from the tiny mine above. Instead I opted for a timber crib retaining wall and tailings dump - a very common site around old mines. The first step was to rough in the dump pile with EPF (pink foam).

Here the tailings dump has been smoothed out and blended into the cliffside with Sculptamold. It was then given just a quick coat of Raw Sienna since this base will be entirely covered by scenery materials.

A couple of rickety, broken old ladders were scratch-built from strip-wood to provide a way up to the mine - albeit a hazardous one. It's nothing but fun to build details like this.

The timber crib retaining wall was built in place from 3/16" diameter dowels, stained and distressed to resemble old timbers. Here I'm backfilling behind the cribbing with small rocks and dirt from Sedona, AZ. This was later cemented in place with diluted white glue.

The slope of the tailings pile was textured with Polyblend sanded grout. It was mixed in a paper cup with a small amount of water to form a thick paste and then stippled on with a cheap paintbrush.

The grout was allowed to dry for a couple of days and then it was stained with thin washes of acrylic paints to represent colorful minerals, and to blend it with the surrounding scenery.

Another layer of fine rocks and dirt was sifted over the tailings pile and cemented into place with diluted white glue. Then more rocks, bushes, cacti, weeds, broken boards and other miscellaneous bits of debris were cemented in place to finish up the scene.

Cacti, bushes and other details near the shaft house foundations. You'd have to be pretty brave to climb those ladders!

The boarded-up mine entrance. The ghost is invisible during they day and only appears when the structure lighting is turned on for night operations.

Overall view if the tailings pile. The weedy overgrown look contributes to the story of a mine that has been abandoned for some time.


With the completion of the Never Mine, just about all of the scenery is now finished on this side of Big Thunder Creek. I'm sure that a few more details will be added here and there, but I was happy to get the haunted mine finished just in time for Halloween. I had considered adding a sound module to this project but decided it would be a little too much with the sounds of the creek, mill and town right next door. Hope you've all enjoyed the tale of the Never Mine and following along with the build. As always, any questions or comments are more than welcome below. More to come real soon. In the meantime, here's a video showing the lighting effects and documenting the Never Mine build. Adios for now!


Friday, October 24, 2014

Viva San Lorenzo!

Verne Niner's Award Winning Diorama Comes to Thunder Mesa Along With Big Changes to the Track Plan


The sleepy border village of San Lorenzo. This award winning diorama by Verne Niner will soon find a new home on the Thunder Mesa layout. Photo by Verne Niner.


When friend and fellow modeler Verne Niner recently announced that he would be dismantling his Estrella & Sonora Grande layout to pursue new adventures in HOn3, many wondered what would become of the superlative structures, fine details and beautiful equipment from that landmark On30 layout. Well, the short answer is that Verne will be selling off most of the layout to other modelers before finally dismantling it at the first of next year. I was fortunate to come to an agreement with Verne regarding a large chunk of the layout, the village of San Lorenzo. I knew that the diorama would make an excellent addition to the TMMC and I simply could not pass on the chance to own such a beautiful and detailed piece of modeling. It is sad news indeed that Verne's E&SG will soon be history, but we're both happy that the spirit will live on as TMMC trains continue to visit San Lorenzo.

The colors, theme, details and scale of the scene makes San Lorenzo a perfect fit for the Thunder Mesa layout. Photo by Verne Niner.

More San Lorenzo details. The frustrated banditos may never get that pig out of the fountain. Photo by Verne Niner.


The San Lorenzo diorama measures 18" x 30" and features four custom soundtracks in addition to an amazing level of detail. A Fantasonics unit plays the sounds of splashing water in the fountain, ringing mission bells, neighing horses, singing birds and the banditos threatening the pig - all at the touch of a button. Details abound. A diamondback rattlesnake slithers through the bushes, a hawk perches atop a saguaro, and rock hound Chuckawalla Slim's Model T truck pauses by the Mercantile. Above all, the mission church is a remarkable feat of scratch-building, complimenting and contrasting with the smaller, secular buildings of the village. Everything works together here in the best tradition of modeling as story. It is no wonder that the diorama won the 2013 Gazette Award at the 33rd annual Narrow Gauge Convention in Pasadena and was featured in the Jan/Feb 2014 Narrow Gauge and Short Line Gazette.

Thirsty cowboys pause for drink of water near the mission ramada. Photo by Verne Niner.

A local farmer stops to chat with the padré, his traditional oxcart loaded with bales of hay. Photo by Verne Niner.

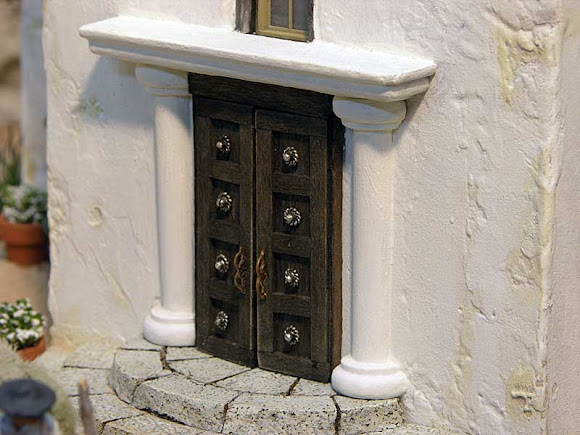
Detail of the mission doors. Photo by Verne Niner.

Bell tower of the mission church. Note the Harris hawk perched atop the saguaro - a common site in the Sonoran Desert. Photo by Verne Niner.


I know that the San Lorenzo diorama was a real labor of love for Verne and I am honored to be taking stewardship of it. San Lorenzo will remain whole and intact on the Thunder Mesa layout, an important stop along the line, and a tribute to the old E&SG. Some pieces from Verne's On30 collection are still available as of this writing, but they are going fast. Click here if you are interested in owning a piece of Estrella & Sonora Grande history.

Big Changes to the Thunder Mesa Plan

As Verne and I discussed the future of San Lorenzo, we've also been swapping ideas about his planned HOn3 D&RGW layout and about the expansion plans for Thunder Mesa. I have been somewhat discontented with my overall plan and the few tweaks I've made here and there haven't resolved the larger issues. In its original form, the TMMC was a very simple 3' x 6' scenic display with a loop of track. It was what is known as an "island design" meant to be viewed from all sides. This type of design has fallen out of fashion in recent years with most modelers now preferring an "around the walls" style plan. This makes sense because island designs take up a lot of space in the center of the room and, the theory goes, you can get more railroad in the same space be wrapping the track around the walls and leaving the center open for operators, namely, you and me. I also suspect that the move away from island style layouts has something to do with some modeler's desire to distance themselves from the perception that they're just "playing with a train set." Fortunately, I've never cared about such perceptions and am the first to admit to having a heap of fun playing with trains.

Anyway, in my quest to expand the layout from its original island I've mostly focused on trying to morph the plan into some semblance of an around the walls design. This has been a largely frustrating exercise because the two design styles have such different requirements. I finally got to the point where I was almost ready to tear out everything I've already built and start over again from scratch. Surely a true around the walls style plan with shadowbox type modules and a nifty lighting valance would be much more sensible, wouldn't it? Then Verne said something that made everything click into place. He said that Thunder Mesa has depth. Yes, scenic depth is exactly what you get with an island style design and exactly what you often lose with boxed-in shelves along the wall. Eureka!

Turns out I really like depth, which, along with dramatic vertical separation is one of the defining characteristics of my particular modeling style. So it was back to the drawing board again. I was already drawing up a new plan to work San Lorenzo into the layout and to take advantage of the space recently vacated by the N scale Pagosa & Southern. I took the opportunity to create something with maximum scenic depth and multiple viewing angles for the Thunder Mesa island. Moving the Thunder Mesa section out from the wall also opened up much needed space for the town, passing tracks, yard and engine facilities.

The focus is on scenery, structures and continuous running on this folded dog bone style plan. Room for a new engine service facility at upper left was an unexpected bonus. Grid spacing on the plan is 12". Aisle width is 30". The thin blue line represents an around the walls backdrop. Tip: to see the plan full size, right click and choose "Open link in new tab."


If I were to list my model railroading interests in order of importance, "scenery" and "structure building" would be way up at the top and "realistic operations" would be down somewhere near the bottom just above "wiring." Truth is, I'm much more of a model builder than an operator of miniature railroads and that's just fine. I like nice looking trains rolling through amazing scenery. This new plan is designed to emphasize those druthers while making the most of my art studio's givens. The mainline is about as uncomplicated as I can make it, with trains starting and finishing their runs in good old Thunder Mesa. I might add a couple of hidden staging tracks under San Lorenzo but that's still up in the air at this point. The Calico line is separate once again and stays up high to twist and turn through Calico Mountain on some 12" radius curves. It now transfers ore to the Thunder Mesa line via a tipple. The village of San Lorenzo is featured on a high bluff above the tracks, and will be complimented by the Indian Pueblos on one side, and the mining camp of Estrella Gulch on the other. Coyote Canyon will be a very dramatic scene with a high steal viaduct, natural bridge and teetering hoodoos. The town of Thunder Mesa will be rotated and moved down slope a bit, closer to the tracks for better viewing of the detailed structures. Another bonus of this plan is somewhat wider radius curves on the new sections.

I'm very happy with the new plan and think it offers just the kind of modeling opportunities and challenges that I want. The scenes will be detailed, layered and deep, with a wall-mounted backdrop wrapping around on three sides. I'm also thrilled to be bringing San Lorenzo over to Thunder Mesa country. I was planning on modeling a sleepy border town and Verne's excellent diorama fits the bill perfectly. I want to thank the readers of this blog who have followed along through all of the changes and twists in the design process. There are a few central ideas that I've been drilling down to and I think I'm getting much closer now. As always, question and comments are welcome below. Adios for now, amigos!

Friday, October 17, 2014

A New Plan for the N Scale Pagosa & Southern

From Simple Loop to Switching Layout on a Shelf


The Pagosa & Southern, version 2.0. The new shelf layout is just 12" x 72" and uses Kato Unitrack.


In the coming months I will be expanding the On30 Thunder Mesa Mining Co. into the space that has, up until recently, been occupied by the N scale Pagosa & Southern. I began work on the P&S early this year and it was originally designed as a simple loop with a couple of sidings, just a diversion from the big layout really. But in the last month or so I've been firming up plans for expanding the TMMC (new track plan coming soon!) and it has become apparent that the P&S in its original location was standing in the way of progress. After searching in vain for a new location for the layout as originally built, I came to the conclusion that "N Scale Colorado" must adapt to what little space was available or face being packed away in boxes once again.

Fortunately I was able to carve out space for a 6' long shelf above my workbench. Just enough room for some moderately interesting N scale switching. I decided to keep the original theme of a 1950's Colorado town, but now the operational focus will be on switching the local industries and moving traffic through an important interchange with the rival Santa Fe.

Looking at the plan above, all trains will enter and exit the layout from a staging shelf at left.  Beyond the tunnel, a short section of track will mate with 30" long portable staging "cassettes." Each cassette can hold and turn a complete short train (locomotive, caboose, and about 6 cars). I'll have more on building these cassettes in a future update. After switching the town, the locomotive will swap ends with the caboose using the run-around track and head back out the way it came.

The first P&S was built using bombproof Kato Unitrack and I'm recycling it all again here. I've been nothing but impressed by the trouble free operation provided by this track and feel that the aesthetic trade-offs are more than worth it for a project like this. The black and white plan shown above lists the part numbers for all of the Kato Unitrack used.

There won't be the towering mountain scenery planned for the first P&S, but the tunnel, creek and truss bridge area should make for an interesting scene. Structures will also be front and center here so I'll be taking my time on those with some more craftsman-style kits. A shelf layout like this also really lends itself to a shadowbox type presentation, with an integrated lighting system and a backdrop wrapping around three sides.

The first P&S being disassembled. Luckily, I used Kato Unitrack and never glued it down. Most of the wood and foam will be re-used on the Thunder Mesa layout. Unfortunately the backdrop is glued down and can't be removed. I'll make a new one.

For the new shelf layout, a simple box-frame was built from 1" x 3" select pine. It measures 12" wide by 72" long. The two inch holes drilled through the crosspieces are for running the wiring through.

The sub-roadbed deck is 1/2" plywood. I know it's fashionable these days to use polystyrene foam insulation board for this but I find that it turns the entire benchwork into a resonator and makes the trains really loud. I only use foam for scenery.

The track was positioned on the plywood sub-roadbed according to the plan. Locations for turnouts and wiring holes were marked in pencil. This layout has three more turnouts than the original P&S. All are #6.

The layout is mounted to the wall with 5 of these metal shelf brackets from Home Depot. It was propped up and shimmed with whatever was handy as a 4' bar level was used to keep everything straight and true during installation. The final height of the benchwork is 59" above the floor; just below eye level for me. 

I was able to re-use this control shelf which was built for the first P&S. Control can be switched between digital DCC or analog DC. A used Bachmann controller from eBay works okay for now but I'll probably replace it in the future.

The new Pagosa & Southern above my workbench. It shares space with a lot of other stuff.


With the shelf complete and the track installed, I've already been having some fun running trains and switching cars on the layout. So far I'm really enjoying the plan and the greatly enhanced operations over the previous layout. Once the staging cassettes are up and running I'll probably use some type of card order system for operating trains.

It's the 1950's in N scale Colorado and most trains on the P&S are handled by EMD GP7's or Alco RS3's. Both of these Rio Grande locos are from Bachmann. They are DCC equipped and their smooth, dependable running was a major contributing factor in my deciding to turn the P&S into a switching layout. By the way, all of these structures are from old layouts and will probably be replaced.


And speaking of operation, on a switching layout like this, you really need an easy and reliable way to couple and uncouple cars. I've used track mounted magnets in the past and found them to be less than reliable. On the Thunder Mesa layout I use modified bamboo skewers as an uncoupling tool and they work just great. Unfortunately, bamboo skewers are just too big to work in N scale. Here's a quick and easy uncoupling tool I came up with for the P&S:

I cut the head off of a dressmaker's T-pin before mounting it in a handle made from 3/8" doweling. A hole was drilled in the end of the dowel just big enough for a tight press-fit with the pin, then a drop of ACC gel was used to cement it in place. Heat shrink tubing on the handle makes it easy to grip.

To uncouple, just insert the tip between two knuckle style couplers and twist gently. It only takes a very light touch and the cars themselves barely move.  It works by slipping into one knuckle coupler and displacing the other. A slight push separates the cars.


It's funny, but every time I think I'm done with N scale and just about ready to throw everything up on eBay, I start fiddling with those little trains again and get drawn back in. It is worth mentioning how far N scale has come and how much better the trains look and run now, versus when I started in the hobby 35+ years ago. The new stuff is a joy to operate and I can see myself continuing to fiddle in 1:160 for many years to come.

That's about it for this week though. Next week I'll have a new post on Thunder Mesa, all about putting the finishing touches on Big Thunder Creek. I'll finish up this Friday's post with a fond look back at the first P&S. Adios, amigos!

Related Posts Plugin for WordPress, Blogger...