Showing posts with label Big Thunder Mountain. Show all posts

Saturday, November 8, 2014

Aerial View, Exspansion and the Town of Thunder Mesa

It's been six months since the last aerial view update and a lot has happened on the layout since then. Much progress has been made in the Big Thunder Creek area and new benchwork has been added to the Thunder Mesa section to bring it in line with the new plan. Work has also begun on a new design for the town of Thunder Mesa, along with all of the necessary wiring for the lights and sound effects in that scene. Let's stoke the boiler in our imaginary airship and take a flight high over Thunder Mesa to see what's new.

Six months ago: May 2, 2014. That pesky Calico section was just starting construction. Good thing I didn't get too much further.

This morning: November 8, 2014. Old benchwork for the Calico section has been removed and the Thunder Mesa "island" section moved out 3' from the back wall. 

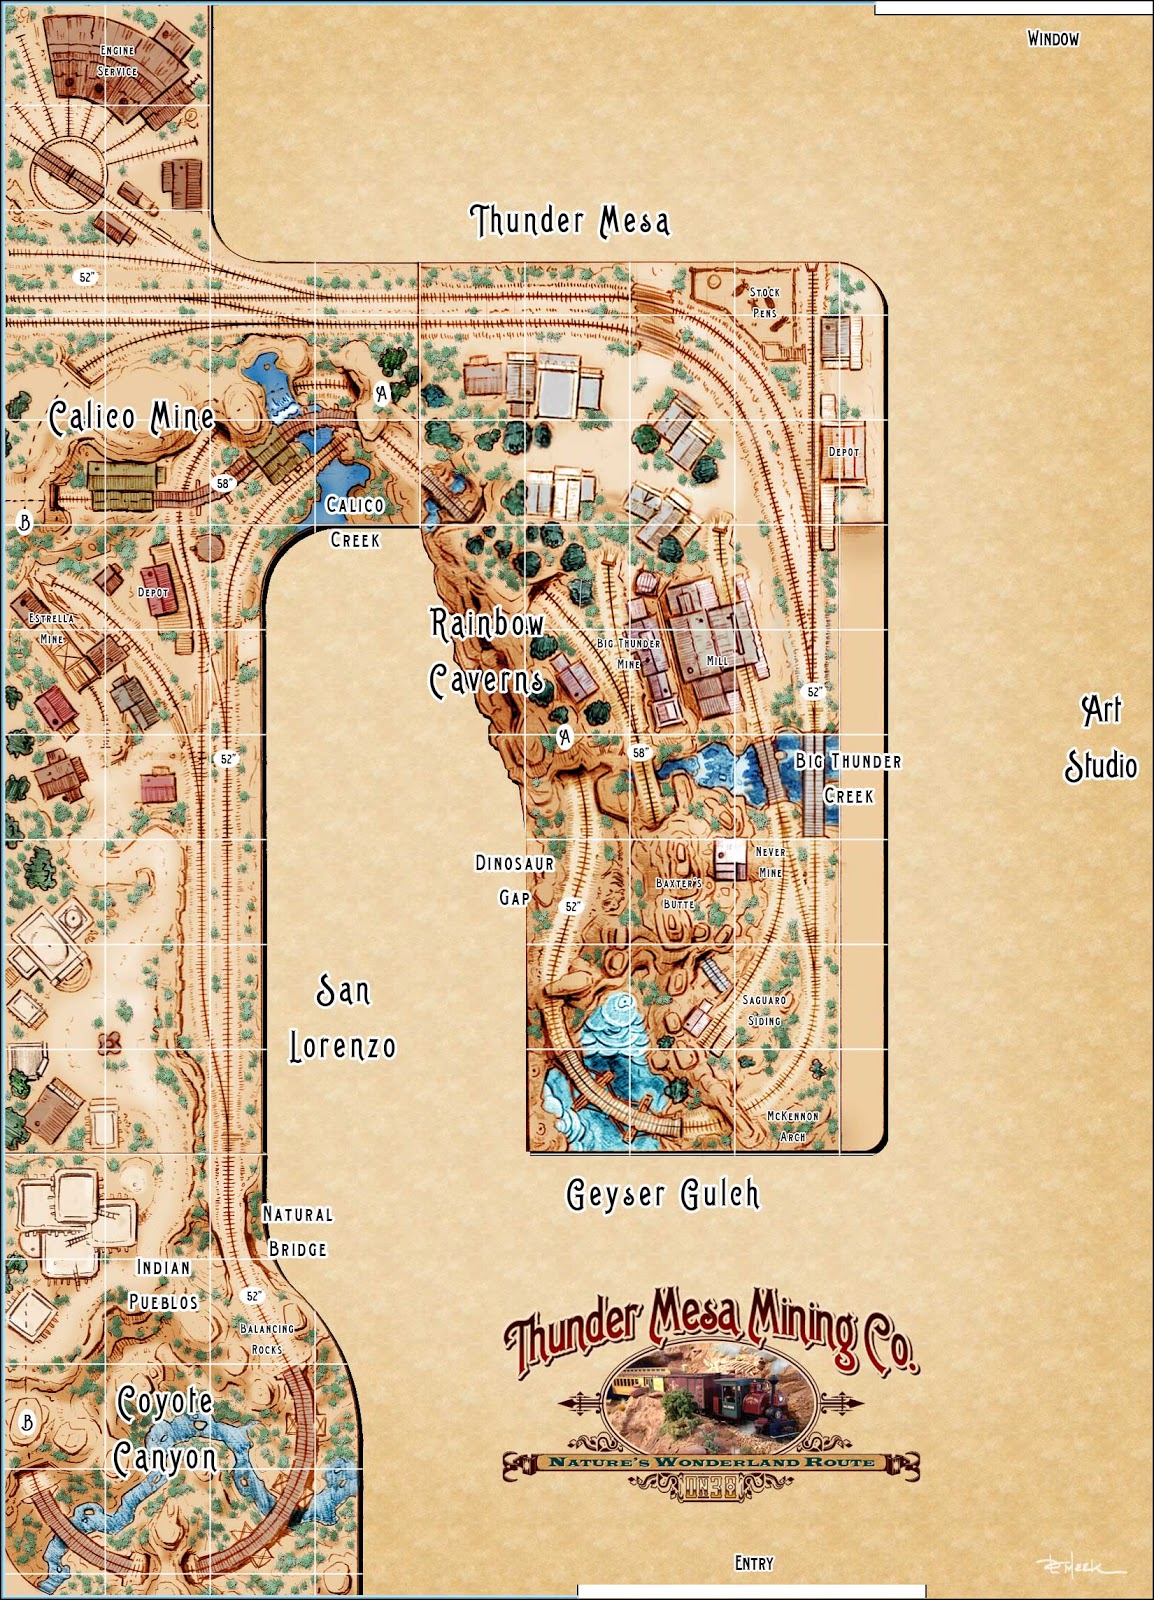
The new "folded dog-bone" style plan that I'm now working from. As well as a new layout for Calico and the addition of San Lorenzo, this plan calls for big changes in the orientation of Thunder Mesa town. For those keeping score at home, this is the third (and hopefully final) location for the town.

Moving in a little closer we can see the recent work done on the Never Mine and Big Thunder Creek. Replacing the paper model mock-up of Thunder Mesa Mill (to the right of the creek) with a finished structure is high on the list of projects to tackle soon.

Flying around the bend we get a view of the new layout for Thunder Mesa town. Six inches of new benchwork was added to the end of this section where it formerly butted against the wall. This created room for a much longer passing siding and a more visually appealing presentation of the town - while still leaving room for a 30" wide aisle.


Just a Little Bit Bigger

The original, central Thunder Mesa section of the layout is now 8.5' long by 4.5' at its widest point. If I ever have to move, that's about as big as it can get and still have any hope of being able to pick it up with a couple other guys and carry it out the door. It started out as 3' x 6' and just hasn't stopped growing. A 54" x 6" chunk of new real estate has been grafted on to the back end to make more room for the town and vastly improved operations.

Extending the benchwork 6 more inches. The rounded end will be covered by a 1/8" masonite fascia. The turntable will be relocated to a new section at the end of the aisle with an expanded yard and engine facilities. 

Here the old track and roadbed has been removed and everything scraped clean down to the plywood. I use Elmer's wood glue to affix my cork roadbed, making it easy to remove when soaked with water and pealed up with a putty knife.

New 1/2" plywood top in place. This will act as support for the town and sub-roadbed for the new tracks. The turntable hole will be covered by the base of the town module.

Midwest HO cork roadbed has been glued down and some Peco On30 flex-track laid for the new passing siding. I used Powergrab silicone based adhesive to hold the track in place. The parallel tracks heading off the layout at top will connect to the new yard and turntable section.


The Little Mining Town of Thunder Mesa

My town of Thunder Mesa is based on the little mining town that stands above the queue on Disneyland's Big Thunder Mountain Railroad; structures that were once part of the little mining town of Rainbow Ridge on the old Nature's Wonderland Mine Train. I created plans and built paper model mock-ups for the town structures several years ago when first starting this project and those mock-ups have come in very handy over time in helping to visualize the various incarnations of Thunder Mesa town. Some of the mock-ups are now a little worse for wear and tear, and all will be retired as they are replaced by detailed structure models one by one.

WED site plan for Rainbow Ridge at Big Thunder Mountain Railroad, Disneyland. © Disney. The structures at the park are tiny and built in very shallow relief - almost like movie flats. I've tried to stay true to the general layout of structures while allowing for more realistic depth and the operational needs of a model train layout.


The town is being built as a separate module, much like a stand-alone diorama that plugs into the layout. This will allow much of it to be built and detailed at the workbench and will also minimize the risk of damage should the layout ever need to be moved. Sound and lighting effects are also integral to the town's presentation and will be completely self contained within the module.

A base for the town module was cut to size from 1/4" MDF.  A box frame of 1" x 2"s was built on top to add strength and prevent warping.

A power strip was installed to bring current to the LED lights, and to the sound module in Big Thunder Saloon. A mini-plug connects the module to the layout's effects panel and a 9v power source. The red painted screws denote the positive terminal; important to keep track of when working with LEDs.

Here, the contours of town are being roughed in with 1" thick EPF (pink foam) and some foamcore for the more gradual slopes. A retaining wall along the front edge of town will separate it from the tracks below.

Overall view of the town module. A dirt road will cross the tracks at grade and then wind up through the town. Stairs and wooden boardwalks will connect the structures.

Moving the layout out from the wall has created all new vistas and photo-ops. This should make for a dramatic and compelling scene when completed with the backdrop in place.


With the town module roughed in and the new benchwork and track in place on the Thunder Mesa section, I can turn my attention to building the frames and supports for the Calico, San Lorenzo and Coyote Canyon sections. There's also still some work to do finishing up and detailing around Big Thunder Creek and, of course, many, many structures to build. Should be fun! Thanks for checking in, amigos. Adios for now!

Friday, April 18, 2014

Building a 14' Excursion Car

Inspired by the trains on Disneyland's Big Thunder Mountain Railroad, I created this plan for a 14' excursion car back in October of 2012. An online friend saw it and suggested he might have the perfect kit to use as a starting point.


The Wildest Ride in the Wilderness

The trains on Disneyland's Big Thunder Mountain Railroad attraction feature distinctive gold and brown cars that are meant to evoke ore gondolas of a bygone era. In reality though, they only remotely resemble any kind of equipment used on a real railroad. Since, in the world of Thunder Mesa, my railroad existed first and helped to inspire the attraction, it makes sense that the TMMC would have a short string of excursion cars converted from old ore gons. The challenge was creating something that could act as a believable "prototype" for the Big Thunder trains.

Big Thunder Mountain Railroad postcard showing the distinctive "ore" cars that folks ride in. © Disney


Starting with a Flatcar Kit

Canadian modeler Heath Trollope graciously asked me to review a kit for a 14' On30 flatcar that he plans on producing, suggesting at the time that it might be just the thing for the Thunder Mesa excursion cars I had talked about building. Since my original plan had been to cut down Bachmann flatcars for the job, I readily accepted the offer. Mostly because, A) I love getting free stuff, and B) I knew Heath would produce a quality kit that might be perfect for my needs. Below is a distilled version of how it went together. My full review and build thread can be viewed on the Railroad Line Forums.

My sample kit consisted of a two-sided sheet of instructions, white resin castings for the under frame, some scale 2x8 decking, and a short length of music wire for the truss rods. Trucks and couplers are not included so I picked up some Kadee HO #501 trucks and #5 couplers as the instructions indicated.

After a couple evenings of enjoyable assembly here is the completed kit just before trucks and couplers were added. The resin castings are very well done and nicely detailed. I stained the decking boards with a rubbing alcohol and shoe dye mixture.

The completed car ready to go to work on the railroad. All in all this is a great little kit that could be the starting point for a wide variety of funky little cars; gondolas, tank cars, pulpwood buggies, even a boxcar or caboose. I don't have sales information on the cars yet, but when I do I'll post a link here on the blog for anyone who might be interested in building a few for themselves.


From Flatcar to Excursion Car

Heath was right of course, and his great little kit was the perfect starting point for my long delayed excursion train project. I've built one car thus far as a prototype and plan to add four more in the not too distant future now that the bugs have been worked out. My plan above shows two different styles of car, a basic and a deluxe model with a shade canopy and seats facing both forward and back. Though the basic car  more closely resembles the Big Thunder trains, I decided to build a car with the deluxe seating pattern, sans canopy, since it makes more sense for the point to point operation I have planned. Still, I tried to capture the flavor of the Big Thunder cars and I hope there is enough of a family resemblance there that folks will understand what I'm getting at.

Once again I turned to printed photo-textures for the car sides and benches. I took some careful measurements of the completed flatcar and then laid out all of the interior and exterior pieces I would need in Adobe Photoshop. These were printed out on HP Premium Presentation Paper and then laminated to smooth 100 lb bristol board with 3M 45 All Purpose Spray Adhesive.

Each bench/bunker was created as a separate sub-assembly. Here are the pieces for the center benches with the exterior and interior walls glued back to back and the edges painted a matching color.

The assembled center benches before trim was added. The benches are reinforced underneath with 1/16" square strip wood.

The completed center bench assembly ready to be installed on the flatcar. The trim pieces are scale 4x6" stock painted with acrylics. Music wire grab irons and Grandt Line nut/bolt/washer castings round out the details.

Two of the bench/bunker sub-assemblies cemented to the flatcar deck. The color scheme and diagonal bracing are direct references to the Big Thunder cars.

The completed car ready to go to work on the layout. Final details include safety chains and steps made from leftover 2x8 stock from the flatcar. A little dry-brushing with acrylics helps bring out the cast-in detail on the car frame and a light dusting with colored chalks adds a needed dose of weathering. During construction, the flatcar developed a slight bow in the middle. It bothered me at first but now I kind of like it.

Each excursion car can hold up to 12 O scale people. These folks look a little pale and could use a paint job. 

All Thunder Mesa passenger equipment is numbered in the 100 series,  starting with Combine 101. These excursion cars will be 107 - 111. Now it's back to the car shop to build four more!


Okay! That about wraps it up for this week's project. Thanks for following along. And very special thanks to Heath Trollope for getting me rolling with his excellent flatcar kit! As always, questions and comments are welcome. Thanks for checking in, folks. Adios for now!

Friday, March 14, 2014

Building Big Thunder Saloon: Part III

Click here for part I of this series.
Click here for part II of this series.

Here's my Big Thunder Saloon, all finished and photographed outdoors in the brilliant Arizona sunshine. In today's post I'll cover the wiring for sound and lights, the interior details, roof and finishing touches.

Right side rear view.

Left side rear view.


Lights and Sound

Nothing brings a model structure to life like the addition of lighting and sounds. For the Big Thunder Saloon I used an #HQ640 Honkey Tonk sound module from ITT Products. The lighting effects are achieved with five separate LEDs; two, 5mm yellow LEDs for the interior, and three 2.5mm yellow flickering LEDs to represent lanterns on the facade and under the eaves of the side porch.


A simple black box was created from illustration board to hide 1.5" speaker and wiring. The speaker was mounted to the side wall with 3M foam tape. The main power bus comes in from beneath the floor, a red wire for positive and a black for negative. Keeping the polarity straight is important when working with LEDs since they are polarity specific.

The ITT Products sound module fits perfectly in the attic. It was wired according to the manufacturer's instructions to run as a continuous loop. Both the sound and lights are on the same circuit so everything will be powered from the main power bus. 

The wiring from the two flickering lanterns out front runs through the wall and into the attic. Every LED must have its own resistors when wire in series.  510 Ohm 1/4 watt resistors were soldered to the positive leads and black wires soldered to the negative. I also doubled up on the resistors to lower the LED's output a bit. To see how I created the lanterns themselves, check part II of this series.

As the final course of logs was being added, another 2.5mm flickering yellow LED was installed within the framework of the side porch roof.

Two, 5mm yellow non-flickering LEDs were installed in the saloon's ceiling to provide interior lighting. The ceiling is 1/16" thick illustration board and snugs down between to the top course of logs, preventing light leaks.

With leads and resistors soldered into place, everything was isolated and covered with electrical tape to prevent shorts.

With the sound module, speaker and all of the lights in place, there was a real bird's nest of wiring to try and fit under the roof!

Here the speaker is wired to the sound module, all of the red wires are soldered to the positive bus and all of the black wires are soldered to the negative bus. Easy peasy.

To finish up the wiring, the main power bus from beneath the saloon was fitted with a mini plug, with the female end leading to the layout's lighting and effects panel where a 9v transformer supplies the power. This makes it easy to unplug and remove the structure from the layout if necessary. Heat-shrink tubing keeps everything tidy and the white dots keep the wiring polarity aligned.


Interior Details

The saloon's interior is visible through the front doors and windows so I wanted to pack it with detail. The Honky Tonk sound module gives the impression of a raucous Saturday night with a piano, banjo and laughter from the crowd. I did my best to make the interior details match those sounds.

I found this nifty laser cut piano kit on ebay. It does a great job of representing an 1880's era Steinway.

Just about every saloon in the Wild West had at least one tasteful nude behind the bar, as well as the famous Anheuser Busch lithograph of Custer's Last Stand. Interior signs and paintings were mocked up in Photoshop and printed out on heavy inkjet presentation paper.

The interior has a total of ten figures. The banjo player is from Woodland Scenics. The bartender and gamblers are from Grandt Line. The piano player is from People Scale. The bar was created from basswood planks and three Rusty Stumps barrels. The mounted buffalo head is from and HO scale critter.

The poker table was created in photoshop and the bottles on the bar are carved graphite pencil leads.

The view through the front windows.

The view through the front windows.

The side porch was finished off with some old white metal castings from my scrap box, a Banta Model Works wooden chair and a broom from Wiseman Model Services. The roof is painted and textured illustration board.


The Roof and Final Details

The roof of Big Thunder Saloon needed to be both removable and sturdy. Here's how I built it from Illustration board.

A very convincing illusion of weathered wood can be created with illustration board and watercolors. Wood grain is scribed into the surface with a fine-toothed razor saw and individual board are delineated by scribing every 12 scale inches with a sharp hobby knife.  Burnt Sienna and Ultramarine Blue watercolors are mixed together to create varying shades of warm and cool grays. The color is then applied with a soft brush, varying the tone here and there to enhance the illusion of woodgrain and individual boards.

Roof panels and rafters were cut from illustration board and only the parts that will show were painted. The rafters were glued in place on 24" centers with Aleen's Tacky glue. This made for a very rigid structure.

The roof was finished with Bar Mills laser cut shingles. I chose a weathered warm gray to contrast with the dark browns of the saloon walls. The smoke stack is a Grandt Line casting with guy wires made from music wire. The roof was weathered with brown, black and gray chalks and then sealed with a light spray of Testor's Dullcoat. The roof simply sits in place atop the structure and is easily removable so that wiring and interior details can be accessed. 

With the roof completed, I moved on to the rock and dirt area on the right side to do a little landscaping. Full strength matte medium was brushed over the entire area.

Real dirt and rocks from Sedona, Arizona were sprinkled and pressed into the wet matte medium. More dirt was added and a little rubbing alcohol held it in place while more diluted (1:1) matte medium was drizzled over the top.

Once the matte medium dried, an assortment of high desert plants were added: tall grass from Woodland Scenics, Spring flowers from Scenic Express,  a prickly pear casting, and my own special recipe Manzanita bushes.


The Finished Model

Big Thunder Saloon was a fun and rewarding build, definitely my most complex model to date on the TMMC and I really enjoyed putting it all together. Here it is in its new home on the layout with the wiring hooked up and the power on.

At home on the layout. There are still lots of structures to be built in Thunder Mesa Town.


Here's a quick video showing the lighting and sound effects.


Friday Updates

There are a lot of projects underway on Thunder Mesa these days and I'm  going to do my best to post a new update at least once a week on Fridays. Please don't hesitate to add comments or questions below. Thanks for checking in. Adios for now!
Related Posts Plugin for WordPress, Blogger...