After a couple month's break, I'm back to work on the railroad, jumping right back into a big scenery project. Ive made some major and minor changes to the overall plan since the beginning of the year and there will be much more on that in a future post. For now I'd like to bring things up to date on the scenery being built around Hanging Rock in what I'm now calling the Horse Thief Canyon section of the TMMC.
The new cliff wall under construction below Hanging Rock. I'm trying something new on these big canyon sections, building the rockwork almost entirely from extruded polystyrene foam insulation board - or EPF for short (that's the pink foam board from your local home center). In the past I've used it mostly as a scenery base and finished with other techniques, but now I've found a way to carve the foam layers themselves into a convincing representation of sandstone. The Kato power pack nestled into the cliff base will provide DC control for an On18 mining tram running between Calico and Big Thunder Mine - much more on that in a future update.
This is a big project, and I'll be spreading it out over several updates. In this first part, I want to concentrate on the cutting and carving techniques used on the pink extruded polystyrene foam board (EPF). This insulation board is lightweight, relatively inexpensive, and has been used by model railroaders for many years as a scenery base. While building some rockwork for Rainbow Caverns, I hit on a new technique (new to me) for carving rock textures into the foam using a sanding bit in a Dremel rotary tool. I was so pleased with the results that I decided to use the same method on the deep canyon sections of the layout too. It's a little labor intensive, but really no more so than my previous method of stacking foam layers and texturing with Sculptamold. I've got a ton of rockwork to do, so whatever method I choose is going to take awhile, but these EPF canyon walls will end up weighing much less than the equivalent amount of plaster or Sculptamold. An important consideration if I should ever have to move the layout.
It's easy to add access hatches with EPF scenery. Here I've created a removable section of cliff below Hanging Rock so I can access the wiring back there when needed. Just push in at the corner and then slide the section out. A similar removable section will also be built into the cliff wall on the other side of the canyon.
Overall view of the Calico and Horse Thief Canyon sections as scenery work begins. All of that space between track level and the bottom of the benchwork will be filled with EPF rockwork.
The basic tools and materials used on the foam rockwork.
1" thick EPF insulation board (purchased in 4' x8' sheets)
Sanding block - medium to fine grit
Loctite Power Grab adhesive and caulking gun (the best adhesive for EPF)
Dremel rotary tool and various sanding bits
Razor saw
Hot wire foam cutter
Various hobby and utility knives
The Slot Canyon
Down below the bridges at Hanging Rock is a deep, serpentine defile known to the locals as Horse Thief Canyon. It's a classic Southwestern "slot" canyon, much narrower than it is wide; the kind often found worming back into the sandstone cliffs of Thunder Mesa country. This particular slot canyon is about 72 scale feet deep but only averages about 12' wide. A perfect hideout for horse thieves and rustlers - as long as it isn't flash flood season.
Slot Canyon near Page, AZ. This is kind of the look I'm after with Horse Thief Canyon.
Here I've made a start on Horse Thief Canyon itself, cutting, carving and shaping the bottom three layers. This bottom section will be brought to a high state of finish before I move on to the next three layers of depth. That way, I won't carve myself into a corner by not being able to reach the depths of the canyon for painting and details.
Each rock layer is cut to shape with a Woodland Scenics hot wire cutter, and then the exposed edges are carved into rocky textures using a variety of sanding bits in a Dremel Tool. The layers are then stacked and glued together using Loctite Power Grab Adhesive (see video below).
One more layer of foam added and some spackling to start blending things together. In my experience, common household spackle works just as well as Woodland Scenics foam putty. In fact, I strongly suspect it's the exact same thing - but at less than half the price. I'll let this dry overnight and then it will get a base coat of tan latex paint.
When complete, the canyon will seem to go on forever since it will be impossible to see the end due to built-in view blocks. At night, the flickering glow of an outlaw camp will be visible just around the bend.
To wrap things up for this installment, here's a step-by-step how-to video on my EPF cutting and carving techniques.
Thanks for tuning in, amigos. Next time up we'll do some painting and finishing of the rockwork in Horse Thief Canyon. Adios for now!
The scenery at Hanging Rock might only be half finished but that's not going to stop me from having a little fun with Photoshop! Creating images like this helps me to envision the story behind a scene.
Ready or not, here comes an end of the month update from Thunder Mesa! I haven't had much time for updates this month but scenery work has been progressing on the Hanging Rock section of the layout, and I'm nearly finished with the structure build for Olson & Furlow's Saloon. Even with several things half done, I wanted to share an update and video log on how things are coming along.
Hanging Rockwork
Rockwork and coloring has been completed in the little canyon nook where Olson & Furlow's will find its home. It still needs ground cover, vegetation and other details but here's a quick rundown on how the scene has come together so far.
The canyon walls and rocky ledges of Hanging Rock were built up with layers of 1" thick polystyrene foam insulation - the pink stuff from your local home center. Here the foam has been painted with my scenery base color to better help envision the final scene. There's also a view of the original paper mock-up of Olson & Furlow's, a structure that has evolved a lot from this plan during construction.
Once I was satisfied with the basic shapes, the foam was skinned with a layer of Sculptamold to further texture and define the rocky canyon walls. Sculptamold is a mixture of plaster and cellulose available from American Art Clay Co. at better stocked hobby and craft stores.
After the Sculptamold dries it's time for a coat of my scenery base color: Glidden "French Mustard" flat interior latex paint.
Then I darken the rocks with a spray of diluted black, letting it flow down into all of the cracks and crevices.
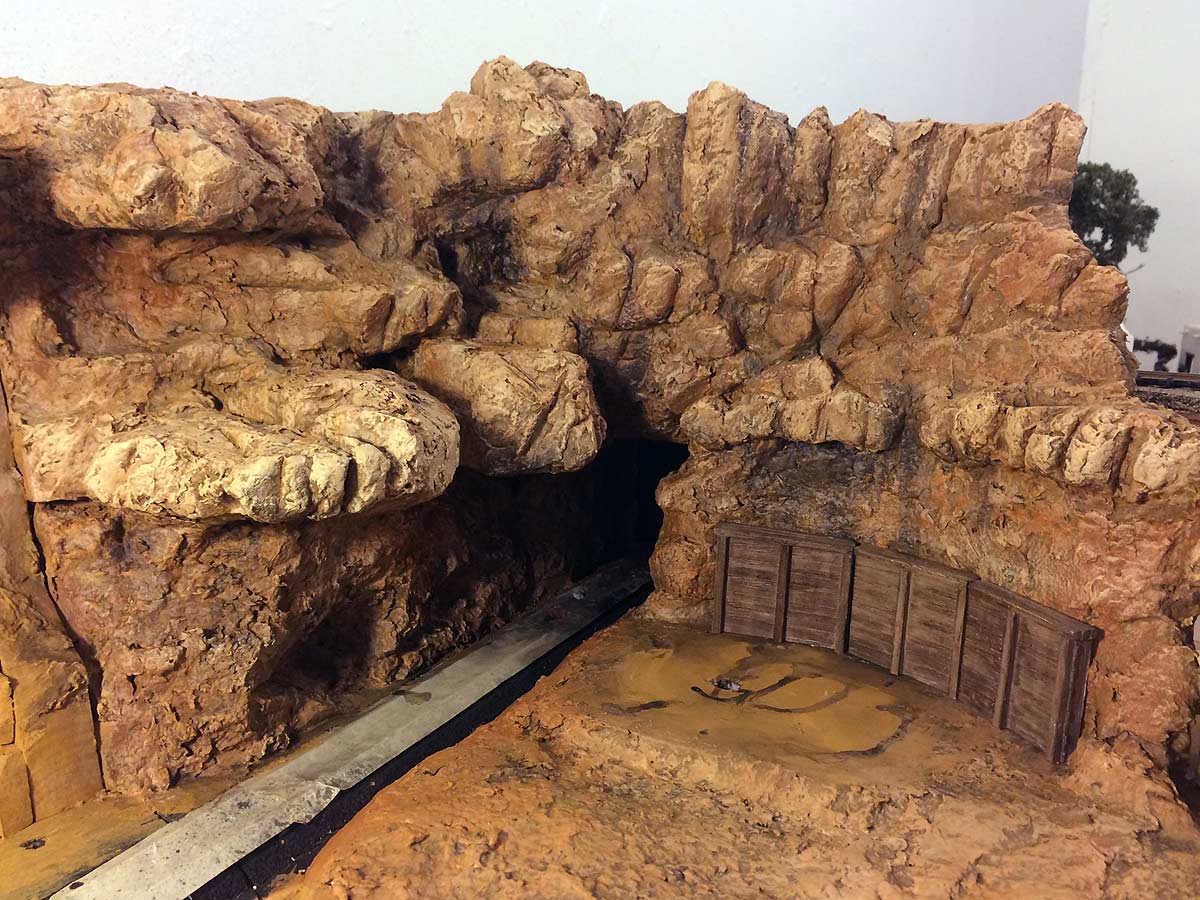
The final paint job is completed using artists' acrylics. The main colors used are Raw Sienna and Unbleached Titanium, with just a little Burnt Sienna and Burnt Umber here and there for variety. The colors are lightly dry-brushed on right out of the tube, catching the rough texture of the rocks and letting the under-color and darkened shadows show through. The wooden retaining wall is a hydrocal casting from Woodland Scenics.
Olson & Furlow's
The main structure in Hanging Rock is Olson & Furlow's Saloon and Store, an appropriately character filled establishment built as a tribute to two of may favorite model railroad authors of the past. I'll be writing much more about this scratch-built model for an upcoming column in Model Railroad Hobbyist Magazine so I don't want to give away too much here. Suffice to say that I wanted something with a lot of texture, charm and visual appeal to act as a focal point for the scene.
To show a long and storied history, I chose to design the structure with a Victorian wooden upper story built atop an older adobe base. Both the wooden walls and the adobe are modeled with illustration board. The base of the structure is 1/4" thick MDF, carved with a Dremel tool to simulate flagstone.
The colorful vintage signs and posters are a hint at the final super-detailing to come.
The old tarpaper roof on the store section has seen better days. The tarpaper was modeled using strips of 220 grit sandpaper painted flat black. The nail heads are tiny dabs of gray acrylic paint.
There's More on Facebook
I'm so humbled and flattered by those who choose to follow my efforts here on this site and also on social media. Thunder Mesa's Facebook page recently surpassed 500 likes and that's not bad for a quirky little hobby like this. If you like this site I hope you'll also come over and join the conversation on Facebook. There's a lot of new stuff posted there first, mostly about this model railroad, but also interesting stuff about the larger worlds of railroading, model building, themed design and Disney. Thank you.
That's all for this time, amigos. Thanks for checking in. Adios for now!
Rainbow Caverns on the TMMC is being modeled as three major show scenes: A bat cave filled with glowing eyes, colorful Rainbow Falls, and a beautiful grotto of color changing crystals. Major work has been completed on the central Rainbow Falls scene and that's the topic of today's post and video log.
Most scenery and effects work is now complete on the upper section of Rainbow Falls, a major scene within Rainbow Caverns, and I'm excited to share the results today in a new post and video log. Tried and true "illusioneering" and stagecraft was used to bring this scene to life with a major element being the "Pepper's Ghost" rainbow effect in front of the falls. Check out this month's video log for a rundown on how the scene was created, and follow along with the photo's below for a more in-depth explanation.
Thunder Mesa Video Log: August 2015
Some representation of Rainbow Caverns has been part of the plan for Thunder Mesa from the very beginning. In fact, it goes back even further, starting with early plans to model Nature's Wonderland, and then on to my HO and On30 Big Thunder & Western layouts. At long last I'm getting around to the real magic at the heart of this model railroad and having a wonderful time playing with miniature versions of some of those classic Disney effects. The Rainbow Falls scene is achieved with a combination of ultra-violet light effects and the classic Pepper's Ghost illusion.
A Pepper's Ghost Rainbow
The waterfall is made from clear acrylic, painted on the back with transparent blue UV reactive paint. The "floating" rainbow is a Pepper's Ghost illusion - basically, a view-point controlled glass reflection.
The Pepper's Ghost illusion is used to make semi-translucent objects appear to float in mid-air. In reality, it's the exact same effect you see when you look at your own reflection in a window. Here, however, the viewing angle is tightly controlled so that only the illuminated object, in this case a photo of a rainbow, can be seen in the reflection. If you've ever experienced the Haunted Mansion at a Disney park then you have seen expert use of this classic illusion.
Here, a simple black box has been created from cardstock with a blurry rainbow printed against black glued inside. An improvement on this design would be to curve the image around the inside of the box so that no edges will be reflected. My second version (not pictured) does just that.
To illuminate the rainbow, a single white 3mm LED was installed in this faux rock fixture.
The next step in creating the illusion is to position a piece of glass at an angle to reflect the picture or object but not the viewer. Note the the glass should be the full height of the scene. In this case, that's five inches.
Rockwork
All of the rockwork inside the caverns is made from pink polystyrene foam. Some are like set pieces, and are removable for maintenance. Layers of these set pieces are positioned to hide lighting rigs, and to complete the illusion of depth in the caverns when viewed from the proper angles. This is Stair Case Falls under UV light.
Here a piece of polystyrene foam is being shaped with a cone sanding bit in a Dremel tool. This goes fast but you have to be careful not to sand away too much!
Each piece is then painted flat black. Once that dries, varies purples and blues are dry-brushed on for a mottled appearance. Keeping the rocks a dark blueish gray helps to make the UV painted objects pop and makes the caverns seem darker, larger, and more mysterious than they are.
The Waterfall
The waterfall was created in the same basic way as the waterfalls for Big Thunder Creek, by sculpting 1mm thick clear acrylic sheet with a hot soldering iron.
The acrylic waterfall was then painted on the back with blue transparent UV paint before being cemented in place on its own set piece with clear silicone caulk.
A single 5mm UV LED is hidden behind the falls for illumination.
UV Lighting
Several of these 5mm Ultra Violet LEDs were positioned strategically in the scene for added illumination. Outside the waterfall, the creek itself is nothing but acrylic UV paint and gloss medium. Here you cam also see the 12v wiring buss that runs below the caverns from a DC transformer. The red wire is positive and the black is negative - important to know when working with LEDs.
I needed a simple way to mount LEDs to the roof of the scene and still have them be flexible enough to aim the lights. Cheep plastic bendy straws came to the rescue. Painted flat black and attached to the ceiling with a dab of hot glue, they make for quite serviceable miniature lighting rigs. A scrim of rockwork hides rigs like this from view.
What's Next?
Down below Rainbow Falls where the track crosses the creek on a stone bridge, there will be a series of deep pools, each slowly changing color as the magical waters drip down from above. Beyond the falls will be a Crystal Grotto, dancing with light. And let's not forget the Bat Cave with its hundreds of shining eyes. Yes, there's much more to come in Rainbow Caverns! But that will have to do it for this time. Thanks for checking in, Amigos. Adios for now!
Once again, I'm back to work on Rainbow Caverns, bringing the "dark ride" portion of the TMMC to life. I'm currently up to my elbows in wiring, LEDs, and black light paint but plan on publishing a full step-by-step and how-to post in about another week. In the meantime, please enjoy this short video highlighting some of the effects in completed scenes thus far. Adios for now!
*Note: Original Disney soundtrack has been replaced by royalty free music from YouTube.
As the crummy waits on the mainline, engine #6, Ollie Johnston, spots a car at Hanging Rock siding before pulling forward to take on water at the tank. Crews are always a little nervous at Hanging Rock and never linger too long due to all of the outlaw activity in the area.
About halfway down the line between San Lorenzo and Thunder Mesa is the whistle-stop burg of Hanging Rock. There's a water tank there, and an old combine repurposed as a depot, but not too much else. In recent years, the labyrinth of canyons, caves and rock ledges have become a haven for horse-thieves, rustlers, bandits and other unsavory types. Before the coming of the railroad, it was an Indian stronghold, a natural rock fortress where a handful of braves once held off an entire regiment of U.S. soldiers. Legends of lost Spanish gold lured a few hearty prospectors to the area but they didn't find much and now their old, abandoned diggings dot the cliff-sides. The height of prosperity arrived with the railroad in the late 1870's when a construction camp was established there for bridges being built across Horse Thief and Coyote Canyons. A couple of enterprising old railway men named Olson & Furlow opened a saloon and small store for the camp workers and it still stands between the tracks today, a haunt for outlaws and the only going concern left in town. Hanging Rock is a good place for an ambush or a hide-out and most decent folks don't stay long.
Hanging Rock Depot is an old combine left over from the construction camp days. The Olson & Furlow Saloon seems to be the only business left in town.
Building Hanging Rock
With all of the mainline track now laid and a good start made on the branchline up to Big Thunder Camp, I've decided to dive right in to the scenery at Hanging Rock. As usual, I'm roughing everything in with layers of 1" thick pink polystyrene insulation foam held together with Powergrab adhesive and pins. I really want the cliffs to tower above the trains here. The dramatic sandstone ledges overhanging the track are what give Hanging Rock its name. Unlike some other scenes on the layout, Hanging Rock has no corollary at any Disney park. I wanted to do something entirely original here. Still, the scene is being designed with the same playful spirit and attention to story in mind.
Here's an overview of all of the track through Hanging Rock. The uppermost "high-line" is the branchline on a 6% grade up to Big Thunder Camp. The track is painted flat black as the first step in my track finishing process. More on that in a future update.
Pink foam was used to rough in the tunnels and cliffs around Hanging Rock. I use a hot wire cutter and hobby knives to shape the foam. The next step is to paint it tan. It's not necessary, but I've gotten into the habit of doing it as it helps me to visualize the final result. By the way, this view only shows the first half of the mesa. The second half will be built on the San Lorenzo side and include a forced-perspective village of Indian pueblos on the very top. The mesa top will be removable to allow access to the tunnels.
A defunct Bachman combine is being pressed into service as a station. So far, the project hasn't progressed much beyond a coat of primer.
I thought it worth the time to build a mock-up of the Olson & Furlow Saloon. This will be a very detailed, scratch-built structure and my tribute to a couple of favorite old narrow gauge modelers, John Olson and Malcolm Furlow.
One prominent sandstone ledge high above the tracks is known as Robber's Roost. The Hanging Rock Gang almost always keeps a lookout or two there. These great looking figures were painted for me by Tim Kulinski.
The water tank was built and modified from a Banta Model Works kit. I built it for Thunder Mesa yard but it's a little small and I kind of like it better here. It might just stay.
The next step in building Hanging Rock will be to skin the foam with rocky-textured Sculptamold and add a few Balsa Foam detail carvings. Then the tunnel portals and interiors will need to be detailed and all of the rock work painted. After that, the structures get finished and ground cover, plants and final details will be added. There's always lots to do on Thunder Mesa so I'd better get cracking! I'm happy with the start I've made on Hanging Rock and very excited to finally be adding some scenery to the long-planned expansion areas. Thanks for checking in, amigos. Adios for now!
The Lone Rock diorama was built to demonstrate rock carving and coloring techniques, and also to serve as a model stand for outdoor photography.
The Lone Rock diorama began with an email from Joey Ricard over at Trackside Scenery. When Joey's not working on his fantastic On30 Spruce Coal & Timber Co. layout, he's producing an awesome series of how-to modeling videos that you can watch over on YouTube. So when Joey asked if I might be interested in contributing to an upcoming video about modeling rocks, I was more than happy to agree. Joey's videos are always fun and informative, focusing on both tried-and-true and new-and-innovative techniques. Just my kind of project.
The idea for a stand-alone diorama that could be taken outdoors for photographing models had been percolating in the back of my mind for some time. Joey's video suggestion was just the push I needed to dust off the idea and get to building. I could document the build with video and photos as I went along, and wind up at the end with the photo-diorama I'd been daydreaming about. I wanted something simple and scenic, with a short length of track and one distinctive rock formation as center of interest. Most of the build is covered in the resulting video (below), so today's post will focus mostly on additional details. Here's how it all went together.
The 12" x 24" diorama started with a simple frame of 1" x 2" MDF and three layers of 1.5" white polystyrene bead-board. Some 1" thick gold polyurethane foam (Balsa Foam) was roughly shaped to form a single, towering butte. 1/2" plywood was cut to shape for track sub-roadbed and glued in place atop the foam. The white foam was shaped with a hot-wire cutter, and a small stone culvert made from Balsa Foam was created to bridge the gully. I used Loctite Power Grab construction adhesive to glue everything together.
The butte was carved from hard density Balsa Foam. This is a commercial version of the same gold urethane carving foam used by Walt Disney Imagineering and Hollywood special effects model builders. It's available through better stocked art and craft dealers.
A short section of the 1/2" plywood sub-roadbed was cut away and a chunk of 1" thick Balsa Foam was used to form a small stone culvert. The arch was created with sandpaper wrapped around a small bottle, and the stones were carved with a hard 5H pencil.
Using photos of rocks from Monument Valley, Moab and Sedona, Lone Rock Butte was carved from Balsa Foam using mostly a #2 hobby knife. The butte was then glued to the base with Loctite Powergrab adhesive. Four bamboo skewers between the butte and the base add additional strength. See the video for more details on the carving process. My part starts at about the 8:40 mark.
Sculptamold was used to blend the butte into the base and to form an embankment along the sub-roadbed right of way. A soft, wet brush is handy for smoothing things out.
Since there would be scenery below it, the stone culvert was finished early and installed flush with the sub-roadbed. It was painted with acrylics and the mortar lines were filled with spackling paste.
Midwest HO scale cork roadbed was glued down with yellow carpenter's glue before just about everything on the diorama was given a base coat of golden-tan flat latex house paint. Then a length of Peco On30 flextrack was cemented in place with Powergrab adhesive.
A wash of diluted India ink was sprayed onto the butte to darken cracks and crevices before final painting was done. Inexpensive craft acrylics were used to complete the paint job. Colors like raw sienna, red oxide, burnt umber and unbleached titanium were applied wet into wet, working from darker to lighter tones. See the video for a more complete rundown on the painting process. Painting and finishing starts at about 12:45 on the video.
The track was painted and weathered using Joey Ricard's easy techniques featured in this video from TracksideScenery.com. First the track is painted flat black. I masked off the diorama for this and did the painting outside with some Krylon spray paint. Next the ties are painted with a light tan acrylic. I used Apple Barrel "Khaki." Then the rails are painted with rust colored chalks suspended in 70% isopropyl alcohol. The final step is to give everything a good dusting with black and dark brown chalks. There's no power going to this track so I didn't bother to clean the paint off of the railhead. On powered track I'd use a Bright Boy or paint thinner to clean the railhead after painting.
The basic ground cover is Polyblend Sanded Grout. I mixed it up with a little water to form a thick paste and then just stippled it on with a cheep paintbrush (don't use a good brush for this! You'll never use it again). The erosion lines were pressed in with a pencil. The grout does a good job of representing soil while also filling and smoothing any remaining gaps in the foam base. This color is called "Sandstone," appropriately enough, and it dries a couple of shades lighter than it goes on. The wet grout generally stays where you put it but I also wet it down with a misting of diluted matte medium to lock it in place.
Once the grout had set overnight, the final coloring was done with light washes of acrylics to blend and unify the grout layer with the rock carving.
Real dirt and rocks were sprinkled on and then glued in place with white glue and diluted matte medium.
The track was ballasted with local sandstone, held in place with diluted matte medium.
Woodland Scenics "Field Grass" was used to make clumps of desert grasses and weeds, held in place with dabs of Aleene's Tacky Glue. Any loose fibers were later cleaned up with a shop vac.
A few more bushes and desert plants finish the diorama. The juniper bushes are Super Trees from Scenic Express covered in Noch dark green foliage. Clumps of gray sage were made with Woodland Scenics medium green bushes, lightly sprayed with gray primer. The prickly-pear cacti are castings from Pegasus Models. Lastly, the 1" x 2" frame was painted flat black to match the fascia on the Thunder Mesa layout.
Building the Lone Rock diorama was a quick, fun and rewarding project. Even if you don't have room for a full layout, I encourage anyone to try their hand at a small diorama like this. It can be finished in a week or so, and it's a great way to learn new techniques or to experiment with scenery ideas. I'll close out today's post with the finished video that Joey and I put together, and with a few photos taken outdoors in beautiful Sedona, AZ.
Set-up for photos in Sedona, AZ.
A small diorama like this is great for photographing models outside in natural light.
That's it for this project. Questions and comments are welcome below. Adios for now, amigos!