Showing posts with label Disneyland. Show all posts

Monday, August 31, 2015

Putting the Rainbow into Rainbow Caverns

Rainbow Caverns on the TMMC is being modeled as three major show scenes: A bat cave filled with glowing eyes, colorful Rainbow Falls, and a beautiful grotto of color changing crystals. Major work has been completed on the central Rainbow Falls scene and that's the topic of today's post and video log.


Most scenery and effects work is now complete on the upper section of Rainbow Falls, a major scene within Rainbow Caverns, and I'm excited to share the results today in a new post and video log. Tried and true "illusioneering" and stagecraft was used to bring this scene to life with a major element being the "Pepper's Ghost" rainbow effect in front of the falls. Check out this month's video log for a rundown on how the scene was created, and follow along with the photo's below for a more in-depth explanation.

Thunder Mesa Video Log: August 2015


Some representation of Rainbow Caverns has been part of the plan for Thunder Mesa from the very beginning. In fact, it goes back even further, starting with early plans to model Nature's Wonderland, and then on to my HO and On30 Big Thunder & Western layouts. At long last I'm getting around to the real magic at the heart of this model railroad and having a wonderful time playing with miniature versions of some of those classic Disney effects. The Rainbow Falls scene is achieved with a combination of ultra-violet light effects and the classic Pepper's Ghost illusion.

A Pepper's Ghost Rainbow

The waterfall is made from clear acrylic, painted on the back with transparent blue UV reactive paint. The "floating" rainbow is a Pepper's Ghost illusion - basically, a view-point controlled glass reflection.

The Pepper's Ghost illusion is used to make semi-translucent objects appear to float in mid-air. In reality, it's the exact same effect you see when you look at your own reflection in a window. Here, however, the viewing angle is tightly controlled so that only the illuminated object, in this case a photo of a rainbow, can be seen in the reflection. If you've ever experienced the Haunted Mansion at a Disney park then you have seen expert use of this classic illusion. 

Here, a simple black box has been created from cardstock with a blurry rainbow printed against black glued inside. An improvement on this design would be to curve the image around the inside of the box so that no edges will be reflected. My second version (not pictured) does just that.

To illuminate the rainbow, a single white 3mm LED was installed in this faux rock fixture.

The next step in creating the illusion is to position a piece of glass at an angle to reflect the picture or object but not the viewer. Note the the glass should be the full height of the scene. In this case, that's five inches.


Rockwork

All of the rockwork inside the caverns is made from pink polystyrene foam. Some are like set pieces, and are removable for maintenance. Layers of these set pieces are positioned to hide lighting rigs, and to complete the illusion of depth in the caverns when viewed from the proper angles. This is Stair Case Falls under UV light.

Here a piece of polystyrene foam is being shaped with a cone sanding bit in a Dremel tool. This goes fast but you have to be careful not to sand away too much!

Each piece is then painted flat black. Once that dries, varies purples and blues are dry-brushed on for a mottled appearance. Keeping the rocks a dark blueish gray helps to make the UV painted objects pop and makes the caverns seem darker, larger, and more mysterious than they are.


The Waterfall

The waterfall was created in the same basic way as the waterfalls for Big Thunder Creek, by sculpting 1mm thick clear acrylic sheet with a hot soldering iron.

The acrylic waterfall was then painted on the back with blue transparent UV paint before being cemented in place on its own set piece with clear silicone caulk.

A single 5mm UV LED is hidden behind the falls for illumination.


UV Lighting

Several of these 5mm Ultra Violet LEDs were positioned strategically in the scene for added illumination. Outside the waterfall, the creek itself is nothing but acrylic UV paint and gloss medium. Here you cam also see the 12v wiring buss that runs below the caverns from a DC transformer. The red wire is positive and the black is negative - important to know when working with LEDs.

I needed a simple way to mount LEDs to the roof of the scene and still have them be flexible enough to aim the lights. Cheep plastic bendy straws came to the rescue. Painted flat black and attached to the ceiling with a dab of hot glue, they make for quite serviceable miniature lighting rigs. A scrim of rockwork hides rigs like this from view.


What's Next?


Down below Rainbow Falls where the track crosses the creek on a stone bridge, there will be a series of deep pools, each slowly changing color as the magical waters drip down from above. Beyond the falls will be a Crystal Grotto, dancing with light. And let's not forget the Bat Cave with its hundreds of shining eyes. Yes, there's much more to come in Rainbow Caverns! But that will have to do it for this time. Thanks for checking in, Amigos. Adios for now!

Friday, January 16, 2015

Scenes and Transitions

McKennon Arch serves as both set-piece and scenic transition, creating a visual terminus for the scenes on either side of it while providing a smooth transition between the two. Memorable scenes do more than just add visual interest, they contribute to story while making a small layout seem larger as trains pass and transition through vignettes in the modeled environment.


A model railroad can be many things. It can be a relaxing pastime and an artful hobby that teaches new skills. It can offer a lesson in history or flights of fancy. It can recreate a transportation system in miniature down to the last rivet or it can invent imaginary railways built upon what-ifs and might-have-beens. If planned well and built with care, a model railroad can entertain, transporting the viewer to another time and place, inviting them into the story just as a good book or movie would. To that end, a model railroad is a show. A magic show of smoke, mirrors and wondrous illusions. A show needs a theme or a story; it needs performers, props and set pieces. It needs scenes and transitions.

I have sometimes been asked why I draw such elaborate track plans with the details of so many scenic elements sketched in along with the right-of-way. Wouldn't a more simple plan showing only the track, wiring and other engineering needs suffice just as well? I draw them that way because I'm thinking in terms of both engineering needs and the needs of the show. Grades, clearances and wiring are important, yes, but of equal importance to me are the scenes and transitions.

In a built environment, be it a model or a theme park, a scene is an area of visual interest that helps to establish theme or to move the story along. A transition is a bridge between scenes; a place for the eye to rest that then leads naturally into the next scene. Classic examples of this can be found at any Disney park. The scene of Main Street USA ends at the visual terminus of the castle. The castle then draws the viewer onward and transitions to the land of fantasy beyond.

Scenes and transitions at Walt Disney World. Walt called big set pieces like the castle a "weenie," something to draw the eye and compel the viewer forward into the next scene. Weenies are used everywhere in Disney parks and besides being iconic, they often act as transitions between larger show scenes. Other times transitions are more subtle, using a blend of architectural details, landscaping and color to ease from one scene to the next.


Planning Scenes

When working out scenes for the Thunder Mesa layout I often think in cinematic terms of establishing shots, medium shots and close-ups. I find this to be a handy way to break things down and it is more useful and story specific than just talking about scenery, structures and details.

Establishing Shots

An establishing shot is the big picture, usually everything that can be seen in a single view when standing a typical distance from the layout. Generally for me that works out to be about 2 - 3 square feet of scenery. The establishing shot is an introduction, it sets up the story with visual cues as to theme, era, mood and locale. Here we have an establishing shot of the desert scene between McKennon Arch and Big Thunder Creek. The rock formations tell us we're in the desert southwest while the structures indicate mining activity. The color palette, scenic exaggeration and whimsical mood help set the tone.


Medium Shots

Moving in closer we come to the medium shots, scenes within the scene that are really the heart of the layout and what most people think of when they think of model railroad scenery. The medium shots are where we focus attention on structures and other scenic elements to reinforce and build upon themes presented in the establishing shot. Within the establishing desert scene shown above we have Saguaro Siding, the Never Mine, the Cactus Forest and Baxter's Butte, all contributing to the overarching story of a southwestern desert mining district and the wild country it inhabits.


Close-ups

All the way down at the detail threshold we have the close-ups. This where all of those tiny detail parts end up, hopefully doing even more to sell the story. Most of the detail in close-ups can't even be seen in the establishing or medium shots but a model railroad is not a movie. In a 3-D environment the close-ups need to be built in to every scene or the model loses integrity when people interact with it. Plus, all of those tiny details in the close-ups add up to more character, texture and depth to the overall scene.


Planning scenes means understanding what you want to say and knowing how to say it. This requires research, an eye for detail and the ability to spot and eliminate visual contradictions. Everything in a scene should support and enhance the story you want to tell, from the big picture down to the closest view. Detail for detail sake is merely visual clutter. Detail that supports the story sells the illusion of a miniature world. There is an important difference between realism and believability. A series of well planned and executed scenes can make even the most outlandish concept into a believable and entertaining show. We pick and choose only the bits of reality needed to sell the illusion.


Making Transitions

Moving from one scene to the next can be tricky, especially if there is a change in tone or locale. Transitions should be invisible; they should seem merely to be another part of the scenes on either sides of them. It should be difficult to put one's finger on precisely where the transition occurs and it should only be evident when one is then immersed in the next scene. There are some tried and true ways to accomplish this. Some use a form of misdirection by leading the eye to a scenic feature that draws attention to itself and away from the transition, while others employ a mini-scene that overlaps and blurs the lines between larger scenes while complementing both. Regardless of method, the goal is a 3-D version of the cinematic cross dissolve. In film parlance, a cross dissolve is where ones scene fades out as another scene fades in. On a model train layout or other built environment this needs to be done by carefully blending one scene into the next.

The Cross Dissolve

Water features are an excellent way to smooth transitions since they naturally divide areas of the layout while making interesting scenes in themselves. On Thunder Mesa, Big Thunder Creek works as a cross dissolve between the desert mining scene discussed above and the mill and town scenes being built to the right. The railroad bridges connect the two scenes both literally and visually and help to ease the transition. The creek also uses a bit of distraction since it draws attention to itself and away from the fact that we are moving between scenes.

Tunnels also make for excellent cross dissolve transitions but they should be used sparingly. Deep cuts, bridges and even dense trees can also be effective,

Here, Ambush Rock divides the Geyser Gulch scene from Dinosaur Gap beyond. This is a subtle transition since the formation can only be seen distinctly from certain viewpoints and fades into the background from others.

The arch is a classic "weenie" in the Disney sense. It distracts from the transition by drawing attention to itself while blending well with the scenes on either side. It draws the eye forward into the next scene while providing a visual terminus for the present one. Plus, there's just something really cool about seeing a train pass through a natural arch.


A View from Above

As an example, the Thunder Mesa section of the layout has several major scenes, establishing shots, which are broken up into smaller scenes or medium shots. Then there are the close-ups or mini-scenes that fill in all of the details. The rules of scenes and transitions apply to all of them.

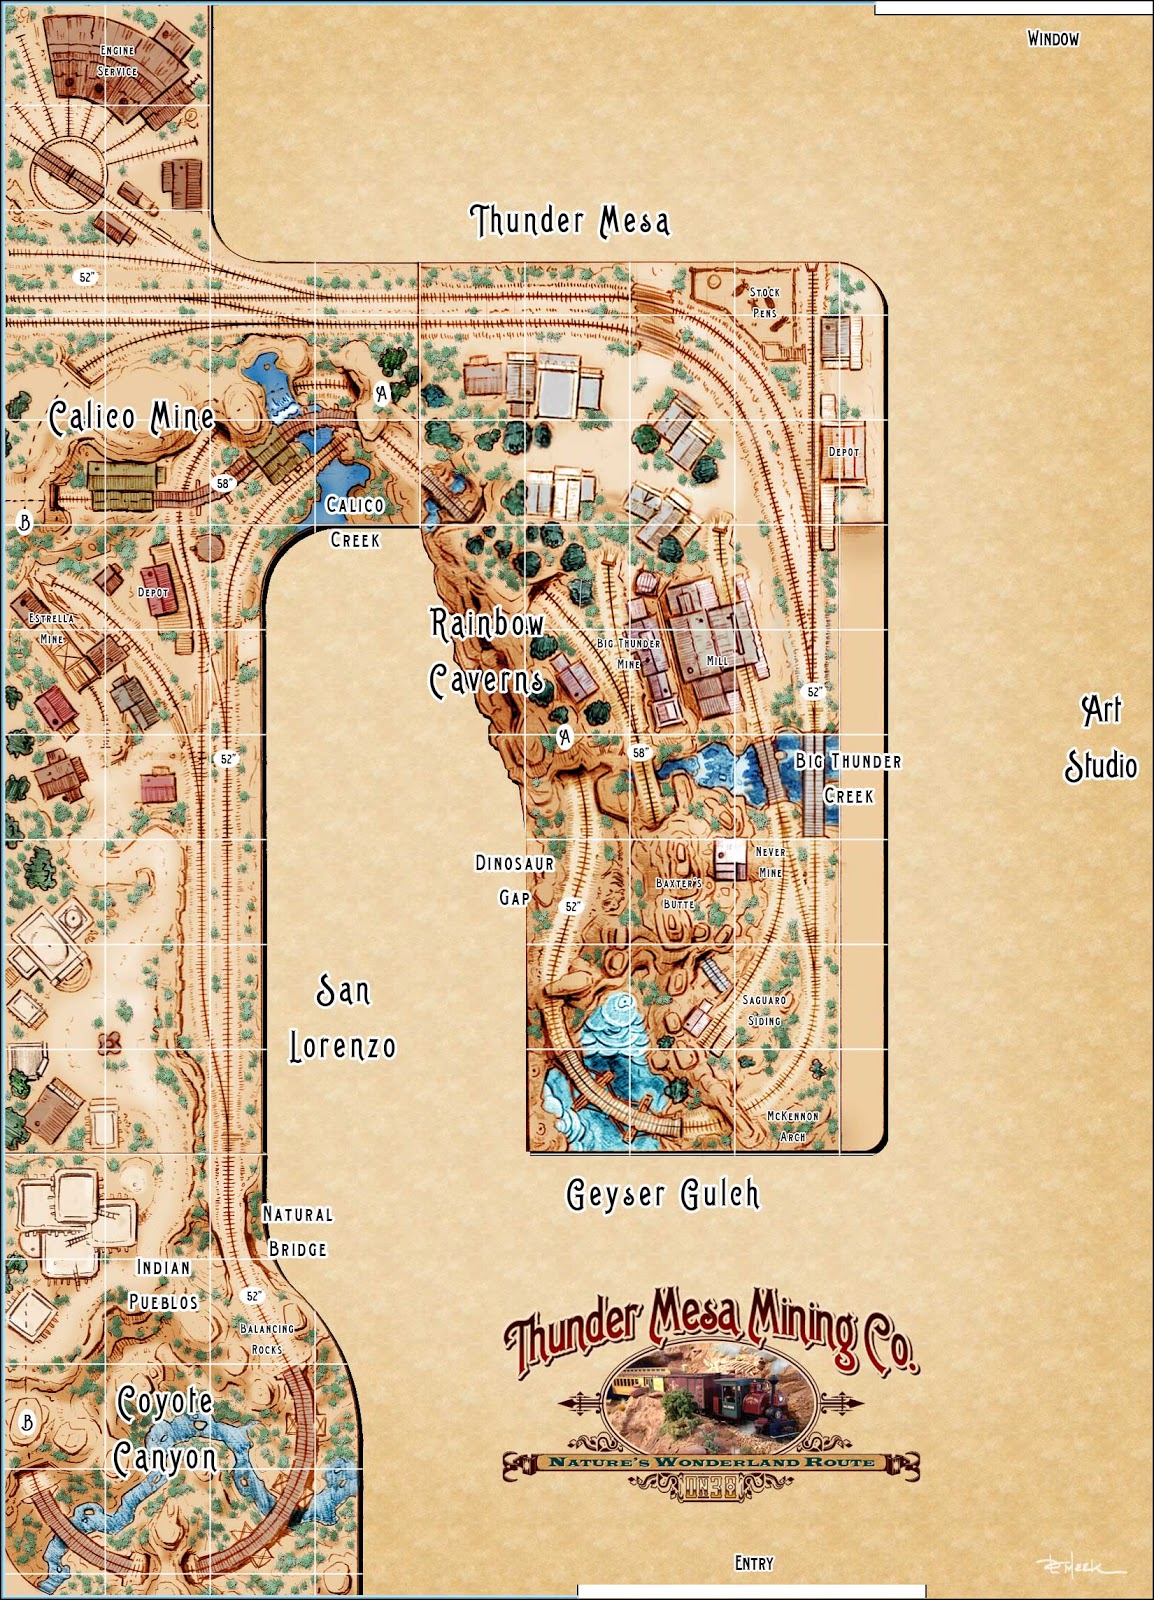
In this overview plan, only the major scenes are called out. The scenes themselves are in color while the transitional areas are black and white. Keep in mind that the transitions are really scenes too, but their main role is to blend the areas where major scenes come together.


Wrapping Up

Hopefully, thinking in terms of scenes and transitions rather than just structures and scenery will help some modelers give their layouts more visual punch. Focusing on establishing shots, medium shots and close ups, certainly helps me to keep my overall goal of telling stories with trains and modeling firmly in mind.

As always, questions and comments are welcome below. Thanks for following along. Adios for now, amigos!

Saturday, November 8, 2014

Aerial View, Exspansion and the Town of Thunder Mesa

It's been six months since the last aerial view update and a lot has happened on the layout since then. Much progress has been made in the Big Thunder Creek area and new benchwork has been added to the Thunder Mesa section to bring it in line with the new plan. Work has also begun on a new design for the town of Thunder Mesa, along with all of the necessary wiring for the lights and sound effects in that scene. Let's stoke the boiler in our imaginary airship and take a flight high over Thunder Mesa to see what's new.

Six months ago: May 2, 2014. That pesky Calico section was just starting construction. Good thing I didn't get too much further.

This morning: November 8, 2014. Old benchwork for the Calico section has been removed and the Thunder Mesa "island" section moved out 3' from the back wall. 

The new "folded dog-bone" style plan that I'm now working from. As well as a new layout for Calico and the addition of San Lorenzo, this plan calls for big changes in the orientation of Thunder Mesa town. For those keeping score at home, this is the third (and hopefully final) location for the town.

Moving in a little closer we can see the recent work done on the Never Mine and Big Thunder Creek. Replacing the paper model mock-up of Thunder Mesa Mill (to the right of the creek) with a finished structure is high on the list of projects to tackle soon.

Flying around the bend we get a view of the new layout for Thunder Mesa town. Six inches of new benchwork was added to the end of this section where it formerly butted against the wall. This created room for a much longer passing siding and a more visually appealing presentation of the town - while still leaving room for a 30" wide aisle.


Just a Little Bit Bigger

The original, central Thunder Mesa section of the layout is now 8.5' long by 4.5' at its widest point. If I ever have to move, that's about as big as it can get and still have any hope of being able to pick it up with a couple other guys and carry it out the door. It started out as 3' x 6' and just hasn't stopped growing. A 54" x 6" chunk of new real estate has been grafted on to the back end to make more room for the town and vastly improved operations.

Extending the benchwork 6 more inches. The rounded end will be covered by a 1/8" masonite fascia. The turntable will be relocated to a new section at the end of the aisle with an expanded yard and engine facilities. 

Here the old track and roadbed has been removed and everything scraped clean down to the plywood. I use Elmer's wood glue to affix my cork roadbed, making it easy to remove when soaked with water and pealed up with a putty knife.

New 1/2" plywood top in place. This will act as support for the town and sub-roadbed for the new tracks. The turntable hole will be covered by the base of the town module.

Midwest HO cork roadbed has been glued down and some Peco On30 flex-track laid for the new passing siding. I used Powergrab silicone based adhesive to hold the track in place. The parallel tracks heading off the layout at top will connect to the new yard and turntable section.


The Little Mining Town of Thunder Mesa

My town of Thunder Mesa is based on the little mining town that stands above the queue on Disneyland's Big Thunder Mountain Railroad; structures that were once part of the little mining town of Rainbow Ridge on the old Nature's Wonderland Mine Train. I created plans and built paper model mock-ups for the town structures several years ago when first starting this project and those mock-ups have come in very handy over time in helping to visualize the various incarnations of Thunder Mesa town. Some of the mock-ups are now a little worse for wear and tear, and all will be retired as they are replaced by detailed structure models one by one.

WED site plan for Rainbow Ridge at Big Thunder Mountain Railroad, Disneyland. © Disney. The structures at the park are tiny and built in very shallow relief - almost like movie flats. I've tried to stay true to the general layout of structures while allowing for more realistic depth and the operational needs of a model train layout.


The town is being built as a separate module, much like a stand-alone diorama that plugs into the layout. This will allow much of it to be built and detailed at the workbench and will also minimize the risk of damage should the layout ever need to be moved. Sound and lighting effects are also integral to the town's presentation and will be completely self contained within the module.

A base for the town module was cut to size from 1/4" MDF.  A box frame of 1" x 2"s was built on top to add strength and prevent warping.

A power strip was installed to bring current to the LED lights, and to the sound module in Big Thunder Saloon. A mini-plug connects the module to the layout's effects panel and a 9v power source. The red painted screws denote the positive terminal; important to keep track of when working with LEDs.

Here, the contours of town are being roughed in with 1" thick EPF (pink foam) and some foamcore for the more gradual slopes. A retaining wall along the front edge of town will separate it from the tracks below.

Overall view of the town module. A dirt road will cross the tracks at grade and then wind up through the town. Stairs and wooden boardwalks will connect the structures.

Moving the layout out from the wall has created all new vistas and photo-ops. This should make for a dramatic and compelling scene when completed with the backdrop in place.


With the town module roughed in and the new benchwork and track in place on the Thunder Mesa section, I can turn my attention to building the frames and supports for the Calico, San Lorenzo and Coyote Canyon sections. There's also still some work to do finishing up and detailing around Big Thunder Creek and, of course, many, many structures to build. Should be fun! Thanks for checking in, amigos. Adios for now!

Friday, September 26, 2014

The Never Mine: Part I ~ The Shaft House and Head-Frame

The Never Mine. Abandoned to the elements back in '85, some folks claim the old place is haunted.


Legend of the Never Mine 

High above Big Thunder Creek, on the rugged slopes of Baxter's Butte, rests the Never Mine. This is old Badwater Baxter's original claim, the oldest developed mine in these wild canyons and the same rich find that started the gold boom in Thunder Mesa Country. According to legend, when Baxter first set out from Fort Wilderness in 1865, the naysayers and local know-it-alls at the fort canteen told him he'd never find anything prospecting in that weird hoodoo country. Old Baxter just grinned beneath his big mustache, slapped his burro on the rump and said, "Never say never!" And the rest, as they say, is history
Though it was undoubtably a rich find, misfortune and strange goings-on seemed to plague the Never Mine right from the start. Mysterious cave-ins, inexplicable equipment failures, frequent accidents and more than a couple of grizzly fatalities soon gave rise to rumors that the claim was cursed or haunted. Evidence of an old Indian burial ground had been found nearby and it was commonly known that the local Ute people held the entire Mesa as sacred. It's no small wonder then that Baxter became a little addled by all the misfortune and eventually sold the claim in 1877. He drifted west to Discovery Bay where the remainder of his years and his fortune were spent experimenting with outlandish airships. The Never Mine was taken over by the Rainbow Ridge Mining Co. which was later acquired by the TMMC. By all reports, the strange happenings continued until the rich ore finally played out and the mine was abandoned in '85. 
Today, the dry desert wind whistles through the timbers of the old head-frame and the mine opening has been boarded up to keep out the curious. Or perhaps, to keep something in. Rumors of hauntings persist. Some foolish mortals say that on certain nights, when clouds obscure the stars and the zephyrs howl down the canyons, strange apparitions and ghostly voices seem to emanate from the long abandoned shaft house and the dark, gaping drift of the Never Mine.

The Model

The shaft house and head frame of the Never Mine; a little less spooky when photographed outdoors in the brilliant Arizona sunshine. The crooked smoke jack is a nod to the original Rainbow Ridge Mine that helped inspire this structure.


Inspiration for the Never Mine came from several sources. The design is loosely based on the Rainbow Ridge Mine, a tiny structure that once stood above the first tunnel on Disneyland's original Mine Train Thru Nature's Wonderland. The overall look and weathering was inspired by scouting trips to southwestern Colorado's Red Mountain Mining District.  The name, "Never Mine," is a direct reference to a bit of Imagineering humor: A signpost in the queue area for Disneyland's Big Thunder Mountain Railroad points the way to several local landmarks, including Dinosaur Gap, Coyote Canyon, Busted Flats and Never Mine.

A signpost at Disneyland. 79 miles to the Never Mine? I think it's closer than that.


I began the structure with no real plan, just modeling by the seat of my pants. Generally, I wanted a small and interesting looking abandoned mine to help round out the scenery near Big Thunder Creek. I had long thought that something which looked a little spooky and haunted might be just right for this spot and a paper model mock-up of a generic abandoned mine held the space for a couple of years. Follow along with the photos and captions to see how the shaft house and head-frame for the Never Mine went together.

The available space for a mine was pretty tight, only about 5" wide by 3.5" deep. Fortunately there was a lot of vertical space to play with and my solution was to simply stack all of the mine elements one on top of the other. A shaft house and head-frame sits on a stone foundation directly above a mine adit, which in turn will sit above a trackside ore tipple. The cliff face with the adit, or drift, was carved from Balsa Foam to match the surrounding scenery and the hoist house was laid out with 1/16" thick illustration board. The door and window are styrene Grandt Line catsings.

The tiny shaft house is a scale 8'x8' with a 24" wide catwalk on two sides. The illustration board structure was spray painted flat black. 

Coffee stir sticks were distressed with an X-acto knife and razor saw, adding woodgrain, splits and knotholes before being stained with a mix of Kiwi black shoe dye thinned with alcohol. The stir sticks are cheap, readily available, and scale out to about 11" wide in 1:48. They were cut to size and then glued in place over the illustration board with yellow carpenter's glue.

A foamcore jig was created to keep the head-frame supports straight and true during assembly.  The head-frame was built up with scale 8"x8" timbers following photos of similar structures I'd seen in Colorado. 

The head-frame was glued in place to the side of the shaft house. For added visual interest, the head-frame sits an inch (4 scale feet) lower than the shaft house.

The problem of where to put the hoist mechanism on such a tiny mine was solved by building this simple shed between the legs of the head-frame.  I guess there's a little steam hoist in there that must draw its water directly from the nearby creek. The sooty smokestack is a painted soda straw.

After assembly, the shaft house was dry-brushed with acrylic Buff Titanium to simulate old, faded whitewash. The Grandt door and window castings were primed and then dry-brushed to match, and signs were printed out on heavy paper to decorate the structure.

Grandt nut/bolt/washer castings were installed in logical places on the head-frame and watercolors were used to further age and weather the boards. Here rust stains are being added with a #1 sable brush. I mix up a batch of burnt sienna and ultramarine watercolors to create varying shades of warm grey. These are then brushed on to simulate age, rust, soot, water stains and other weathering effects. The watercolors soak right into the wood for a very realistic look and if the color gets too heavy it is easy to scrub off and blend with just a bit more water. If you try this technique though, take care, too much water can dissolve the yellow or white glue on your carefully constructed model. 

Here is the rest of the head-frame assembly and the parts hidden by the shaft house roof. The sheave wheel is from a 1:43 Model T truck, turned down with a rotary tool. The brackets holding it in place are painted paper with nut/bolt.washer castings affixed.

Before the roof was installed, lighting effects were added in the form of two 5mm LEDs. A blue LED emits a ghostly glow through the frosted panes of the shaft house window, while a flickering amber LED simulates a mysteriously rekindled firebox glimpsed through the roof of the hoist shack. The LEDs are wired in series with 510 ohm resistors soldered to the positive diodes of each bulb. A pigtail of wires protrudes from the base of the structure to connect to the layout's 9v DC accessory buss. 

The shaft house roof was made from illustration board with paper corrugated roofing. The roofing was cut into scale 4'x8' panels and painted with red oxide primer before assembly. Weathering was done with watercolors and brown, black and rust colored chalk powders. 

Rafters and rafter ends were created from scale 1"x8" stock. The crooked smoke jack is a Grandt Line casting with the crook created by sawing off the uppermost section, filing at an angle, and then glueing back in place. The jack was airbrushed silver and black and then weathered with powdered chalks.

Another view. The hoist cable is black painted elastic thread.


With the shaft house and head-frame complete I can now turn my attention to the mine adit and ore dump down below. There will be a lot more on how I built those coming in a future post. For now, thanks for checking in. Comments and questions are always welcome. Adios amigos!

Click here for part II
Related Posts Plugin for WordPress, Blogger...