Showing posts with label animals. Show all posts

Friday, January 9, 2015

Building a Better Cactus

Down by McKennon Arch, a pair of cactus wrens are building their nest high in an old saguaro. These giant cactus can stand for centuries and provide homes for many desert creatures. The holes are made by gila woodpeckers and later get used as nesting spots by wrens and other birds. The birds are made from polymer clay and the saguaro cacti are carved and painted Balsa Foam.


I must admit that I'm cheating a little by including a forest of giant saguaro cacti on my canyon country themed layout. In nature, saguaros are usually found down in the lower country of the Sonoran Desert and not up on the high plateaus around Four Corners. I've always had a soft spot for these bristly sentinels of the desert, so I hope I'll be forgiven for including a patch of them growing here or there. Also, the Cactus Forest was a feature of the Living Desert on Disneyland's original Nature's Wonderland Mine Train, and Thunder Mesa draws a lot of inspiration from that old attraction. And nothing says "Wild West" quite like the sight of mighty saguaro on the landscape.

Saguaro have been part of Thunder Mesa from the very beginning, but I've changed the way I model them over time. Originally, the Cactus Forest was populated with carved balsa wood succulents made with the old John Olson method, alongside some plastic monstrosities from Woodland Scenics. After a while, these no longer satisfied me and I began looking around for a better way to model them.

The Cactus Forest as originally modeled with John Olson style balsa wood saguaros and some funny looking little plastic things from Woodland Scenics.


I tried Travis Handschug's method of making saguaros from polymer clay but since I enjoy carving more than sculpting I finally ended up making most of my cactus from Balsa Foam, the same polyurethane carving foam that Thunder Mesa's rock formations are carved from. I use the higher density Balsa Foam II for cacti since it is less fragile and holds detail better than the softer foam. With a razor saw, I cut the foam into rods that are 1/2" square and about 6 or 7 inches long. Then they are sanded into a basic cigar-type shape before lines are scribed in with a hobby knife. Naturally, the crooked and bent arms are shaped from angled pieces of foam.

Balsa Foam from American Art Clay Co., and some of the tools used to work with it.

Here's a craved Balsa Foam saguaro before painting. Along with some strong adhesive, small lengths of wire help hold the arms in place. The pointy end of a bamboo skewer is inserted into the base to serve as a handle during painting and to help plant the cactus on the layout.


Now, everyone thinks they know what these cactus look like from movies and TV shows but it is very instructive to do some actual research into these plants. First of all, they grow a lot bigger than many people realize and a mature saguaro can tower 40' or more. That would be 10" tall in O scale! They can also have as many as 25 arms. It would take some real time and dedication to model a cactus like that.

Real saguaros are big!


Obviously, if I modeled them to scale they would dwarf everything else on the layout and throw off the carefully constructed false perspective illusion created by the buttes above. The only choice then was to caricature the saguaro. My cactus are at a smaller scale than the real thing (who knows? maybe they are a rare, "dwarf" subspecies that only grows at higher elevations), and they have just enough arms to get the idea across.
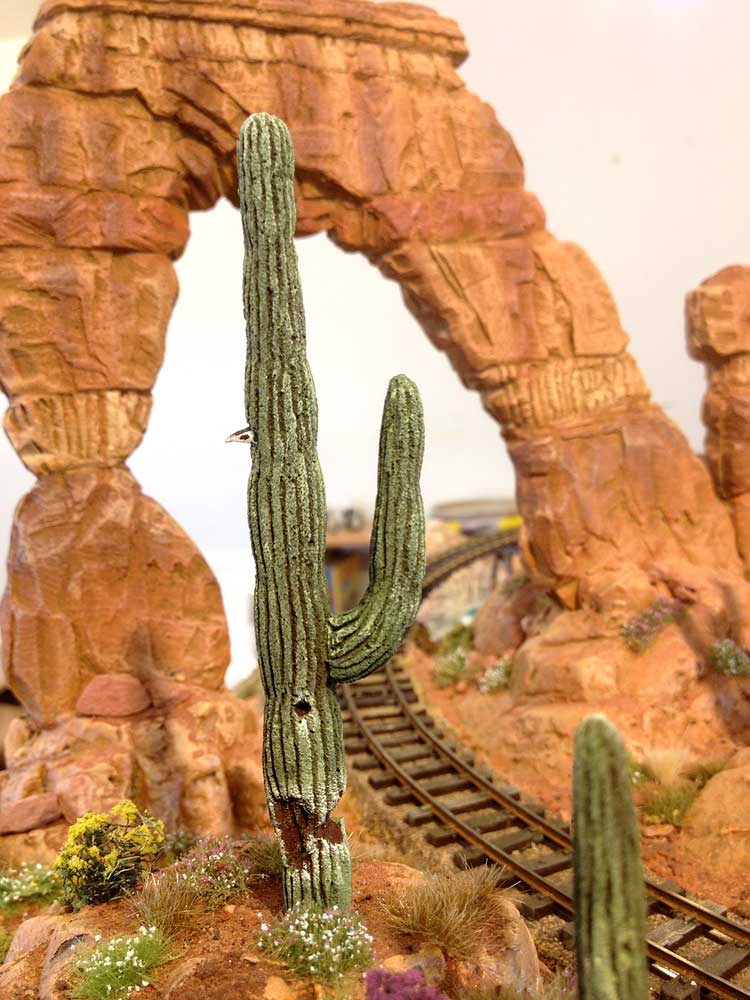
Another cactus wren pokes her head out of a finished saguaro. After carving, the cactus are painted with dark brown acrylic craft paint. Once that dries, Olive Green, Moss Green and Ivory are dry-brushed on to complete the paint job. The chewed away part of the cactus down below is evidence of javelina in the area. Javelina are bristly pig-like critters that enjoy chowing down on cactus.

The Cactus Forest today, sans backdrop. I'm much happier with the way it looks now and will be using the same techniques to add a few more saguaro here and there on the layout as things progress.


That's the story of building a better cactus. Admittedly, today's post was more of a "what I did" than a "how to do it" and if I glossed over any details or if anyone has any questions, please feel free to ask in the comments section below. I've got several big new projects on the back burner and I look forward to sharing all of those as the new year goes on. As always, thanks for checking in, amigos. Adios for now!

Friday, November 14, 2014

Big Thunder Creek: Part IV ~ Trees, Details & Sound

Click here for part I
Click here for part II
Click here for part III

All of the final touches are in and the sound is turned on for Big Thunder Creek. Does that mean the scene is finished? Well, there's always more to add but we'll call it done for now!


Welcome to the fourth and final post chronicling the build of Big Thunder Creek. Its been a fun and rewarding project that has brought a lot of life to the layout. In this installment I'll add the finishing touches to the scene, including some animal life, an old cottonwood tree, and the sound effects of birds and rushing water.

The Cottonwood

Throughout the desert Southwest, the majestic cottonwood has always been a welcome site. Cottonwood trees only grow near reliable sources of water like springs, creeks and stock ponds where they provide shade for weary travelers and habitat for wildlife. The bright green of a cottonwood grove can be seen for miles across the desert and always means life-saving water. When planning Big Thunder Creek I knew that it simply would not be complete without at least a representative sample of the cottonwood.

A Fremont Cottonwood in fall color beside a desert wash. Even if there's no water visible on the surface, a healthy cottonwood means that water can be found just below ground.

Cottonwoods have gray bark and distinctive branching trunks. I created mine using yard clippings from our paradise trees and Super Sage tree material from Scenic Express. The paradise tree clippings do a good job of representing the twisted trunks and thick branches of a typical cottonwood, while the sage is perfect for representing the smaller leaf-bearing branches and twigs. Paradise branches were trimmed and cemented together and a pin was cemented into the base to make it easier to plant on the layout and to work on at the bench. The Super Sage was soaked in diluted matte medium to make it pliable (as per the instructions) and then individual sprigs were cemented to the trunk and branches with fast-setting ACC.

Much has been written about modeling trees so I'll just cut to the chase here. Once the trunk was complete, the crown was sprayed with 3M 45 General Purpose Adhesive and then sprinkled with Noch Spring Green Leaf Flake. The other creekside bushes were made in a similar fashion and all were planted on the layout using Aleene's Tacky Glue.

Ground cover beneath the tree was created with a layer of fine dirt from my Sedona collection and ground up dry leaves from the yard. Everything was held in place with a spray of "wet" water (water with 1-2 drops of dishwashing liquid) and then glued down with diluted matte medium. Various ground foams, sticks, plants and grasses from Woodland Scenics help round out the scene. Good scenery is variety and layers, just like nature.

The finished cottonwood and environs. The challenge here was to build a tree of realistic size that didn't completely overpower the rest of the scene.


Critters and Other Details

Water in the desert attracts animals like a magnet, and while much of that illusion will be conveyed through sound effects, I wanted a few representative critters that would be visible to viewers.

Some ducks and a turtle made from Sculpey II. These were baked for about 15 minutes at 275ยบ and then painted with acrylics. For scale, the pin that makes up the head and tail of the turtle is about an inch long. It was trimmed much shorter before being added to the layout.

The ducks and  turtle in their natural habitat of Big Thunder Creek. For the record, the ducks are named Donald and Daisy. 

Why did the armadillo cross the train tracks? To get to the creek of course! This little guy is a white metal casting from Wiseman Model Services.

More greenery along the creek. This small hill between the bridges was created to help separate the creek from areas to the right.  The cacti are excellent plastic castings from Pegasus Hobbies.

An old Indian trail winds its way down to the creek from the mesa and a pair of Ute braves have stopped to pay their respects to Thunder Falls. The figures are from Woodland Scenics.

Finishing the creek scene meant finishing up the track too. Here, ballast is being spread along the mainline with a small, soft brush. This was then held in place with a spray of "wet" water  and then glued down with diluted matte medium. The mainline ballast is died chick grit and the sidings are red dirt from Sedona.


Adding Sound

As I have on previous projects, I turned to ITT Products when it came time to add sound to Big Thunder Creek. I wanted an ambient effect with the roar of the waterfalls coming from an upper speaker and babbling water and bird sounds coming from a speaker near the layout fascia. Their small sound modules are perfect for adding spot sounds like this to specific locales.

Sound modules and 2" speakers from ITT Products. The modules were wired in series to a panel switch but the speakers were placed farther apart. The speaker for the waterfall sound module was placed directly behind the big falls and the speaker for the brooks and birds was placed closer to the front of the layout.

The wiring for the sound modules is very straight forward and the instructions are quite clear and easy to follow - even for an electronics dummy like me. Here the two modules have been wired in parallel and leads have been added to connect to a 9v power source. Small jumper wires have also been connected on the center on/off terminal to allow for continuous looping sound. The orange disk at lower left on each module is the volume control.

Here the two sound modules have been mounted to benchwork below the layout in a relatively easy to reach location.


The best way to demonstrate the sound modules is with a video. To wrap up the project, here's a short movie on the sights and sounds of Big Thunder Creek. Enjoy!


Thanks for coming along for the Big Thunder Creek project. I hope everyone enjoyed the journey. Of course, there's still lots to do on this side of the layout with Thunder Mesa Mill and other structure projects waiting in the wings. We'll see what I'm in the mood to tackle in the days and weeks to come. In the meantime, thanks for checking in, amigos. Adios for now!
Related Posts Plugin for WordPress, Blogger...