Showing posts with label Balsa Foam. Show all posts

Saturday, January 24, 2015

Lone Rock: A Canyon Country Diorama

The Lone Rock diorama was built to demonstrate rock carving and coloring techniques, and also to serve as a model stand for outdoor photography.


The Lone Rock diorama began with an email from Joey Ricard over at Trackside Scenery. When Joey's not working on his fantastic On30 Spruce Coal & Timber Co. layout, he's producing an awesome series of how-to modeling videos that you can watch over on YouTube. So when Joey asked if I might be interested in contributing to an upcoming video about modeling rocks, I was more than happy to agree. Joey's videos are always fun and informative, focusing on both tried-and-true and new-and-innovative techniques. Just my kind of project.

The idea for a stand-alone diorama that could be taken outdoors for photographing models had been percolating in the back of my mind for some time. Joey's video suggestion was just the push I needed to dust off the idea and get to building. I could document the build with video and photos as I went along, and wind up at the end with the photo-diorama I'd been daydreaming about. I wanted something simple and scenic, with a short length of track and one distinctive rock formation as center of interest. Most of the build is covered in the resulting video (below), so today's post will focus mostly on additional details. Here's how it all went together.

The 12" x 24" diorama started with a simple frame of 1" x 2" MDF and three layers of 1.5" white polystyrene bead-board. Some 1" thick gold polyurethane foam (Balsa Foam) was roughly shaped to form a single, towering butte. 1/2" plywood was cut to shape for track sub-roadbed and glued in place atop the foam. The white foam was shaped with a hot-wire cutter, and a small stone culvert made from Balsa Foam was created to bridge the gully. I used Loctite Power Grab construction adhesive to glue everything together.

The butte was carved from hard density Balsa Foam. This is a commercial version of the same gold urethane carving foam used by Walt Disney Imagineering and Hollywood special effects model builders. It's available through better stocked art and craft dealers.

A short section of the 1/2" plywood sub-roadbed was cut away and a chunk of 1" thick Balsa Foam was used to form a small stone culvert. The arch was created with sandpaper wrapped around a small bottle, and the stones were carved with a hard 5H pencil.

Using photos of rocks from Monument Valley, Moab and Sedona, Lone Rock Butte was carved from Balsa Foam using mostly a #2 hobby knife. The butte was then glued to the base with Loctite Powergrab adhesive. Four bamboo skewers between the butte and the base add additional strength. See the video for more details on the carving process. My part starts at about the 8:40 mark.

Sculptamold was used to blend the butte into the base and to form an embankment along the sub-roadbed right of way. A soft, wet brush is handy for smoothing things out.

Since there would be scenery below it, the stone culvert was finished early and installed flush with the sub-roadbed. It was painted with acrylics and the mortar lines were filled with spackling paste.

Midwest HO scale cork roadbed was glued down with yellow carpenter's glue before just about everything on the diorama was given a base coat of golden-tan flat latex house paint. Then a length of Peco On30 flextrack was cemented in place with Powergrab adhesive.

A wash of diluted India ink was sprayed onto the butte to darken cracks and crevices before final painting was done. Inexpensive craft acrylics were used to complete the paint job. Colors like raw sienna, red oxide, burnt umber and unbleached titanium were applied wet into wet, working from darker to lighter tones. See the video for a more complete rundown on the painting process. Painting and finishing starts at about 12:45 on the video.

The track was painted and weathered using Joey Ricard's easy techniques featured in this video from TracksideScenery.com. First the track is painted flat black. I masked off the diorama for this and did the painting outside with some Krylon spray paint. Next the ties are painted with a light tan acrylic. I used Apple Barrel "Khaki." Then the rails are painted with rust colored chalks suspended in 70% isopropyl alcohol. The final step is to give everything a good dusting with black and dark brown chalks. There's no power going to this track so I didn't bother to clean the paint off of the railhead. On powered track I'd use a Bright Boy or paint thinner to clean the railhead after painting.

The basic ground cover is Polyblend Sanded Grout. I mixed it up with a little water to form a thick paste and then just stippled it on with a cheep paintbrush (don't use a good brush for this! You'll never use it again). The erosion lines were pressed in with a pencil. The grout does a good job of representing soil while also filling and smoothing any remaining gaps in the foam base. This color is called "Sandstone," appropriately enough, and it dries a couple of shades lighter than it goes on. The wet grout generally stays where you put it but I also wet it down with a misting of diluted matte medium to lock it in place.

Once the grout had set overnight, the final coloring was done with light washes of acrylics to blend and unify the grout layer with the rock carving.

Real dirt and rocks were sprinkled on and then glued in place with white glue and diluted matte medium.

The track was ballasted with local sandstone, held in place with diluted matte medium.

Woodland Scenics "Field Grass" was used to make clumps of desert grasses and weeds, held in place with dabs of Aleene's Tacky Glue. Any loose fibers were later cleaned up with a shop vac.

A few more bushes and desert plants finish the diorama. The juniper bushes are Super Trees from Scenic Express covered in Noch dark green foliage. Clumps of gray sage were made with Woodland Scenics medium green bushes, lightly sprayed with gray primer. The prickly-pear cacti are castings from Pegasus Models. Lastly, the 1" x 2" frame was painted flat black to match the fascia on the Thunder Mesa layout.


Building the Lone Rock diorama was a quick, fun and rewarding project. Even if you don't have room for a full layout, I encourage anyone to try their hand at a small diorama like this. It can be finished in a week or so, and it's a great way to learn new techniques or to experiment with scenery ideas. I'll close out today's post with the finished video that Joey and I put together, and with a few photos taken outdoors in beautiful Sedona, AZ.


Set-up for photos in Sedona, AZ.

A small diorama like this is great for photographing models outside in natural light.


That's it for this project. Questions and comments are welcome below. Adios for now, amigos!

Friday, January 9, 2015

Building a Better Cactus

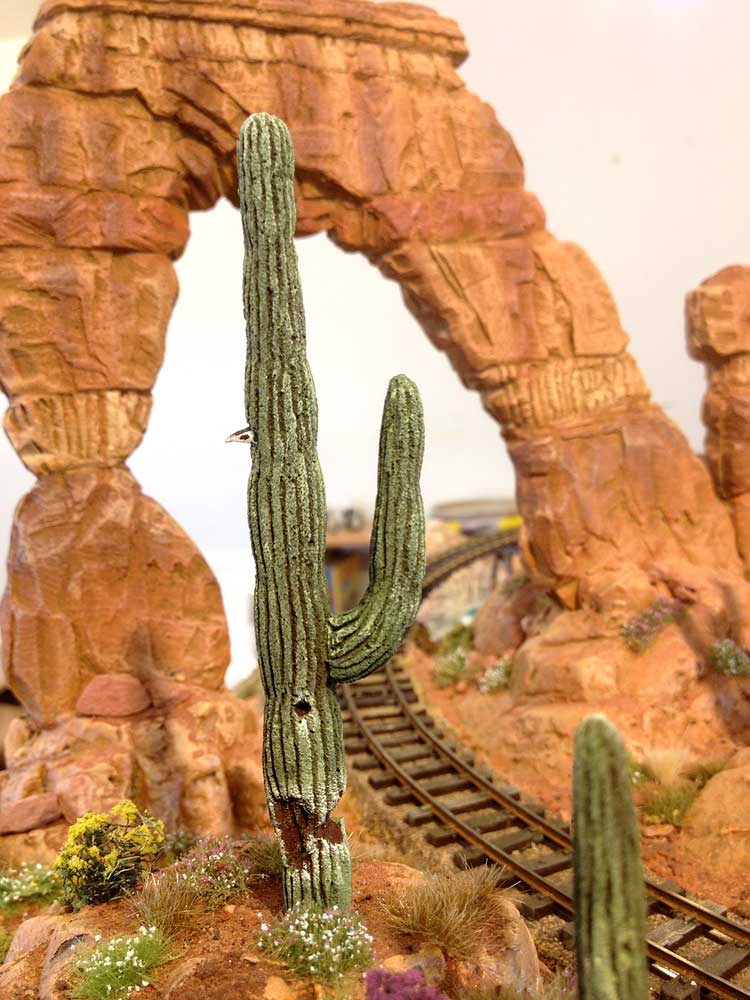
Down by McKennon Arch, a pair of cactus wrens are building their nest high in an old saguaro. These giant cactus can stand for centuries and provide homes for many desert creatures. The holes are made by gila woodpeckers and later get used as nesting spots by wrens and other birds. The birds are made from polymer clay and the saguaro cacti are carved and painted Balsa Foam.


I must admit that I'm cheating a little by including a forest of giant saguaro cacti on my canyon country themed layout. In nature, saguaros are usually found down in the lower country of the Sonoran Desert and not up on the high plateaus around Four Corners. I've always had a soft spot for these bristly sentinels of the desert, so I hope I'll be forgiven for including a patch of them growing here or there. Also, the Cactus Forest was a feature of the Living Desert on Disneyland's original Nature's Wonderland Mine Train, and Thunder Mesa draws a lot of inspiration from that old attraction. And nothing says "Wild West" quite like the sight of mighty saguaro on the landscape.

Saguaro have been part of Thunder Mesa from the very beginning, but I've changed the way I model them over time. Originally, the Cactus Forest was populated with carved balsa wood succulents made with the old John Olson method, alongside some plastic monstrosities from Woodland Scenics. After a while, these no longer satisfied me and I began looking around for a better way to model them.

The Cactus Forest as originally modeled with John Olson style balsa wood saguaros and some funny looking little plastic things from Woodland Scenics.


I tried Travis Handschug's method of making saguaros from polymer clay but since I enjoy carving more than sculpting I finally ended up making most of my cactus from Balsa Foam, the same polyurethane carving foam that Thunder Mesa's rock formations are carved from. I use the higher density Balsa Foam II for cacti since it is less fragile and holds detail better than the softer foam. With a razor saw, I cut the foam into rods that are 1/2" square and about 6 or 7 inches long. Then they are sanded into a basic cigar-type shape before lines are scribed in with a hobby knife. Naturally, the crooked and bent arms are shaped from angled pieces of foam.

Balsa Foam from American Art Clay Co., and some of the tools used to work with it.

Here's a craved Balsa Foam saguaro before painting. Along with some strong adhesive, small lengths of wire help hold the arms in place. The pointy end of a bamboo skewer is inserted into the base to serve as a handle during painting and to help plant the cactus on the layout.


Now, everyone thinks they know what these cactus look like from movies and TV shows but it is very instructive to do some actual research into these plants. First of all, they grow a lot bigger than many people realize and a mature saguaro can tower 40' or more. That would be 10" tall in O scale! They can also have as many as 25 arms. It would take some real time and dedication to model a cactus like that.

Real saguaros are big!


Obviously, if I modeled them to scale they would dwarf everything else on the layout and throw off the carefully constructed false perspective illusion created by the buttes above. The only choice then was to caricature the saguaro. My cactus are at a smaller scale than the real thing (who knows? maybe they are a rare, "dwarf" subspecies that only grows at higher elevations), and they have just enough arms to get the idea across.

Another cactus wren pokes her head out of a finished saguaro. After carving, the cactus are painted with dark brown acrylic craft paint. Once that dries, Olive Green, Moss Green and Ivory are dry-brushed on to complete the paint job. The chewed away part of the cactus down below is evidence of javelina in the area. Javelina are bristly pig-like critters that enjoy chowing down on cactus.

The Cactus Forest today, sans backdrop. I'm much happier with the way it looks now and will be using the same techniques to add a few more saguaro here and there on the layout as things progress.


That's the story of building a better cactus. Admittedly, today's post was more of a "what I did" than a "how to do it" and if I glossed over any details or if anyone has any questions, please feel free to ask in the comments section below. I've got several big new projects on the back burner and I look forward to sharing all of those as the new year goes on. As always, thanks for checking in, amigos. Adios for now!

Friday, November 21, 2014

Foam Scenery on the N Scale Pagosa & Southern

Using Floral Foam and Foam Paste to Model a Rocky Cliff


Scenery work has begun on the N scale Pagosa & Southern! All of the rock work in this photo was modeled using dry green floral foam and my special recipe foam paste. Backdrop added in Photoshop.


I want to keep things very light and portable on my N scale Pagosa & Southern shelf layout. To do that, I've set a goal of using little or no plaster and that has led to experimentation with more foam scenery techniques. I've used Balsa Foam to carve many of the rock formations on the On30 Thunder Mesa layout and I wanted to see if I could also get acceptable results in N scale using far less expensive green floral foam. (Note that I am talking about the dry green floral foam here, often used for silk flower arrangements, and not the "wet" foam that absorbs and holds water.) In practice, the green foam can be carved like a less dense version of Balsa Foam. Fine detail is not really possible and the resulting carvings can be fragile, but I have found that when they are painted and properly blended the results can be quite convincing. I've also found that mixing the resulting foam dust with matte medium creates a very useful modeling paste for blending the rock cravings and other scenic elements together. This foam paste shows great promise and could be a handy scenic material for modelers in all scales.

Top view of the sceniked area, also showing a bit of the staging shelf at left.


Making Floral Foam Rocks

Hobby knives, a sharp pencil, a razor saw and other tools have been used to carve a hunk of dry green floral foam into a rocky cliff wall. The cliff-face on the P&S was made up of four separate carved pieces cemented together and blended in with my special recipe foam paste. 

To seal them and add strength, the carvings were painted on all sides with tan latex paint.

A wash of diluted black acrylic was brushed on to darken all of the cracks and crevices. 

Each section of the cliff-face was then painted with acrylics. Here, a base of dark grayish-tan is being applied. 

Successively lighter colors were then brushed over the surface of the rocks, allowing them to blend and mix with previous coats. Rocks don't have a uniform color in nature and they shouldn't when modeled either. The final color is unbleached titanium, dry-brushed on for highlights.

Here, the first sections of rock carvings are in place and blending has begun using foam paste. The bottom of the creek bed has also been boxed in with 1/4" foamcore and the Kato truss bridge has been painted and weathered with acrylic paints. The tunnel portal is a Hydrocal plaster casting from Woodland Scenics.


How to Make Foam Paste

I stumbled on the idea for foam paste when considering what to do with all of the little bits and piles of dust left over after the carving process. I mixed a little bit of the dust with some matte medium to see if it might be useful for blending rocks together and was pleasantly surprised by how well it worked.

Making foam paste from green floral foam and acrylic matte medium is a quick and easy (if somewhat messy) process. It is basically a mixture of glue, foam dust and pigment and the resulting paste has a grainy, sand-like texture that is great for all sorts of scenic applications. It can be used as a sort of zip-texture ground cover, a gap filling adhesive, and a spackle-like compound for blending rock carvings and castings together. Once dry, it is strong, light weight and can be painted, sanded and carved. Tools clean up easily with soap and water. Working time is an hour or so (depending on how liquid one makes the mixture) and a 1/4" layer will cure completely overnight. Here's how I make it:

First, smash up about 8 oz of dry green floral foam. This is easy to do with your hands or with the butt of a screwdriver. The goal is to create a uniform powder. Yes, it gets everywhere but is easy to clean up with a shop-vac.

Next, pour in about 6 oz + -  of cheep, craft store matte medium. The ratio is about 4:3, foam to matte medium but you really just want enough to wet all of the foam and make a paste.

Stir very well until all of the foam dust is mixed with the matte medium.

Add pigment. This is optional but makes it quicker to work with if it already matches the scenery colors on your layout. I'm adding about a tablespoon of inexpensive raw sienna acrylic paint here.

Mix well again until you get something like peanut butter. This foam paste is now ready to use. I mix and store mine in old jelly jars with airtight lids. It can last for months.


Working with Foam Paste

Foam paste can be applied with a paintbrush, a flat stick or a finger. Here I'm using a wooden stir stick to fill and blend the gaps between two rock carvings. The foam paste sticks very well to most surfaces and dries with little or no shrinkage.  It can be thinned with water or more matte medium if desired.

A thick layer of foam paste was slathered on to glue separate layers of the cliff-face together and to fill gaps around the tunnel portal casting.

Using a wet brush, it's easy to blend the foam paste into carvings and other scenery. In the foreground, a small hill has been created from floral foam and will be covered in foam paste.

Foam paste can also be used to cover ground areas with a convincing soil texture quickly and easily. Just stipple it on with a brush for a form of zip-texturing. Here the foam paste is being applied right up to the edge of the Kato Unitrack roadbed.

For the creek bank, hunks of floral foam were shaped and glued in place before being skinned and blended together with a layer of foam paste. A little water on the brush makes it easy to feather edges of the foam paste where it meets other scenery.

Once the foam paste had cured overnight, colors were touched up and blended with acrylic paints, and various ground foams, trees and other scenic materials were cemented into place.


Finishing Up

Trees, ground foams and other materials from Woodland Scenics and Scenic Express were used to bring life to the scene. With the cliff-face completed I can next turn my attention to modeling the creek where more floral foam carvings and foam paste will be used. I'm working from left to right on this little shelf layout, with the goal of completing about a square foot of scenery before moving on to the next area. I'm pleased with the results that can be achieved with inexpensive floral foam and excited about the possibilities offered by foam paste modeling.

A train bound for Wolf Creek exits the tunnel. More work will be done to blend the Kato Unitrack into the scenery but N scale Colorado is starting to come to life.


That's about all the news from N scale Colorado. Next week I'll return to Thunder Mesa country with an update on that layout's progress. As always, questions and comments are welcome below. Thanks for checking in, amigos. Adios for now!

Friday, October 31, 2014

The Never Mine: Part II ~ Happy Haunted Halloween Edition

Grim Grinning Ghosts Come Out to Socialize with the Addition of a Haunted Mine Tunnel!


Click here for part I

Welcome foolish mortals, to the Never Mine! Happy Halloween!

Just beware of hitchhiking ghosts!


At the end of September I described building the shaft house and head-frame of the spooky, abandoned Never Mine. In today's post I'll detail construction of the mine tunnel base, including the addition of a happy haunt who only comes out after dark. Then we'll finish up the scene with a tailings pile, timber crib retaining wall, and all of the final landscaping details. Follow along with the photos and captions to see how it all went together.

The base for the Never Mine was carved from two layers of 1" thick Balsa Foam laminated together with wood glue. Most of the carving was done with #2 and #11 hobby knives and a hard, 5H pencil. A random stone foundation for the shaft house was integrated into the carving. Here I'm test fitting the top beam of the timber framing for the mine adit. 

For my happy haunt, I cut some 1mm clear acrylic sheet to size and fogged the surface with fine sandpaper. Then the outline of the ghost was painted from behind with thick black acrylic paint. The acrylic sheet was cemented into place and all of the edges blended with spackle. 

A hunk of Baxter's Butte was cut away and a simple power bus made from two strips of thin brass sheet was glued in place.  Accessory power from a 9v transformer feeds this bus and all wiring leads from the model were soldered on to it. Special care was taken to keep track of the positive bus as LED lights are polarity specific and will not function if the positive diode receives a negative charge. Here a 5mm green LED has been soldered into place to illuminate the ghost.

A quick check to make sure everything would fit and work properly.

The carving was painted with acrylics to match existing rock-work on the layout and the mine adit was finished with scale 8' x 8' beams and 1" x 12' planks stained with a shoe dye and alcohol mixture. The boards were distressed and broken to look as if they have been there for some time. The nail holes were added with a sharp 5H pencil.

Here is the entire assembly installed on the layout and the lights turned on. The shaft house has a single blue LED and the hoisting shed has a flickering amber LED as described in part I.

The carved base was glued down and blended into the existing scenery with Sculptamold. The mine structures above merely sit in place and can be easily removed if required. A short length of Micro Engineering code 55 N scale bridge track was added to represent O scale 18" gauge mine car tracks emerging from the tunnel.

I had originally planned to build an abandoned ore tipple to go with the Never Mine but later decided that such an imposing trackside structure would detract from the tiny mine above. Instead I opted for a timber crib retaining wall and tailings dump - a very common site around old mines. The first step was to rough in the dump pile with EPF (pink foam).

Here the tailings dump has been smoothed out and blended into the cliffside with Sculptamold. It was then given just a quick coat of Raw Sienna since this base will be entirely covered by scenery materials.

A couple of rickety, broken old ladders were scratch-built from strip-wood to provide a way up to the mine - albeit a hazardous one. It's nothing but fun to build details like this.

The timber crib retaining wall was built in place from 3/16" diameter dowels, stained and distressed to resemble old timbers. Here I'm backfilling behind the cribbing with small rocks and dirt from Sedona, AZ. This was later cemented in place with diluted white glue.

The slope of the tailings pile was textured with Polyblend sanded grout. It was mixed in a paper cup with a small amount of water to form a thick paste and then stippled on with a cheap paintbrush.

The grout was allowed to dry for a couple of days and then it was stained with thin washes of acrylic paints to represent colorful minerals, and to blend it with the surrounding scenery.

Another layer of fine rocks and dirt was sifted over the tailings pile and cemented into place with diluted white glue. Then more rocks, bushes, cacti, weeds, broken boards and other miscellaneous bits of debris were cemented in place to finish up the scene.

Cacti, bushes and other details near the shaft house foundations. You'd have to be pretty brave to climb those ladders!

The boarded-up mine entrance. The ghost is invisible during they day and only appears when the structure lighting is turned on for night operations.

Overall view if the tailings pile. The weedy overgrown look contributes to the story of a mine that has been abandoned for some time.


With the completion of the Never Mine, just about all of the scenery is now finished on this side of Big Thunder Creek. I'm sure that a few more details will be added here and there, but I was happy to get the haunted mine finished just in time for Halloween. I had considered adding a sound module to this project but decided it would be a little too much with the sounds of the creek, mill and town right next door. Hope you've all enjoyed the tale of the Never Mine and following along with the build. As always, any questions or comments are more than welcome below. More to come real soon. In the meantime, here's a video showing the lighting effects and documenting the Never Mine build. Adios for now!


Related Posts Plugin for WordPress, Blogger...