Here's Thunder Mesa's revised track plan showing all the changes that have been made. The town of Calico now plays an important role as one end of the railroad in operations. The addition of a reverse loop and short passing siding there now make it possible to operate the layout in a point-to-point fashion. The former village of San Lorenzo has now been incorporated into Thunder Mesa as the "Old Spanish" section of town. This change freed up the far right corner for a turntable and more accessible engine service area.
The improved track arrangement at Calico forced my plans for an On18 mini-layout to be shelved (again), but the On18 line does make an appearance as a point-to-point mining tram feeder between Big Thunder Mine and the ore bins at Calico. Lastly, the Lone Rock diorama now finds a permanent home on the layout. It's a non-operating scenic feature, but its position against the backdrop offers great sight-lines when looking across the aisle (now called "Coyote Canyon") from the McKennon Arch area.
April 2016 Video Log
Howdy Folks! So much has been happening out here in Thunder Mesa Country that it's hard to know where to begin. The right of way has been changed, towns have been moved, combined or added, and entire areas have been reimagined. On top of all that, a lot of real progress has been made bringing these changes to life with new scenery work and modeling at Horse Thief Canyon and the town of Thunder Mesa well underway. The best way to get caught up on things is with a new video log. After that, I'll delve more deeply into the details below.
Engine #9, the Admiral Fowler
Featured in the new video log is the TMMC's latest locomotive: #9, the Admiral Fowler. Like several of the other Thunder Mesa locomotives, it's an 0-4-2 Porter from Bachmann. I've dressed it up with a fancy cap stack and some custom decals from Stan Cedarleaf.
The "Niner" rounds the bend at Dinosaur Gap. The gold capped stack was made from some HO parts in my scrap box.
Continuing the Thunder Mesa tradition of naming locomotives after Disney Imagineers, animators and others who played a big role in Disneyland's development, the new Porter is named in honor of Admiral Joe Fowler. This was the man Walt Disney put in charge of Disneyland's construction, and who stayed on as general manager of the park for its first decade.
The Admiral Fowler has an unusual crew. The engineer is none other than local legend Chuckwalla Slim, and the fireman is his trusty dog, Sparky. Both figures were painted by my friend, the late Verne Niner, and the locomotive bears the number 9 in his honor. The TMMC has yet to acquire a #8.
Cattle Cars
The new track plan calls for some larger stock pens at Thunder Mesa and that means I'll need some livestock cars. The TMMC doesn't own any itself, but it does interchange with the parent Santa Fe, Denver & Carolwood and that line does run some cattle cars. To represent some of that interchange traffic, I've repainted and weathered a couple of old Bachmann cars for now.
Livestock car #59 belongs to the Mescal Lines Ry. Disney Imagineer and well known model railroad author John Olson built his HOn3 Mescal Lines in the early 1980s, and my TMMC owes a very large creative debt to that landmark model railroad.
Car 201 is lettered for the TMMC's parent road, the Santa Fe, Denver & Carolwood. The SFD&C is roughly based upon the Santa Fe & Disneyland Railroad so it seemed appropriate that their cattle cars should bear the same numbering as the original Retlaw 2 cars at Disneyland.
Out with the On18 "mini-layout" and in With a Reverse Loop at Calico
The plans for Calico have probably changed more than anything else on the layout. Earlier this year I decided to nix the idea for a mini On18 Calico layout in favor of a reverse loop and a mainline stop at the town of Calico itself. I concluded that the space could be much better used for a second town to act as the far end of the line from Thunder Mesa. This decision also meant that the steep grade up to Big Thunder Mine would have to go, and that the village of San Lorenzo could be incorporated into Thunder Mesa town as Verne Niner had once suggested. But don't despair On18 fans! If you take a close look at the plan above, you'll see that the old Big Thunder high-line will now be an On18 mining tram bringing ore to the bins at Calico.
Quick thumbnail sketch for the grade changes at Calico.
Out with the old...
...And in with the new.
The reverse loop is controlled by an MRC DCC auto reverse module hidden below decks.
San Lorenzo Merges With Thunder Mesa Town
Before his untimely passing late last year, Verne Niner and I discussed several different options for integrating his award winning San Lorenzo diorama into the layout. One thing he had suggested was making San Lorenzo the "Old Spanish" section of town. I immediately liked that idea since it implied a long and rich history for the town. It's something you see a lot in the older towns of the Desert Southwest, where Native American, Spanish, and Anglo cultures all come together and overlap. Still, I was hesitant to alter Verne's beautiful diorama until I came up with the new operating scheme placing Calico at one end of the line and Thunder Mesa at the other. Now there was no reason (or room) for a third town on the layout and I found myself thinking back to our early conversations. The decision made, I carefully disassembled the diorama, cataloging everything in pictures, and managed to save every last detail except for the bead-board foam base. In their new placement, the adobe structures have a somewhat different orientation, but their positions from left to right are the same. Several of the structures also have new foundations at differing heights to better compliment Thunder Mesa's boomtown aesthetic. Adding lighting to the structures was always on my to-do list and this move seemed a logical time to also move forward with that project.
The San Lorenzo structures in their new locations as the Old Spanish section of Thunder Mesa. Disneyphiles may also notice that this arrangement mimics the orientation of Rainbow Ridge to the early California flavored area of Zocalo Park at Disneyland (former location of Mineral Hall and Casa de Fritos). This is no accident and the fountain area here is now called "Zocalo Plaza."
LED lighting has been added to the jail.
The Mercantile has also received LED lighting, along with some new signage and a wooden front porch.
One more thing that remains intact from the original diorama is the Pricom Dreamplayer sound system. The mission bells ring, chickens cluck, horses whinny, and the angry banditos still threaten the pig bathing in the fountain. It's a wonderful scene, and I think fondly of Verne every time I look at it.
New Rockwork, boardwalks and Retaining Walls
With the San Lorenzo structures becoming part of Thunder Mesa, it seemed like a good time to tackle some of the scenery work around town too. The new rockwork that forms a backdrop for the town was built and finished with the same techniques I've been describing in the step-by-step build of Horse Thief Canyon. With the rock and paint work done, I've since moved on to building all of the retaining walls, board sidewalks, and steps through town.
The rockwork behind town was built up with carved layers of extruded polystyrene foam. The layers were then blended together with spackling compound and Sculptamold.
Once the sculpt is complete, the rocks are painted with latex and acrylic paints. Here I'm applying a wash of diluted black to darken the cracks and crevices.
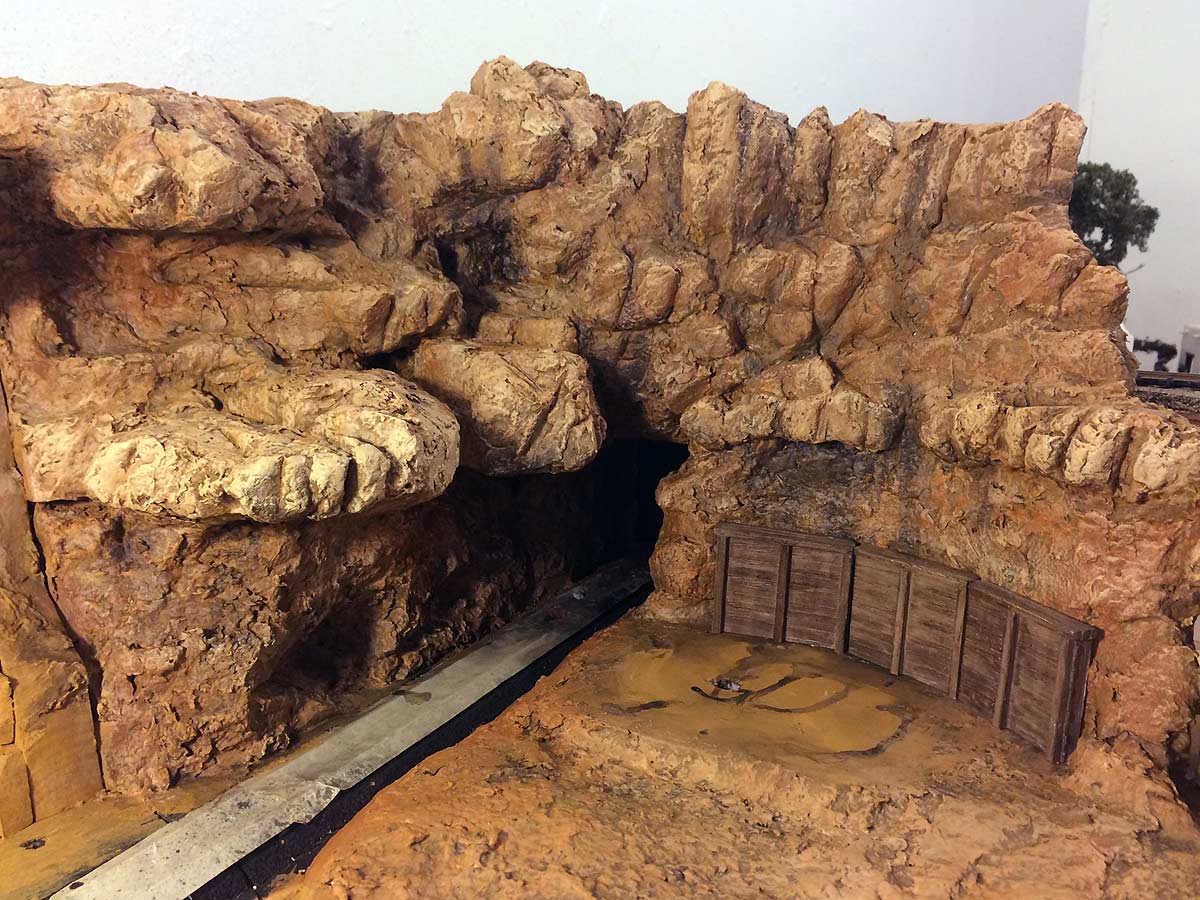
After final paint and with a backdrop in place the scene starts to come together. This new promontory above town is called Castle Rock. Just below that is Injun Joe's Cave, where, as legend has it, lost Spanish gold is still waiting to be discovered.
Here's an overhead view of the new board sidewalks and retaining walls built in town.
And a view from the depot platform. The timber retaining walls help to separate the depot scene from the town beyond. One by one, each of the paper and cardstock mock-ups in town are being replaced by fully detailed models. It would be much more difficult to plan a scene like this without them. The Marshal's Office will likely be my next structure project.
A quiet night in Thunder Mesa Town. Soon, ground cover, weeds, and other details will be added to further enhance this scene.
Engine Service Area
With the San Lorenzo structures moved to the other side of the tracks, that freed up their former location for an expanded engine service area with much improved access. The centerpiece of this scene will be one of the excellent turntables from Kitwood Hill Models. I'll be building the 9" gallows turntable here, and when completed it will allow the layout to operated in a point-to-point scheme between Thunder Mesa and the reverse loop at Calico.
The new engine service area and an inset of the Kitwood Hills Model turntable. Can't wait to get started on this terrific kit!
Horse Thief Canyon
Meanwhile, progress also continues a-pace at Horse Thief Canyon. I'll continue to update the build of this scenic slot canyon in its own step-by-step series.
Horse Thief Canyon - nearly 75' deep below track level. The mainline will cross here on a classic deck-truss bridge.
Effects Control Panel
Each section of the layout will eventually have its own small panel for controlling lights, sound effects, music, and animation. The first such panel is now complete for the Thunder Mesa section.
This small panel was built into the layout fascia on the Thunder Mesa section. The panel face was created in Photoshop, printed on cardstock and laminated with a matte finish clear acrylic. This was then affixed to 1/8" thick masonite. The functions are controlled by simple SPST on/off switches, and a green LED indicates power. All of the effects on Thunder Mesa run on a 9 volt DC system.
Frontierland Music Loop
Every land at a Disney park has its very own soundtrack, usually a one hour music loop that helps to reinforce the land's theme and further immerse guests in the experience. I've always enjoyed the music played in Frontierland and thought it would be a kick to add it to the railroad. I put together my own extended loop that also includes music from the Big Thunder queue and Big Thunder Ranch (now gone!). The music is provided by an inexpensive MP3 player and piped in through speakers hidden under the layout.
What's Next
The first 3 months of 2016 have been a very busy time on the railroad but with each project completed I see three more that still need doing. Coming soon will be new structures for Thunder Mesa Town, ore bins for the On18 line in Calico, a build of my Kitwood Hill Models 9" gallows turntable (can't wait to get started on that one!), some new scenery and effects for Rainbow Caverns, a backdrop to install, and Horse Thief Canyon to finish. All that and more should keep me busy through the end of the year.
A look ahead at the future through the magic of Photoshop. This is the view standing in Coyote Canyon and looking toward Big Thunder Mine and Rainbow Caverns. Horse Thief Canyon is at left and Dinosaur Gap is on the right. The Indian Pueblos will be right about where the thunder storm is on the backdrop. I've also imagined some black drop curtains down below the fascia to give things a more finished look.
Though work on the layout has been steady, I haven't had the time to update this blog as often as in the past. Going forward, look for more long posts like this one to come out every few weeks or so, and for more frequent posts (sometimes several a day!), head on over to Facebook and follow the Thunder Mesa page there. As always, questions and comments are welcome below. Thanks for checking in, amigos. Adios for now!
After a couple month's break, I'm back to work on the railroad, jumping right back into a big scenery project. Ive made some major and minor changes to the overall plan since the beginning of the year and there will be much more on that in a future post. For now I'd like to bring things up to date on the scenery being built around Hanging Rock in what I'm now calling the Horse Thief Canyon section of the TMMC.
The new cliff wall under construction below Hanging Rock. I'm trying something new on these big canyon sections, building the rockwork almost entirely from extruded polystyrene foam insulation board - or EPF for short (that's the pink foam board from your local home center). In the past I've used it mostly as a scenery base and finished with other techniques, but now I've found a way to carve the foam layers themselves into a convincing representation of sandstone. The Kato power pack nestled into the cliff base will provide DC control for an On18 mining tram running between Calico and Big Thunder Mine - much more on that in a future update.
This is a big project, and I'll be spreading it out over several updates. In this first part, I want to concentrate on the cutting and carving techniques used on the pink extruded polystyrene foam board (EPF). This insulation board is lightweight, relatively inexpensive, and has been used by model railroaders for many years as a scenery base. While building some rockwork for Rainbow Caverns, I hit on a new technique (new to me) for carving rock textures into the foam using a sanding bit in a Dremel rotary tool. I was so pleased with the results that I decided to use the same method on the deep canyon sections of the layout too. It's a little labor intensive, but really no more so than my previous method of stacking foam layers and texturing with Sculptamold. I've got a ton of rockwork to do, so whatever method I choose is going to take awhile, but these EPF canyon walls will end up weighing much less than the equivalent amount of plaster or Sculptamold. An important consideration if I should ever have to move the layout.
It's easy to add access hatches with EPF scenery. Here I've created a removable section of cliff below Hanging Rock so I can access the wiring back there when needed. Just push in at the corner and then slide the section out. A similar removable section will also be built into the cliff wall on the other side of the canyon.
Overall view of the Calico and Horse Thief Canyon sections as scenery work begins. All of that space between track level and the bottom of the benchwork will be filled with EPF rockwork.
The basic tools and materials used on the foam rockwork.
1" thick EPF insulation board (purchased in 4' x8' sheets)
Sanding block - medium to fine grit
Loctite Power Grab adhesive and caulking gun (the best adhesive for EPF)
Dremel rotary tool and various sanding bits
Razor saw
Hot wire foam cutter
Various hobby and utility knives
The Slot Canyon
Down below the bridges at Hanging Rock is a deep, serpentine defile known to the locals as Horse Thief Canyon. It's a classic Southwestern "slot" canyon, much narrower than it is wide; the kind often found worming back into the sandstone cliffs of Thunder Mesa country. This particular slot canyon is about 72 scale feet deep but only averages about 12' wide. A perfect hideout for horse thieves and rustlers - as long as it isn't flash flood season.
Slot Canyon near Page, AZ. This is kind of the look I'm after with Horse Thief Canyon.
Here I've made a start on Horse Thief Canyon itself, cutting, carving and shaping the bottom three layers. This bottom section will be brought to a high state of finish before I move on to the next three layers of depth. That way, I won't carve myself into a corner by not being able to reach the depths of the canyon for painting and details.
Each rock layer is cut to shape with a Woodland Scenics hot wire cutter, and then the exposed edges are carved into rocky textures using a variety of sanding bits in a Dremel Tool. The layers are then stacked and glued together using Loctite Power Grab Adhesive (see video below).
One more layer of foam added and some spackling to start blending things together. In my experience, common household spackle works just as well as Woodland Scenics foam putty. In fact, I strongly suspect it's the exact same thing - but at less than half the price. I'll let this dry overnight and then it will get a base coat of tan latex paint.
When complete, the canyon will seem to go on forever since it will be impossible to see the end due to built-in view blocks. At night, the flickering glow of an outlaw camp will be visible just around the bend.
To wrap things up for this installment, here's a step-by-step how-to video on my EPF cutting and carving techniques.
Thanks for tuning in, amigos. Next time up we'll do some painting and finishing of the rockwork in Horse Thief Canyon. Adios for now!
As 2015 draws to a close, it's only natural to look back at what was accomplished in the past year and to think about all that still needs to be done. The TMMC has come a long way this year, with the entire mainline now complete through the expansion areas, a more logical layout for the town, and scenic work well underway in Rainbow Caverns and Hanging Rock. Still, there's much yet to be done. So many projects in fact that at times it can be a little overwhelming and I start to wonder if maybe I haven't bitten off more than I can chew. Thunder Mesa isn't really a very big model railroad, but the high level of detail, scratchbuilt structures, animation and lighting effects means that progress can be rather slow at times. Still, my enthusiasm for the project remains high, and there are a number of projects that I'm looking forward to tackling in the new year.
So, without further ado, here's a look ahead at some of the TMMC's "unfinished business" that I'd like to get done in 2016.
Geyser Gulch
This lone, temporary trestle bent has been standing in for a real bridge over Geyser Gulch for longer than I care to admit. I've drawn up plans for the bridge, purchased materials, and even figured out a way to make "Old Unfaithful" geyser erupt in the background. I just need to make time to finally finish this signature scene.
Thunder Mesa Mill
Just to the right of Big Thunder Creek stands this paper mock-up of Thunder Mesa Mill, based loosely on the boarding area structure for Big Thunder Mountain at Disneyland. This is where all of the ore from the mines at Calico and Big Thunder Camp gets processed before being shipped out to the wider world. As such, it's pretty important to the economic lifeblood of the railroad. It's also a signature scene that really helps to establish the story of the railroad. Replacing this mock-up with a fully detailed, scratchbuilt structure is high on my list of priorities for the new year.
The Backdrop
Don't be fooled by the pretty photos I post, most of the walls around the TMMC layout are still embarrassingly bare. I've been using temporary backdrops for most photos and Photoshop composites for the really arty ones. But help is on the way. The above image is a low-res version of a digital painting I created that will be printed upon 3oz vinyl scrim and then affixed to the layout room walls. This will give me a seamless sky backdrop that wraps around three sides of the layout. Landscape features like distant buttes and mesas will then be painted on 1/8" hardboard and mounted between the 3-D layout scenery and the sky backdrop. This should make for some dramatic scenes that look like they go on forever.
Thunder Mesa Town
Hoo-boy, there's loads to do here. Other than the depot and Big Thunder Saloon, nearly everything in town is still in the paper model mock-up stage. As usual, I'll have to take it one structure at a time and finish what I can. It's highly doubtful that I'll get all those little building done in the coming year, but I would like to make a good start on the scenery and ground cover and then tackle as many of them as I can. We'll see what happens.
Turntable and Engine House
Well, at least the water tank is finished (but that might be moving to Hanging Rock). The current turntable here is unpowered and a hold-over from an earlier version of the railroad. I'd like to replace it this year with one of the fine A-frame TT's from Kitwood Hill Models. The engine house is planned as a white-plastered stone structure to harmonize with the adobe structures of nearby San Lorenzo. Time will tell if that plan pans out or I decide to go with something else. Obviously, the turntable approach track and engine house tracks are waiting for more permanent structures to be built. All of the track in this area needs paint, ballast and final detailing.
Rainbow Caverns and Big Thunder Camp
These two go together because one sits right on top of the other. I've made some good progress on the interior of Rainbow Caverns this year, but as you can see the exterior scenery is still far from finished. I'd like to finish the rest of the interior scenes this coming year and complete the rockwork cave openings on the exterior. As for Big Thunder Camp, it's planned as a major mining scene with several scratchbuilt structures. Sounds like a good candidate for my 2017 list. In 2016, I'll be happy to get the final track laid up there and all the wiring done for the lighting and animation to come.
Natural Arch Bridge
This is the connecting bit of scenery between Hanging Rock on the left and Rainbow Caverns on the right. It shouldn't take very long to finish up this scene once the branchline track to Big Thunder Camp is laid across the top of the bridge.
Hanging Rock
This scene is still a little less than half finished, mostly because the plans are not yet 100% firm in my mind. Olson & Furlow's place still needs LED lighting installed and a few more outlaw figures. A small depot made from an old combine car is planned for the near side of the tracks, while an ore tipple, shack and water tank will probably be against the cliffs on the other side. There's much more rockwork to be finished and a couple of tunnel portals to detail too. The tunnel interiors will be a project all their own.
Calico
Last but not least is the portable On18 Calico mini-layout that so far exists only in the planning stages. This almost qualifies as a substantial model railroad project all on its own and I could probably spend most of 2016 working on it and nothing else. The latest plan, shown above, is slightly simplified from the earlier figure eight scheme proposed. It hews a little closer to the Knott's Berry Farm inspiration now while promising to be easier to operate. My tests with N scale/On18 mechanisms told me that they didn't much like the 6% grade I had in mind before. This flat, simple loop now gives me room for an underground "Glory Hole" mining scene and some animated blasting on the other end. I have no illusions about finishing Calico in the coming year, but I would very much like to make a good start on it and at least get some On18 equipment running. Once again, time will tell.
To 2016 and Beyond
Once again I would like to give my sincere thanks to everyone who has been following along with my modeling efforts on the TMMC. You guys are the best and I'm just getting started. I wish each of you all the blessings of the season, a very merry Christmas and a happy, healthy and prosperous New Year. Feliz Navidad, amigos! Adios for now.
Once again the town of Thunder Mesa is getting a makeover. As other structure projects have gotten underway, I've been eyeing the town and seeing how everything works now that all mainline track has been completed. Turns out, I didn't really like where the depot had been located and one change lead to another until the entire town had been reconfigured.
As the layout has grown from it's original 3'x6' configuration, the little Town of Thunder Mesa has been moved and reshuffled again and again; most recently at about this time last year. As my overall vision for the TMMC has evolved, this very central piece of the puzzle has necessarily evolved right along with it.
On the original 3'x6' layout, the town was situated high up behind the mill
With the first layout expansion, the town was moved even higher up behind the new turntable. The road up to town was almost impossibly steep and I was never crazy about the sight lines this configuration offered.
In November of last year I began work on a new town module that could be built at the workbench and then installed on the layout. Once again I tried to keep the general look and feel of the town's inspiration, Disneyland's Rainbow Ridge, with the building stacked in rows facing the track. In the end I felt that, while this works fine for a theme park, it stretches credibility a little too much for what's supposed to be a real town.
Meanwhile, Thunder Mesa Depot and the Rainbow Desert Freight Lines still resided alongside the short spur where they were originally planted back in April. With a new passing siding added as part of the latest expansion, this location began to make less and less sense. Surely, the depot would have been built in the heart of town right along the mainline tracks, just as was done in countless frontier boomtowns throughout the West. Deciding at last to move the depot to a more logical spot is what lead to the latest redesign of Thunder Mesa town.
And here we are today with the depot rotated 180º and placed trackside in the heart of town. A low retaining wall will separate the depot area from the main street where the commercial building of Thunder Mesa will now curve around on a slight rise. Gone is the idea of building the entire town as one removable module. Now, each structure will be its own unit, just I had started to do with Big Thunder Saloon.
It makes so much more sense now for trains arriving in town to stop here in front of the depot instead of having to back into a siding.
Rainbow Desert Freight Lines has moved to a more logical location too, between the former depot spur and the main road into town.
The new location of Rainbow Desert Freight creates improved sight lines flowing into the main street of town.
As for the old depot spur, this will now be home to some stock pens and perhaps a livery stable.
With this new town configuration firmly established, I feel more comfortable diving into the scenery here and finishing up some of those other structures. I'm really looking forward to replacing all of those paper mock-ups once and for all. They've done their job in the planning stage but now it's time to move on. Breaking up the old depot scene was a little tough, but the lesson here is to never be so enamored with a scene that you are afraid to change it when a better idea comes along.
Thanks for checking in, amigos. I'm juggling a lot of projects right now and there should be much more fun stuff to come in the weeks and months ahead. Adios for now!
The scenery at Hanging Rock might only be half finished but that's not going to stop me from having a little fun with Photoshop! Creating images like this helps me to envision the story behind a scene.
Ready or not, here comes an end of the month update from Thunder Mesa! I haven't had much time for updates this month but scenery work has been progressing on the Hanging Rock section of the layout, and I'm nearly finished with the structure build for Olson & Furlow's Saloon. Even with several things half done, I wanted to share an update and video log on how things are coming along.
Hanging Rockwork
Rockwork and coloring has been completed in the little canyon nook where Olson & Furlow's will find its home. It still needs ground cover, vegetation and other details but here's a quick rundown on how the scene has come together so far.
The canyon walls and rocky ledges of Hanging Rock were built up with layers of 1" thick polystyrene foam insulation - the pink stuff from your local home center. Here the foam has been painted with my scenery base color to better help envision the final scene. There's also a view of the original paper mock-up of Olson & Furlow's, a structure that has evolved a lot from this plan during construction.
Once I was satisfied with the basic shapes, the foam was skinned with a layer of Sculptamold to further texture and define the rocky canyon walls. Sculptamold is a mixture of plaster and cellulose available from American Art Clay Co. at better stocked hobby and craft stores.
After the Sculptamold dries it's time for a coat of my scenery base color: Glidden "French Mustard" flat interior latex paint.
Then I darken the rocks with a spray of diluted black, letting it flow down into all of the cracks and crevices.
The final paint job is completed using artists' acrylics. The main colors used are Raw Sienna and Unbleached Titanium, with just a little Burnt Sienna and Burnt Umber here and there for variety. The colors are lightly dry-brushed on right out of the tube, catching the rough texture of the rocks and letting the under-color and darkened shadows show through. The wooden retaining wall is a hydrocal casting from Woodland Scenics.
Olson & Furlow's
The main structure in Hanging Rock is Olson & Furlow's Saloon and Store, an appropriately character filled establishment built as a tribute to two of may favorite model railroad authors of the past. I'll be writing much more about this scratch-built model for an upcoming column in Model Railroad Hobbyist Magazine so I don't want to give away too much here. Suffice to say that I wanted something with a lot of texture, charm and visual appeal to act as a focal point for the scene.
To show a long and storied history, I chose to design the structure with a Victorian wooden upper story built atop an older adobe base. Both the wooden walls and the adobe are modeled with illustration board. The base of the structure is 1/4" thick MDF, carved with a Dremel tool to simulate flagstone.
The colorful vintage signs and posters are a hint at the final super-detailing to come.
The old tarpaper roof on the store section has seen better days. The tarpaper was modeled using strips of 220 grit sandpaper painted flat black. The nail heads are tiny dabs of gray acrylic paint.
There's More on Facebook
I'm so humbled and flattered by those who choose to follow my efforts here on this site and also on social media. Thunder Mesa's Facebook page recently surpassed 500 likes and that's not bad for a quirky little hobby like this. If you like this site I hope you'll also come over and join the conversation on Facebook. There's a lot of new stuff posted there first, mostly about this model railroad, but also interesting stuff about the larger worlds of railroading, model building, themed design and Disney. Thank you.
That's all for this time, amigos. Thanks for checking in. Adios for now!