Here's Thunder Mesa's revised track plan showing all the changes that have been made. The town of Calico now plays an important role as one end of the railroad in operations. The addition of a reverse loop and short passing siding there now make it possible to operate the layout in a point-to-point fashion. The former village of San Lorenzo has now been incorporated into Thunder Mesa as the "Old Spanish" section of town. This change freed up the far right corner for a turntable and more accessible engine service area.
The improved track arrangement at Calico forced my plans for an On18 mini-layout to be shelved (again), but the On18 line does make an appearance as a point-to-point mining tram feeder between Big Thunder Mine and the ore bins at Calico. Lastly, the Lone Rock diorama now finds a permanent home on the layout. It's a non-operating scenic feature, but its position against the backdrop offers great sight-lines when looking across the aisle (now called "Coyote Canyon") from the McKennon Arch area.
April 2016 Video Log
Howdy Folks! So much has been happening out here in Thunder Mesa Country that it's hard to know where to begin. The right of way has been changed, towns have been moved, combined or added, and entire areas have been reimagined. On top of all that, a lot of real progress has been made bringing these changes to life with new scenery work and modeling at Horse Thief Canyon and the town of Thunder Mesa well underway. The best way to get caught up on things is with a new video log. After that, I'll delve more deeply into the details below.
Engine #9, the Admiral Fowler
Featured in the new video log is the TMMC's latest locomotive: #9, the Admiral Fowler. Like several of the other Thunder Mesa locomotives, it's an 0-4-2 Porter from Bachmann. I've dressed it up with a fancy cap stack and some custom decals from Stan Cedarleaf.
The "Niner" rounds the bend at Dinosaur Gap. The gold capped stack was made from some HO parts in my scrap box.
Continuing the Thunder Mesa tradition of naming locomotives after Disney Imagineers, animators and others who played a big role in Disneyland's development, the new Porter is named in honor of Admiral Joe Fowler. This was the man Walt Disney put in charge of Disneyland's construction, and who stayed on as general manager of the park for its first decade.
The Admiral Fowler has an unusual crew. The engineer is none other than local legend Chuckwalla Slim, and the fireman is his trusty dog, Sparky. Both figures were painted by my friend, the late Verne Niner, and the locomotive bears the number 9 in his honor. The TMMC has yet to acquire a #8.
Cattle Cars
The new track plan calls for some larger stock pens at Thunder Mesa and that means I'll need some livestock cars. The TMMC doesn't own any itself, but it does interchange with the parent Santa Fe, Denver & Carolwood and that line does run some cattle cars. To represent some of that interchange traffic, I've repainted and weathered a couple of old Bachmann cars for now.
Livestock car #59 belongs to the Mescal Lines Ry. Disney Imagineer and well known model railroad author John Olson built his HOn3 Mescal Lines in the early 1980s, and my TMMC owes a very large creative debt to that landmark model railroad.
Car 201 is lettered for the TMMC's parent road, the Santa Fe, Denver & Carolwood. The SFD&C is roughly based upon the Santa Fe & Disneyland Railroad so it seemed appropriate that their cattle cars should bear the same numbering as the original Retlaw 2 cars at Disneyland.
Out with the On18 "mini-layout" and in With a Reverse Loop at Calico
The plans for Calico have probably changed more than anything else on the layout. Earlier this year I decided to nix the idea for a mini On18 Calico layout in favor of a reverse loop and a mainline stop at the town of Calico itself. I concluded that the space could be much better used for a second town to act as the far end of the line from Thunder Mesa. This decision also meant that the steep grade up to Big Thunder Mine would have to go, and that the village of San Lorenzo could be incorporated into Thunder Mesa town as Verne Niner had once suggested. But don't despair On18 fans! If you take a close look at the plan above, you'll see that the old Big Thunder high-line will now be an On18 mining tram bringing ore to the bins at Calico.
Quick thumbnail sketch for the grade changes at Calico.
Out with the old...
...And in with the new.
The reverse loop is controlled by an MRC DCC auto reverse module hidden below decks.
San Lorenzo Merges With Thunder Mesa Town
Before his untimely passing late last year, Verne Niner and I discussed several different options for integrating his award winning San Lorenzo diorama into the layout. One thing he had suggested was making San Lorenzo the "Old Spanish" section of town. I immediately liked that idea since it implied a long and rich history for the town. It's something you see a lot in the older towns of the Desert Southwest, where Native American, Spanish, and Anglo cultures all come together and overlap. Still, I was hesitant to alter Verne's beautiful diorama until I came up with the new operating scheme placing Calico at one end of the line and Thunder Mesa at the other. Now there was no reason (or room) for a third town on the layout and I found myself thinking back to our early conversations. The decision made, I carefully disassembled the diorama, cataloging everything in pictures, and managed to save every last detail except for the bead-board foam base. In their new placement, the adobe structures have a somewhat different orientation, but their positions from left to right are the same. Several of the structures also have new foundations at differing heights to better compliment Thunder Mesa's boomtown aesthetic. Adding lighting to the structures was always on my to-do list and this move seemed a logical time to also move forward with that project.
The San Lorenzo structures in their new locations as the Old Spanish section of Thunder Mesa. Disneyphiles may also notice that this arrangement mimics the orientation of Rainbow Ridge to the early California flavored area of Zocalo Park at Disneyland (former location of Mineral Hall and Casa de Fritos). This is no accident and the fountain area here is now called "Zocalo Plaza."
LED lighting has been added to the jail.
The Mercantile has also received LED lighting, along with some new signage and a wooden front porch.
One more thing that remains intact from the original diorama is the Pricom Dreamplayer sound system. The mission bells ring, chickens cluck, horses whinny, and the angry banditos still threaten the pig bathing in the fountain. It's a wonderful scene, and I think fondly of Verne every time I look at it.
New Rockwork, boardwalks and Retaining Walls
With the San Lorenzo structures becoming part of Thunder Mesa, it seemed like a good time to tackle some of the scenery work around town too. The new rockwork that forms a backdrop for the town was built and finished with the same techniques I've been describing in the step-by-step build of Horse Thief Canyon. With the rock and paint work done, I've since moved on to building all of the retaining walls, board sidewalks, and steps through town.
The rockwork behind town was built up with carved layers of extruded polystyrene foam. The layers were then blended together with spackling compound and Sculptamold.
Once the sculpt is complete, the rocks are painted with latex and acrylic paints. Here I'm applying a wash of diluted black to darken the cracks and crevices.
After final paint and with a backdrop in place the scene starts to come together. This new promontory above town is called Castle Rock. Just below that is Injun Joe's Cave, where, as legend has it, lost Spanish gold is still waiting to be discovered.
Here's an overhead view of the new board sidewalks and retaining walls built in town.
And a view from the depot platform. The timber retaining walls help to separate the depot scene from the town beyond. One by one, each of the paper and cardstock mock-ups in town are being replaced by fully detailed models. It would be much more difficult to plan a scene like this without them. The Marshal's Office will likely be my next structure project.
A quiet night in Thunder Mesa Town. Soon, ground cover, weeds, and other details will be added to further enhance this scene.
Engine Service Area
With the San Lorenzo structures moved to the other side of the tracks, that freed up their former location for an expanded engine service area with much improved access. The centerpiece of this scene will be one of the excellent turntables from Kitwood Hill Models. I'll be building the 9" gallows turntable here, and when completed it will allow the layout to operated in a point-to-point scheme between Thunder Mesa and the reverse loop at Calico.
The new engine service area and an inset of the Kitwood Hills Model turntable. Can't wait to get started on this terrific kit!
Horse Thief Canyon
Meanwhile, progress also continues a-pace at Horse Thief Canyon. I'll continue to update the build of this scenic slot canyon in its own step-by-step series.
Horse Thief Canyon - nearly 75' deep below track level. The mainline will cross here on a classic deck-truss bridge.
Effects Control Panel
Each section of the layout will eventually have its own small panel for controlling lights, sound effects, music, and animation. The first such panel is now complete for the Thunder Mesa section.
This small panel was built into the layout fascia on the Thunder Mesa section. The panel face was created in Photoshop, printed on cardstock and laminated with a matte finish clear acrylic. This was then affixed to 1/8" thick masonite. The functions are controlled by simple SPST on/off switches, and a green LED indicates power. All of the effects on Thunder Mesa run on a 9 volt DC system.
Frontierland Music Loop
Every land at a Disney park has its very own soundtrack, usually a one hour music loop that helps to reinforce the land's theme and further immerse guests in the experience. I've always enjoyed the music played in Frontierland and thought it would be a kick to add it to the railroad. I put together my own extended loop that also includes music from the Big Thunder queue and Big Thunder Ranch (now gone!). The music is provided by an inexpensive MP3 player and piped in through speakers hidden under the layout.
What's Next
The first 3 months of 2016 have been a very busy time on the railroad but with each project completed I see three more that still need doing. Coming soon will be new structures for Thunder Mesa Town, ore bins for the On18 line in Calico, a build of my Kitwood Hill Models 9" gallows turntable (can't wait to get started on that one!), some new scenery and effects for Rainbow Caverns, a backdrop to install, and Horse Thief Canyon to finish. All that and more should keep me busy through the end of the year.
A look ahead at the future through the magic of Photoshop. This is the view standing in Coyote Canyon and looking toward Big Thunder Mine and Rainbow Caverns. Horse Thief Canyon is at left and Dinosaur Gap is on the right. The Indian Pueblos will be right about where the thunder storm is on the backdrop. I've also imagined some black drop curtains down below the fascia to give things a more finished look.
Though work on the layout has been steady, I haven't had the time to update this blog as often as in the past. Going forward, look for more long posts like this one to come out every few weeks or so, and for more frequent posts (sometimes several a day!), head on over to Facebook and follow the Thunder Mesa page there. As always, questions and comments are welcome below. Thanks for checking in, amigos. Adios for now!
Or Cabooses if you prefer. Today's post is all about painting, decaling, and weathering TMMC crummies #90 and #91.
#90 is a drover's caboose and sometimes takes the place of Combine #101, bringing up the rear of the Daily Mixed with passengers and mail. Freshly shopped caboose #91 often travels the branchline up to Big Thunder Camp.
Custom Decals
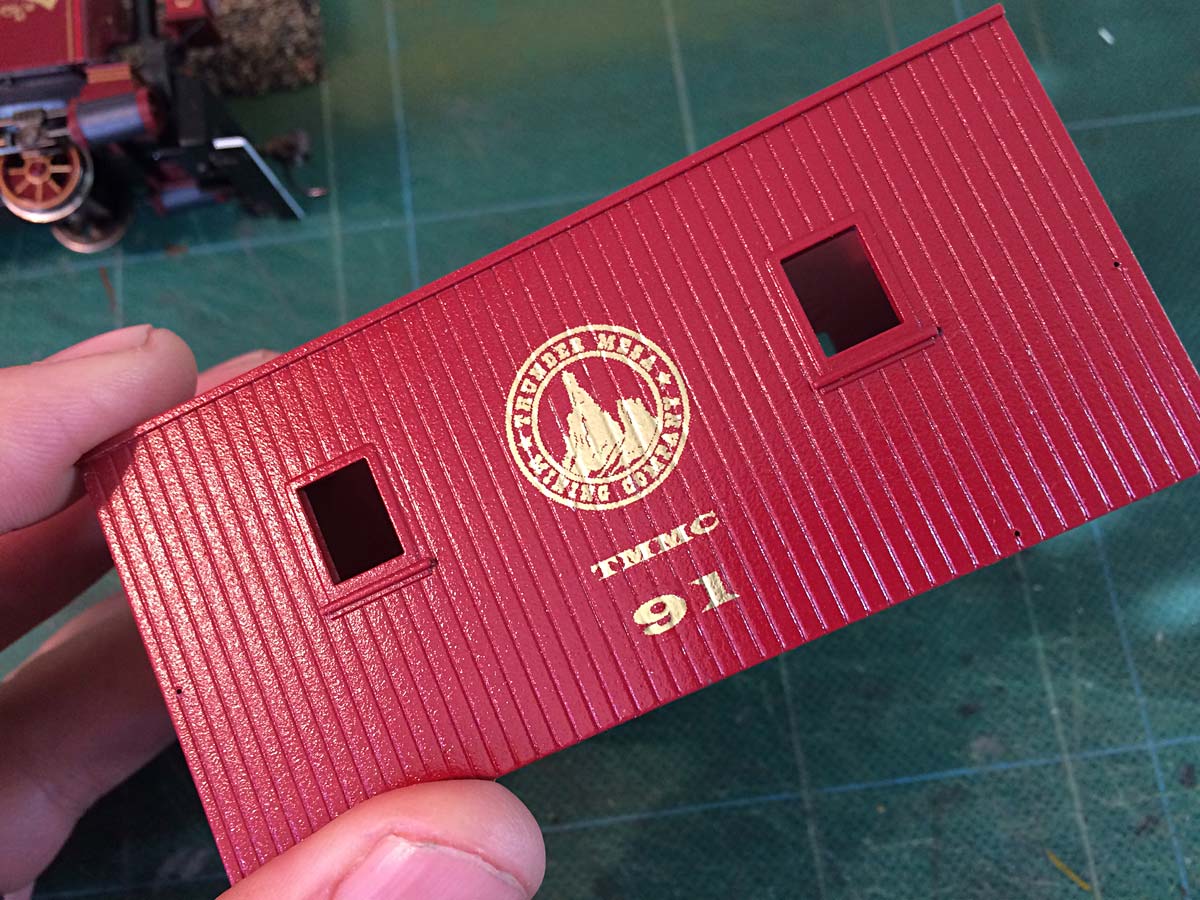
The Thunder Mesa Mining Company is a rather well-to-do little railroad that takes good care of their equipment. To reflect this, I've had some fancy gold decals printed by Cedarleaf Custom Decals. I supplied Stan Cedarleaf with camera-ready artwork and he printed up the water-slide decals on his ALPS printer. Stan also offers layout and design services for those who can't do their own.
A sheet of Thunder Mesa's custom gold water-slide decals.
I liked the Bachmann factory color scheme on the drover's caboose, so I applied the decals to it without further modifications. The red caboose started out as a Bachmann Colorado & Southern short caboose. I removed the original C&S decals with acetone, then disassembled, primed and repainted the caboose with a satin-finish spray enamel called Colonial Red. A smooth satin or gloss finish is always best for applying decals.
Applying Decals
There's nothing revolutionary about my decaling techniques, more like "tried-and-true." Getting things properly aligned can be the hardest part so I usually mark locations for decals very lightly in pencil before beginning. Some modelers prefer small scissors for cutting out decals, I usually use a sharp hobby knife. The trick is to cut as close to the edge of design as is practical, thereby eliminating as much of the decal film as you can.
I have all of the tools and materials ready before getting any decals wet. A dish of warm water with a couple drops of liquid detergent to improve flow, a soft brush, paper towels, tweezers, a hobby knife and decal setting solutions are a must. The Micro Set helps to stick the decal in place while the Micro Sol is used to soften the decal so it will snug down over details. Both are from Micro-Mark.
I pick up small decals by poking them with a hobby knife. Then I dunk them in the warm water for no more than 4 seconds - just enough time to loosen them from the backing paper and activate the adhesive. Then they are laid on a paper towel to soak up the excess water.
After wetting the decal, a little Micro Set is brushed onto the area where it will go. The decal is then positioned and very carefully slid off from the backing paper and on to the model. Sorry I couldn't get a picture of that step but it's really as straightforward as it sounds.
If the decal is not exactly where I want it, it can be repositioned with a soft brush or even a finger. Care must be taken though not to tear or wrinkle the decal. Yes, I've destroyed more than a couple this way and that's why I always have extras printed on a sheet. Once the decal is in position, I dab on a little Micro Sol to soften it and help it snug into the details. If too much is applied, I dab around the edges with a dry paper towel.
It's important to proceed slowly and carefully and not get in a hurry. When doing multiple decals like this, I let each one set up for about an hour before proceeding to the next. Then I let the whole thing dry overnight before tackling the other side. Yes, it can take awhile, but that's why I usually try and decal several models at the same time. That way, I can be working on one car while the other car is drying.
Reassembly
After decaling, the caboose was reassembled with new clear acrylic glazing for the windows and repairs made to the interior lighting that had not worked in some time.
Watercolor Weathering
Both cabooses were weathered using colored chalks, dry-brushed acrylics and watercolor washes. I wanted the yellow caboose to look as if it hasn't seen the inside of a shop in awhile - a little dirty and faded but still well maintained. The roof is weathered with chalks while the car sides got watercolor washes.
Watercolor weathering works particularly well on scribed walls. I mixed up a dark, warm-grey wash with Burnt Sienna and Ultramarine and then applied it generously to the car sides, letting it run and fill the scribe lines between boards. Once it was dry, I went back with a wet brush and washed most of it off, also dabbing here and there with a paper towel. The end result was a grimy look in the corners and crevices, much like this type of equipment gets in the real world.
The watercolor washes can be brushed on and washed off again and again to achieve the desired amount of weathering. Individual boards can be picked out with a wet brush and scrubbed "clean" here and there for a varied look as I did here on caboose #90.
I wanted caboose #91 to look as if it was recently shopped so I kept the weathering more subtle. I don't usually bother, but the chalks and watercolors can be fixed in place with a light spray of Testor's Dullcoat.
Final Thoughts
Both cabooses still need marker lights, figures and other details but they are complete enough to call them done for now. A magazine photo-shoot with a looming deadline was the impetus for getting off my keister and getting them finished and I'm glad that I did. Questions and comments are welcome below. Here's a final shot of caboose #90 from that shoot that wont be used for the magazine. Adios for now, amigos!
Engine #6, on a caboose hop near Lone Rock. I wonder what could be happening on the tracks up ahead to cause the train to stop here?
Inspired by the trains on Disneyland's Big Thunder Mountain Railroad, I created this plan for a 14' excursion car back in October of 2012. An online friend saw it and suggested he might have the perfect kit to use as a starting point.
The Wildest Ride in the Wilderness
The trains on Disneyland's Big Thunder Mountain Railroad attraction feature distinctive gold and brown cars that are meant to evoke ore gondolas of a bygone era. In reality though, they only remotely resemble any kind of equipment used on a real railroad. Since, in the world of Thunder Mesa, my railroad existed first and helped to inspire the attraction, it makes sense that the TMMC would have a short string of excursion cars converted from old ore gons. The challenge was creating something that could act as a believable "prototype" for the Big Thunder trains.
Canadian modeler Heath Trollope graciously asked me to review a kit for a 14' On30 flatcar that he plans on producing, suggesting at the time that it might be just the thing for the Thunder Mesa excursion cars I had talked about building. Since my original plan had been to cut down Bachmann flatcars for the job, I readily accepted the offer. Mostly because, A) I love getting free stuff, and B) I knew Heath would produce a quality kit that might be perfect for my needs. Below is a distilled version of how it went together. My full review and build thread can be viewed on the Railroad Line Forums.
My sample kit consisted of a two-sided sheet of instructions, white resin castings for the under frame, some scale 2x8 decking, and a short length of music wire for the truss rods. Trucks and couplers are not included so I picked up some Kadee HO #501 trucks and #5 couplers as the instructions indicated.
After a couple evenings of enjoyable assembly here is the completed kit just before trucks and couplers were added. The resin castings are very well done and nicely detailed. I stained the decking boards with a rubbing alcohol and shoe dye mixture.
The completed car ready to go to work on the railroad. All in all this is a great little kit that could be the starting point for a wide variety of funky little cars; gondolas, tank cars, pulpwood buggies, even a boxcar or caboose. I don't have sales information on the cars yet, but when I do I'll post a link here on the blog for anyone who might be interested in building a few for themselves.
From Flatcar to Excursion Car
Heath was right of course, and his great little kit was the perfect starting point for my long delayed excursion train project. I've built one car thus far as a prototype and plan to add four more in the not too distant future now that the bugs have been worked out. My plan above shows two different styles of car, a basic and a deluxe model with a shade canopy and seats facing both forward and back. Though the basic car more closely resembles the Big Thunder trains, I decided to build a car with the deluxe seating pattern, sans canopy, since it makes more sense for the point to point operation I have planned. Still, I tried to capture the flavor of the Big Thunder cars and I hope there is enough of a family resemblance there that folks will understand what I'm getting at.
Once again I turned to printed photo-textures for the car sides and benches. I took some careful measurements of the completed flatcar and then laid out all of the interior and exterior pieces I would need in Adobe Photoshop. These were printed out on HP Premium Presentation Paper and then laminated to smooth 100 lb bristol board with 3M 45 All Purpose Spray Adhesive.
Each bench/bunker was created as a separate sub-assembly. Here are the pieces for the center benches with the exterior and interior walls glued back to back and the edges painted a matching color.
The assembled center benches before trim was added. The benches are reinforced underneath with 1/16" square strip wood.
The completed center bench assembly ready to be installed on the flatcar. The trim pieces are scale 4x6" stock painted with acrylics. Music wire grab irons and Grandt Line nut/bolt/washer castings round out the details.
Two of the bench/bunker sub-assemblies cemented to the flatcar deck. The color scheme and diagonal bracing are direct references to the Big Thunder cars.
The completed car ready to go to work on the layout. Final details include safety chains and steps made from leftover 2x8 stock from the flatcar. A little dry-brushing with acrylics helps bring out the cast-in detail on the car frame and a light dusting with colored chalks adds a needed dose of weathering. During construction, the flatcar developed a slight bow in the middle. It bothered me at first but now I kind of like it.
Each excursion car can hold up to 12 O scale people. These folks look a little pale and could use a paint job.
All Thunder Mesa passenger equipment is numbered in the 100 series, starting with Combine 101. These excursion cars will be 107 - 111. Now it's back to the car shop to build four more!
Okay! That about wraps it up for this week's project. Thanks for following along. And very special thanks to Heath Trollope for getting me rolling with his excellent flatcar kit! As always, questions and comments are welcome. Thanks for checking in, folks. Adios for now!