Friday, February 28, 2014

Building Big Thunder Saloon: Part II

Click here for part I of this series.

Testing out the flickering LED "lanterns" on my Big Thunder Saloon. 


In this installment I'll show how the foundation and front porch were built, detail my techniques for creating realistic log walls, and share a couple tricks for making painted windows and hanging lanterns. Here we go!

A Strong Foundation


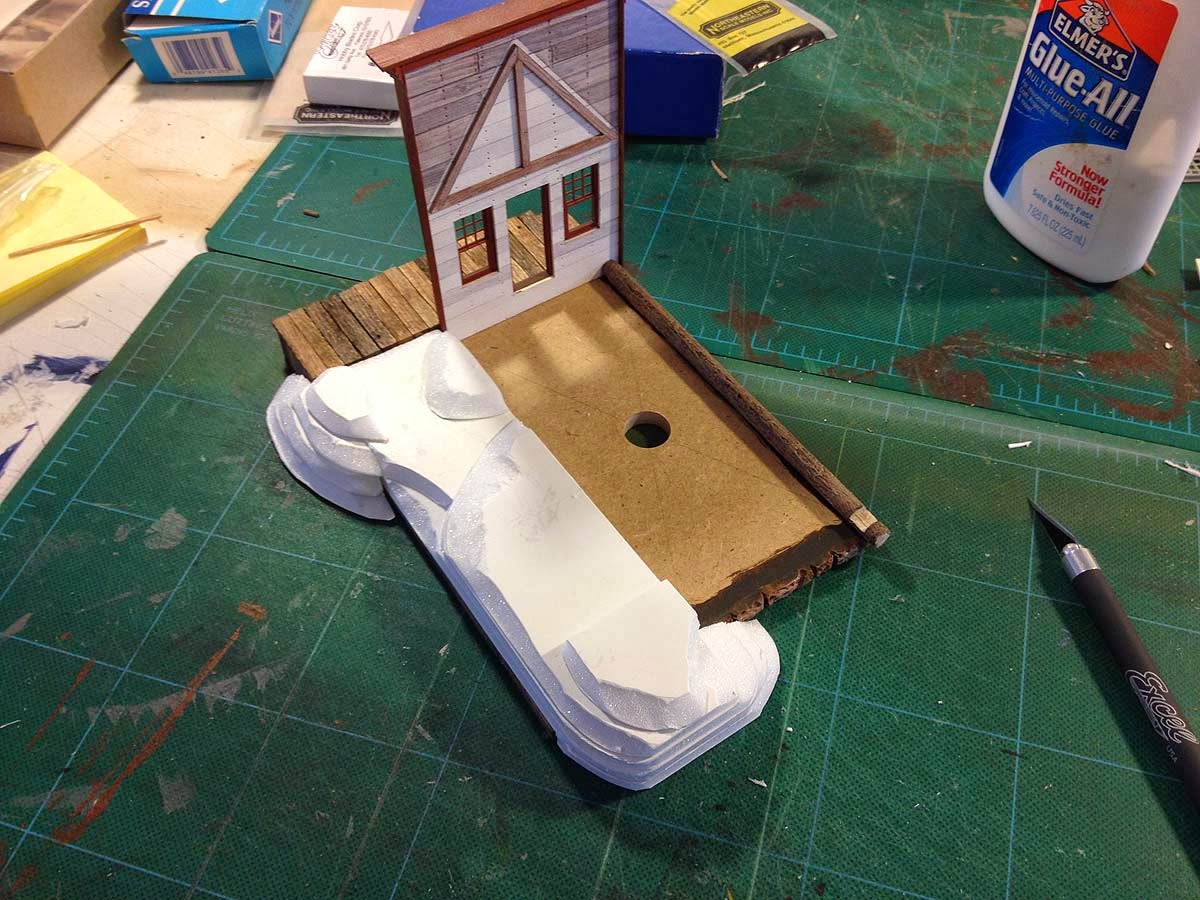
With the facade nearly complete it was time to move on to the foundation. Just like on the depot project, I'm using 1/4" mdf. It makes a nice, sturdy base and can be carved to represent wood, stone or whatever. The saloon is built into a hillside so I cut a piece a little larger than the actual structure so that part of it can also serve as the base for some rocky scenery on the right side. The left edge I carved with a Dremel and hobby knife to resemble a cut stone foundation. The whole in the center is for wiring that will be hidden below the floor. 

I painted the foundation with acrylics using the same techniques and colors I use for rock-work on the layout ( it stands to reason that the foundation would be local sandstone). After that, I started on the front boardwalk and steps. I cut simple risers out of illustration board and then clad the whole thing in strip-wood and coffee stir sticks stained with Minwax Early American and Dark Walnut. 

The completed front porch and faux stone foundation.

I built up the rocky hillside with layers of 1/4" thick Foamcore.

When happy with the shape of things, I slathered the Foamcore with Patch & Paint spackle, sculpting some simple rock forms here and there as I went. This is almost exactly how I build terrain on the layout, just in miniature.

Once dry,  the spackle was painted with artist's acrylics, primarily Burnt Umber, Raw Sienna and Unbleached Titanium. A dusting with rust and brown chalks tones down the colors and helps to blend everything together. The empty brown square will be the location of a side porch.


A Technique for Making Log Walls

The side and back walls of Big Thunder Saloon are rough-hewn logs. I chose to simulate this using 1/4" round hardwood dowels and a fairly simple painting and texturing technique. Since the dowels are a uniform width, it takes the guess work out of building. Each log represents 12 scale inches of height, making it relatively easy to figure out how many are needed.

The first thing to figure out is what kind of logs are being represented. Even though the TMMC exists in the desert, the higher elevations would be forested with Ponderosa pine. It makes sense that anyone building a log structure would use those. 

I used Liquitex Modeling Paste to simulate the craggy bark of Ponderosa Pines. Acrylic modeling paste is basically very thick matte medium and is available from most art suppliers and craft stores. 

The modeling paste was applied to each log with a soft brush, brushing lengthwise with the dowel to simulate layers of bark. The modeling paste can be diluted a bit with matte medium, but it works best to keep the mixture thick to simulate rough bark.

Once the modeling paste was dry, I notched one end to receive another log by cutting halfway down with a razor saw and carving the middle out with a hobby knife. 

Then each log is painted with very dark brown acrylics,  Raw Umber in this case.

Once the brown dries, successively lighter colors are dry-brushed over the high spots, leaving the cracks and crevices dark. I used Burnt Sienna, Raw Sienna and Unbleached Titanium (a tannish white). 

Finally, the "cut" areas of the log are touched up with Unbleached Titanium and Raw Sienna, a good match for raw wood.  The completed structure will require 27 logs like this.

Each layer or course of logs is a custom fit. However I did create a simple jig to ensure the notches would line up and be a uniform depth from log to to log. The strip of masking tape on the razor saw shows how deep to notch each log.

Log structures of this kind had mud, adobe or plaster chinking between the logs to insulate and fill gaps and the prototype displays this feature. I thinned down some modeling paste with matte medium and added a couple drops of Raw Umber to create the chinking material for my structure. When dry it also creates a very strong bond.

I loaded a syringe with the paste mixture and applied it like a bead of caulk to the top of each each course of logs.

The next layer is then pressed into place causing the paste to ooze out a little on each side, simulating the chinking.

Here are the first four courses of logs in place. The white card-stock structure is a hidden back-room holding the speaker, wiring and electronics for the sound and lighting effects. More on that in the next update.


Lanterns and Painted Windows

Disneyland's Big Thunder Saloon has a pair of flickering lanterns flanking either side of the doorway and fancy signs painted on the glass windows. I wanted to recreate both of these details on my model.

I used Avery #18660 Clear Address Labels for the painted windows, creating and then reversing the lettering in Adobe Photoshop. The labels were printed out on a Brother inkjet printer.

After printing, the labels were affixed to the back of clear acrylic glassing which was then cut to the proper size to fit the Grandt Line window castings. Reversing the signs allows them to be viewed through the shiny side of the "glass."

And here they are cemented into place behind the window castings. The butterfly saloon doors were built up with layers of printed textures from a photo of actual saloon doors.

For the lanterns I chose a pair of 2.5mm yellow flickering LEDs like the ones used in battery powered candles. The bulbs were sanded flat on the ends and the diodes bent back at a 90ยบ angle. Everything except the top lip of each bulb and the lower portion of each diode was covered with masking tape. They were then sprayed flat black.

After painting, the masking was removed and the round nub from a Lego was ACC'd to the flattened bulb end. This gave me my lanterns.

Small holes were drilled through the facade to accept the diodes and they were pressed into place. I'll show how the lights were wired and spend some time on the rest of the electronics in the next update.


Well, that should about do it for this update. Thanks for following along!

And speaking of following along, I see we've picked up several new members recently and y'all couldn't be more welcome! Just a reminder, if you enjoy step-by-step articles like the post above you might want to go check out the Railroad Line Forums if you're not already a member. I maintain an active thread on Thunder Mesa in the On30 forum where you can see more daily progress. It is also home to some of the finest modelers in the hobby and I learn something new from them just about every time I log on. Great folks and well worth a visit.

Adios for now!

Click here for part III of this series.

Monday, February 17, 2014

Building Big Thunder Saloon: Part I

Big Thunder Saloon is one of the slightly less than full-scale structures making up a mining boom-town on the Big Thunder Mountain Railroad attraction at Disneyland in California. Like the other structures, the saloon was once part of the town of Rainbow Ridge on the original Mine Train Thru Nature's Wonderland. I'll be doing my best to recreate many of these structures in O scale for the TMMC.


Creating a Plan

As I don't have ready access to original blueprints in the Disney archives, I had to create my own plan for Big Thunder Saloon. I used photos from the park and known dimensions of things like doors and board widths to make educated guesses about the size and shape of the structure. For example, the false front of the structure is board and batten. That usually means 12" wide boards with 1" x 2" battens. Knowing this makes it easy to guesstimate the width of the structure. Certain things like the depth of the building could only be guessed at, but, as usual, my goal was not to make an exact copy, but rather a handsome model that captures the look and feel of the original.

My plan for Big Thunder Saloon was created in Adobe Illustrator. As usual, I altered things a bit during construction, mostly by adding about 2 more inches (8 scales feet) to the depth of the structure. It was a little hard to believe how "Poker, Billiards, Entertainment and Dancing" could all take place in a structure this small! A PDF of this plan can be downloaded for free here.


The plan was created some years ago for an earlier version of the TMMC. This paper mock-up was built from the plan and has acted as a placeholder for the saloon ever since. It's high time to replace it with an actual structure.


Photo-Texture Modeling

One big challenge in creating a structure like this is replicating the fancy Victorian era sign painting on the facade. Trying to hand paint something like this on a wooden or styrene structure often ends in mixed results at best, even for someone with an artistic bent and steady hands. My solution was to to turn once again to Photo-texture modeling. This is a technique I've used before with good success on things like my Combine 101 project. The technique uses hi-res photographic textures of wood, metal or stone surfaces, composited with text and building details in a photo editing program like Adobe Photoshop. The composited image is then printed out on heavy paper and used as the actual building materials or walls of a structure. When properly layered and finished with 3-D details like door and window castings, the photo-textures can create a very convincing, eye-fooling illusion of reality. A great many hi-res textures are available for free download at sites like www.cgtextures.com.

Follow along with the photos and captions below to see how printed paper can become a convincing model. 

Here is the photo of painted wooden planks that was used as a starting point for the facade of my saloon. The photo was resized, color-corrected and cut and pasted to the correct dimensions in Adobe Photoshop.


Here the photo-textures have been composited into the original plan with the text layered on top. Some pieces like the "Poker and Billiards" sign have been separated out for ease of construction. Battens were created for the board and batten siding by cutting and pasting a single plank repeatedly across the facade, adjusting shade and saturation on each for variety and visual interest. The lettering was faded into the wood texture using transparency and subtle blur effects. The gray areas will be cut out for Grandt Line door and window castings.


Two copies of the facade were printed out full size on 32 lb HP Premium Presentation Paper using an Epson R1800 inkjet printer. 3M 45 General Purpose spray adhesive was used to coat the back of one printout and that was laminated to 1/16" thick Strathmore illustration board. This results in a wall about 3 scale inches thick. The facade, door and window openings and rear roof peak were cut out with a sharp #11 hobby knife and modified Grandt Line castings were popped in to check the fit.


Using the same technique, the second copy was laminated to a thinner sheet of 100 lb Bristol Board and each batten was cut from this sheet, resulting in battens about 1 scale inch deep. The door and window assembly was built up with illustration board and castings, then primed and painted a dark brown with artist's acrylics. All of this was glued in place and then the battens were cut to length and glued in place around it.

An interior wall was cut from 1/16" thick illustration board with door and window openings to match the facade. Wood grain was simulated by dragging a fine-toothed razor saw blade over the illustration board and then individual 12" wide boards were scribed into the surface with a hobby knife. The boards were stained with a very thin 50:50 mixture of Burnt Sienna and Ultramarine Blue artist's acrylics. Individual boards were picked out for extra weathering, especially those that will show above the roof line, and then nail holes were added with the tip of a hard HB pencil. The interior wall was then laminated to the back of the facade using 3M 45 General Purpose spray adhesive resulting in a wall that's a prototypical 6 scale inches thick.


Corner trim and the fancy cornice were built up using dimensional strip wood, painted with an orange-brown mixture of artist's acrylics. Buff Titanium (a very light tan) was dry-brushed over all the wooden and plastic parts to age them and highlight details. No further weathering is needed or recommended on the printed textures since it tends to obscure rather than enhance the printed detail.


Finally, rafters were added to the interior wall to support a removable roof. The rafters are not wood, but textured and painted illustration board.


With the battens and other 3-D details in place the illusion is complete. Here the advantages of photo-texture modeling become clear. It would be extremely difficult to create the look of perfect lettering painted over the board and batten surface using any other technique that I know of.


That's about all for this time. In the next installment of this build I'll detail construction of the building foundations and show a quick and easy way to make realistic looking log walls from wooden dowels. Adios for now!

Click here for part II of this series.

Wednesday, February 12, 2014

Jumping into Rainbow Caverns

"Now we're going deep into the earth to view the dazzlin' Rainbow Caverns! You'll see giant stalagmites, stalactites 'n colorful falls on every side..." 

- Recorded narration from Disneyland's Mine Train Thru Nature's Wonderland.


Let's Go Spelunking!

After a couple months away from working on the TMMC I figured it was high time to jump back in with both feet and get started on a major project again. Some version of Rainbow Caverns has been integral to the idea of Thunder Mesa ever since I first happened on the idea of freelancing a Disney-esque railroad. Until recently the Caverns have been an empty foam box that trains travel through, but now I aim to remedy that with scenery, animation, sound and lighting effects; creating a colorful underground world seldom seen on a model railroad. I won't try to recreate the Disneyland version scene by scene. Instead I'm going for something more like an homage that captures the feel of the original, along with a little of Knott's Calico Mine Train salted in for good measure.

Geyser Grotto in Rainbow Caverns on the Mine Train Thru Nature's Wonderland, Disneyland USA. © Disney


Cavern scene on the Calico Mine Train, Knott's Berry Farm, USA.


Planning the Caverns 

Rainbow Caverns will be constructed as two separate scenes, each one executed like a small diorama. The first scene will be on the original section of layout almost directly beneath the town of Thunder Mesa. A second, larger scene will be built beneath the Calico Section once track has been laid through that part of the expansion. Since the track and most of the infrastructure is already in place for the first scene, I'll be starting there.


The area for Scene 1 currently has the exterior scenery roughed in with pink foam and the interior painted flat black. The scene will be viewed through cave like openings in the cliff wall and a large hunk of this wall can be removed for access.


Scene 1 of Rainbow Caverns will be viewed through these cave openings in the cliff face.


Here a removable section of scenery has been placed to one side to enable work on the interior of the caverns.

A Backdrop for the Diorama

Scene 1 will be a classic "wet cave" with rushing waterfalls and a large chamber filled with stalagmites and stalactites. In addition to lighting and sound effects, one of the most important elements for making this shadow-box like diorama work will be a convincing backdrop. Since I'll literally be working "inside the box" in rather close quarters, it just makes sense to paint and install this internal backdrop before any more work is done.

I created my Rainbow Caverns backdrop on a 5" x 15" piece of  Strathmore illustration board. Working from the darkest shades to the lightest, I painted the cavern scene with artist's acrylics, using photos from Disneyland, Knott's and real world caverns for reference.


The completed Rainbow Caverns backdrop ready to be installed on its shadow-box diorama. The colors are intentionally over the top, nearly florescent, in order to show up well in the dim cave. They don't call 'em Rainbow Caverns for nothing!

And here is the scene with the backdrop in place. It's a little difficult to photograph without any lighting installed yet so I composited a couple of pictures in Photoshop to illustrate how it looks in person. The next step will be constructing some 3-D cavern scenery to blend with the backdrop. Just in front of the locomotive in this shot will be a ceiling to floor waterfall, animated by fiber optics lights.

Several LEDs will be used to light the interior of the Caverns, including some ultraviolet lights. A hidden speaker will provide the sounds of running and splashing water.


On Down the Line

With the all important backdrop painted I can proceed with building the rest of the scene. Next will come some unusual subterranean rock formations carved from polystyrene foam and painted to blend with the backdrop. Then I'll try and tackle an animated waterfall with twinkling fiber optics. Should be fun!

Thanks for checking in. Adios for now!

Tuesday, February 4, 2014

A Backdrop for the N Scale Pagosa & Southern


Greetings from N scale Colorado! A backdrop sure does help set the scene.


With the benchwork finished and the Kato Unitrack in place, the next project I wanted to tackle on the P&S was the backdrop. It's much easier to install a backdrop at this stage and having one in place early on really helps set the stage for the scenery to come.

For this project I designed my own backdrop in Adobe Photoshop, blending together several photos taken on trips to southwestern Colorado. Sharp eyed rail fans might be able to pick out a few well known narrow gauge landmarks like Red Mountain, Animas Forks and Lizard Head Pass.

This is the complete backdrop created for the P&S. It measures 15" x 90" and curves around two sides of the layout.

Once the design was complete, I sent the digital file off to be printed by a commercial firm that specializes in banners for trade shows and point of sale. It was printed on 13oz vinyl scrim making it waterproof and durable; important considerations with the scenery as yet unbuilt. Turnaround was fast, and the entire cost was much less than commercially available backdrops.

An even coat of 3M General Purpose 45 spray adhesive was applied to the plywood backdrop supports. Brown kraft paper was taped down over the layout and over anything else that I didn't want coated with glue.


With the glue nice and tacky, I rolled out the backdrop, lining up the top edge with the top of the backing board. Rolling out about a foot at a time, I used a brayer to insure good adhesion and to work out any air bubbles.


The backdrop was designed 2" shorter than the backing board. This causes a nice, natural curve or cove in the backdrop when glued into place. No further support for the curve is necessary. 

Getting the entire backdrop installed took a little less than an hour. (In fact, it has taken longer to write this post about it than to actually do it!) I'm really happy to have this done because it already adds so much to the railroad.

Starting on Some Scenery

While I was waiting for the backdrop to arrive from the printer, I went ahead and started roughing in the scenery around what will become Wolf Creek Canyon.

Soon a high country stream will cascade through this canyon. The scenery forms are carved pink Polystyrene foam insulation. The section of Unitrack over the gorge will be replaced with a scratch-built trestle.

Well, that's about it from N scale Colorado! Thanks for checking in. More progress across the aisle in On30 Thunder Mesa Country coming real soon. Adios for now!
Related Posts Plugin for WordPress, Blogger...