Showing posts with label paper models. Show all posts

Wednesday, December 16, 2015

Unfinished Business

As 2015 draws to a close, it's only natural to look back at what was accomplished in the past year and to think about all that still needs to be done. The TMMC has come a long way this year, with the entire mainline now complete through the expansion areas, a more logical layout for the town, and scenic work well underway in Rainbow Caverns and Hanging Rock. Still, there's much yet to be done. So many projects in fact that at times it can be a little overwhelming and I start to wonder if maybe I haven't bitten off more than I can chew. Thunder Mesa isn't really a very big model railroad, but the high level of detail, scratchbuilt structures, animation and lighting effects means that progress can be rather slow at times. Still, my enthusiasm for the project remains high, and there are a number of projects that I'm looking forward to tackling in the new year.

So, without further ado, here's a look ahead at some of the TMMC's "unfinished business" that I'd like to get done in 2016.

Geyser Gulch

This lone, temporary trestle bent has been standing in for a real bridge over Geyser Gulch for longer than I care to admit. I've drawn up plans for the bridge, purchased materials, and even figured out a way to make "Old Unfaithful" geyser erupt in the background. I just need to make time to finally finish this signature scene.

Thunder Mesa Mill

Just to the right of Big Thunder Creek stands this paper mock-up of Thunder Mesa Mill, based loosely on the boarding area structure for Big Thunder Mountain at Disneyland. This is where all of the ore from the mines at Calico and Big Thunder Camp gets processed before being shipped out to the wider world. As such, it's pretty important to the economic lifeblood of the railroad. It's also a signature scene that really helps to establish the story of the railroad. Replacing this mock-up with a fully detailed, scratchbuilt structure is high on my list of priorities for the new year.

The Backdrop

Don't be fooled by the pretty photos I post, most of the walls around the TMMC layout are still embarrassingly bare. I've been using temporary backdrops for most photos and Photoshop composites for the really arty ones. But help is on the way. The above image is a low-res version of a digital painting I created that will be printed upon 3oz vinyl scrim and then affixed to the layout room walls. This will give me a seamless sky backdrop that wraps around three sides of the layout. Landscape features like distant buttes and mesas will then be painted on 1/8" hardboard and mounted between the 3-D layout scenery and the sky backdrop. This should make for some dramatic scenes that look like they go on forever.

Thunder Mesa Town

Hoo-boy, there's loads to do here. Other than the depot and Big Thunder Saloon, nearly everything in town is still in the paper model mock-up stage. As usual, I'll have to take it one structure at a time and finish what I can. It's highly doubtful that I'll get all those little building done in the coming year, but I would like to make a good start on the scenery and ground cover and then tackle as many of them as I can. We'll see what happens.


Turntable and Engine House

Well, at least the water tank is finished (but that might be moving to Hanging Rock). The current turntable here is unpowered and a hold-over from an earlier version of the railroad. I'd like to replace it this year with one of the fine A-frame TT's from Kitwood Hill Models. The engine house is planned as a white-plastered stone structure to harmonize with the adobe structures of nearby San Lorenzo. Time will tell if that plan pans out or I decide to go with something else. Obviously, the turntable approach track and engine house tracks are waiting for more permanent structures to be built. All of the track in this area needs paint, ballast and final detailing.

Rainbow Caverns and Big Thunder Camp

These two go together because one sits right on top of the other. I've made some good progress on the interior of Rainbow Caverns this year, but as you can see the exterior scenery is still far from finished. I'd like to finish the rest of the interior scenes this coming year and complete the rockwork cave openings on the exterior. As for Big Thunder Camp, it's planned as a major mining scene with several scratchbuilt structures. Sounds like a good candidate for my 2017 list. In 2016, I'll be happy to get the final track laid up there and all the wiring done for the lighting and animation to come.

Natural Arch Bridge

This is the connecting bit of scenery between Hanging Rock on the left and Rainbow Caverns on the right. It shouldn't take very long to finish up this scene once the branchline track to Big Thunder Camp is laid across the top of the bridge.

Hanging Rock

This scene is still a little less than half finished, mostly because the plans are not yet 100% firm in my mind. Olson & Furlow's place still needs LED lighting installed and a few more outlaw figures. A small depot made from an old combine car is planned for the near side of the tracks, while an ore tipple, shack and water tank will probably be against the cliffs on the other side. There's much more rockwork to be finished and a couple of tunnel portals to detail too. The tunnel interiors will be a project all their own.

Calico

Last but not least is the portable On18 Calico mini-layout that so far exists only in the planning stages. This almost qualifies as a substantial model railroad project all on its own and I could probably spend most of 2016 working on it and nothing else. The latest plan, shown above, is slightly simplified from the earlier figure eight scheme proposed. It hews a little closer to the Knott's Berry Farm inspiration now while promising to be easier to operate. My tests with N scale/On18 mechanisms told me that they didn't much like the 6% grade I had in mind before. This flat, simple loop now gives me room for an underground "Glory Hole" mining scene and some animated blasting on the other end. I have no illusions about finishing Calico in the coming year, but I would very much like to make a good start on it and at least get some On18 equipment running. Once again, time will tell.

To 2016 and Beyond

Once again I would like to give my sincere thanks to everyone who has been following along with my modeling efforts on the TMMC. You guys are the best and I'm just getting started. I wish each of you all the blessings of the season, a very merry Christmas and a happy, healthy and prosperous New Year. Feliz Navidad, amigos! Adios for now.

Monday, February 17, 2014

Building Big Thunder Saloon: Part I

Big Thunder Saloon is one of the slightly less than full-scale structures making up a mining boom-town on the Big Thunder Mountain Railroad attraction at Disneyland in California. Like the other structures, the saloon was once part of the town of Rainbow Ridge on the original Mine Train Thru Nature's Wonderland. I'll be doing my best to recreate many of these structures in O scale for the TMMC.


Creating a Plan

As I don't have ready access to original blueprints in the Disney archives, I had to create my own plan for Big Thunder Saloon. I used photos from the park and known dimensions of things like doors and board widths to make educated guesses about the size and shape of the structure. For example, the false front of the structure is board and batten. That usually means 12" wide boards with 1" x 2" battens. Knowing this makes it easy to guesstimate the width of the structure. Certain things like the depth of the building could only be guessed at, but, as usual, my goal was not to make an exact copy, but rather a handsome model that captures the look and feel of the original.

My plan for Big Thunder Saloon was created in Adobe Illustrator. As usual, I altered things a bit during construction, mostly by adding about 2 more inches (8 scales feet) to the depth of the structure. It was a little hard to believe how "Poker, Billiards, Entertainment and Dancing" could all take place in a structure this small! A PDF of this plan can be downloaded for free here.


The plan was created some years ago for an earlier version of the TMMC. This paper mock-up was built from the plan and has acted as a placeholder for the saloon ever since. It's high time to replace it with an actual structure.


Photo-Texture Modeling

One big challenge in creating a structure like this is replicating the fancy Victorian era sign painting on the facade. Trying to hand paint something like this on a wooden or styrene structure often ends in mixed results at best, even for someone with an artistic bent and steady hands. My solution was to to turn once again to Photo-texture modeling. This is a technique I've used before with good success on things like my Combine 101 project. The technique uses hi-res photographic textures of wood, metal or stone surfaces, composited with text and building details in a photo editing program like Adobe Photoshop. The composited image is then printed out on heavy paper and used as the actual building materials or walls of a structure. When properly layered and finished with 3-D details like door and window castings, the photo-textures can create a very convincing, eye-fooling illusion of reality. A great many hi-res textures are available for free download at sites like www.cgtextures.com.

Follow along with the photos and captions below to see how printed paper can become a convincing model. 

Here is the photo of painted wooden planks that was used as a starting point for the facade of my saloon. The photo was resized, color-corrected and cut and pasted to the correct dimensions in Adobe Photoshop.


Here the photo-textures have been composited into the original plan with the text layered on top. Some pieces like the "Poker and Billiards" sign have been separated out for ease of construction. Battens were created for the board and batten siding by cutting and pasting a single plank repeatedly across the facade, adjusting shade and saturation on each for variety and visual interest. The lettering was faded into the wood texture using transparency and subtle blur effects. The gray areas will be cut out for Grandt Line door and window castings.


Two copies of the facade were printed out full size on 32 lb HP Premium Presentation Paper using an Epson R1800 inkjet printer. 3M 45 General Purpose spray adhesive was used to coat the back of one printout and that was laminated to 1/16" thick Strathmore illustration board. This results in a wall about 3 scale inches thick. The facade, door and window openings and rear roof peak were cut out with a sharp #11 hobby knife and modified Grandt Line castings were popped in to check the fit.


Using the same technique, the second copy was laminated to a thinner sheet of 100 lb Bristol Board and each batten was cut from this sheet, resulting in battens about 1 scale inch deep. The door and window assembly was built up with illustration board and castings, then primed and painted a dark brown with artist's acrylics. All of this was glued in place and then the battens were cut to length and glued in place around it.

An interior wall was cut from 1/16" thick illustration board with door and window openings to match the facade. Wood grain was simulated by dragging a fine-toothed razor saw blade over the illustration board and then individual 12" wide boards were scribed into the surface with a hobby knife. The boards were stained with a very thin 50:50 mixture of Burnt Sienna and Ultramarine Blue artist's acrylics. Individual boards were picked out for extra weathering, especially those that will show above the roof line, and then nail holes were added with the tip of a hard HB pencil. The interior wall was then laminated to the back of the facade using 3M 45 General Purpose spray adhesive resulting in a wall that's a prototypical 6 scale inches thick.


Corner trim and the fancy cornice were built up using dimensional strip wood, painted with an orange-brown mixture of artist's acrylics. Buff Titanium (a very light tan) was dry-brushed over all the wooden and plastic parts to age them and highlight details. No further weathering is needed or recommended on the printed textures since it tends to obscure rather than enhance the printed detail.


Finally, rafters were added to the interior wall to support a removable roof. The rafters are not wood, but textured and painted illustration board.


With the battens and other 3-D details in place the illusion is complete. Here the advantages of photo-texture modeling become clear. It would be extremely difficult to create the look of perfect lettering painted over the board and batten surface using any other technique that I know of.


That's about all for this time. In the next installment of this build I'll detail construction of the building foundations and show a quick and easy way to make realistic looking log walls from wooden dowels. Adios for now!

Click here for part II of this series.

Thursday, February 28, 2013

February Update


Emerging from Rainbow Caverns.

February was a short month but I still managed to get a lot done out in Thunder Mesa country. Most of the work this month was on scenery and structures, but I've also started work on some special animation effects and a final "Grand Plan" for an expansion of the layout should time and resources allow.

Geyser Gulch

Just after leaving Thunder Mesa, trains pass beneath majestic McKennon Arch, gateway to the Living Desert, and into an active geo-thermal area known locally as Geyser Gulch. The Gulch is spanned by a rickety old wooden trestle and is home to bubbling pools, multi-hued hot springs and more than a couple erupting geysers - including "Old Unfaithful," most famous of them all.

Hot Springs and erupting Geysers at the Magic Kingdom, Walt Disney World.

Geyser Gulch under construction on the TMMC.

Old Unfaithful. The terraced hot springs are built up with disks of foamcore, card-stock and paper. The edges will be finished with acrylic modeling paste to give them the look of built-up and eroded travertine.  The rest of the Gulch is Sculptamold over carved foam.

Modeling the physical appearance of the geysers is relatively easy, the tricky part will be making them erupt on demand. 

The plan is to use Theatrical fog forced up through tubing and out the geyser tops when a magnetic reed switch or photocell is tripped by a passing train. Theatrical fog is made by heating glycol until it vaporizes.  A great deal of fog can be made from a very small amount of glycol so the trick will be keeping the amount fog small enough to be convincing as a 1/4" scale geyser. Too much could easily overpower the entire layout.

Copper tubbing has already been installed below the geyser cauldrons,  ready to be connected to the fog system.

I know that a lot of trial and error will be required to get these geysers working effectively and I'm currently looking into building or buying a very small fog maker. Wish me luck!

Mock-Ups 2.0

Anyone who has followed my modeling knows that I am a big believer in using structure mock-ups to work out a scene. They are quick, easy and cheep to build and can really help answer important questions about proportions, spacing and color, especially in a group of buildings like a town. On top of that, a well built and attractive mock-up can "hold the place" for a more elaborate and delicate finished model as scenery, lighting and other details are worked in. My first round of mock-ups on the TMMC were pretty basic, just white foamcore boxes really. But as I create plans for my structures, all of which will be scratch built, I've gotten in the habit of cutting and pasting those plans together into full sized, dimensional paper models. To date, I've replaced all of my earlier plain white mock-ups with these paper models.

The town of Thunder Mesa. All structures are paper model mock-ups that act as both plans and place-holders for  more detailed, scratch built structures yet to be built. Using these mock-ups has allowed me (and you) to see what my completed town will look now, rather than months from now when all of the final structures are built. Note that the scenery in this area is still just painted styrofoam at this point


I design my structures in Adobe Illustrator, a wonderfully versatile vector graphics program,  and use photos from the parks and educated guesses for most of the dimensions. My goal has never been to make exact copies of the Disneyland structures, but rather to capture the look and feel of them in a way that works for my layout. Here is a sampling of the plans I've created for Thunder Mesa, most are based on Disneyland structures that currently exist on the Big Thunder Mt RR, or used to exist in the little mining town of Rainbow Ridge.

El Dorado Hotel and Barber Shop.


Miner's Hardware.


Marshal Bound's Office. This one is from Rainbow Ridge and no longer exists at Disneyland.


Paper model mock-ups on the layout.


Panhandle Hotel.


Thunder Mesa Gazette. This is the Big Thunder Epitaph at Disneyland.

Cordelia's Cafe. This one isn't at Disneyland. It is a freelanced design and my homage to Cordelia Knott's wonderful chicken dinners and Boysenberry pies.


Paper models on the layout.

Gold Nugget Dance Hall.

Assay Office.

Big Thunder Saloon. 

Dance Hall, Assay and Saloon as paper models.

General Mercantile.

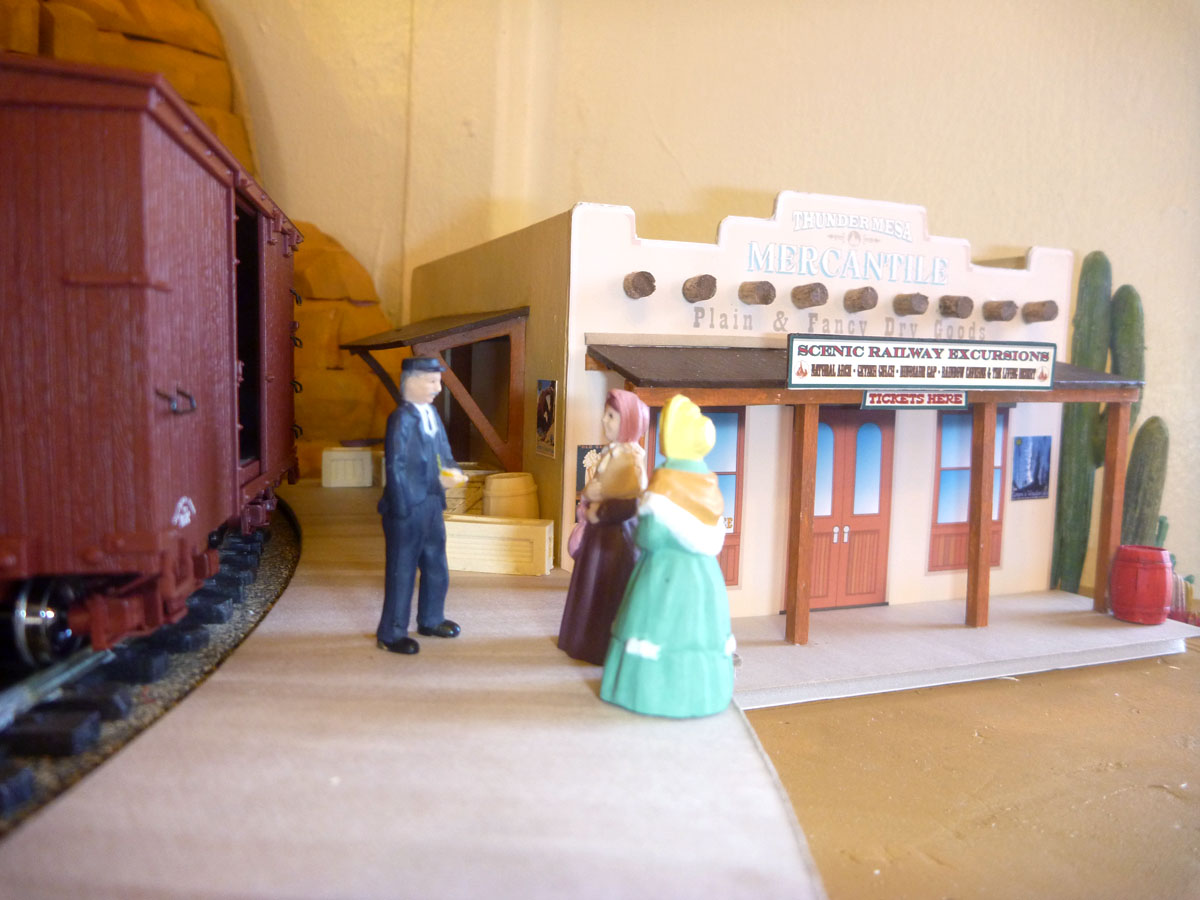
The General Mercantile sits trackside on the layout with its own curving platform. It doubles as the town Post Office, and as train station for guests taking scenic rail excursions aboard the Thunder Mesa Line.


Another view of the Mercantile paper model. Colorful posters advertise the amazing scenic wonders along the line in "Nature's Wonderland."

Big Thunder Mill

Those familiar with Disneyland's Big Thunder Mountain Railroad might wonder why I'm not using the big, iconic ore mill/mine building to load passengers. Well, because in my world, that big building is still used for mining.

Unlike the Disneyland structure, most of the lower portion of my Big Thunder Mill is enclosed. The large freight doors are used for loading bags of ore concentrates into boxcars. The cut-away in the platform is the ore dump where side dump ore cars drop raw ore from the mines into an underground hopper. Were this a real mill, a conveyer would move the ore to the top floor of the mill where it would be fed into the stamps for crushing and sorting.


The ore dump. This is a pretty small mill so only one car at a time can dump its ore. The dump goes straight through to below the layout where loose ore can be collected in a container, then returned to the mines and load the cars all over again.


One of the side dump cars. In operation, music wire will come up through the small tube between the ties and tip the cars. The wire will be attached to a Tortoise switch machine activated from the control panel. It takes a steady hand on the throttle to line up each car at the dump!


Another view of the mill. The open loading dock at right is for incoming supplies, parts, coal, etc.


A Thunder Mesa train prepares to head out after dumping its ore cars at the mill. Another train will bring boxcars to be loaded with ore concentrates bound for the Santa Fe and Carolwood interchange. On the left is old abandoned Shaft #1. Some folks say it's haunted.


 Engine Shed

Mock-up for an open-air engine shed.


Why on Earth would a little town like Thunder Mesa need an engine shed? Why, for the mill switcher of course. But, why would they need a mill switcher? Couldn't the local trains just switch the mill as they came through town? Well, yes, they could, if there was a runaround track. But there isn't, so trains traveling in one direction can switch the mill but trains traveling in the other direction can't. The solution? A mill switcher.

There is a switchback siding in Thunder Mesa and, almost from the beginning, I had though that it would be a good place for a funky old engine shed and service area. Then, for while I thought it would be a lousy place for one and decided to put some stock pens there instead. Turns out it was even a lousier place for stock pens than it was for an engine shed and I was back to square one again.

Then, as I began to think about how my little empire might actually operate I realized that an engine shed and service area would be just the thing for that spot. It also fits into my larger "Grand Plan" for expanding the layout, but I'll go into that in depth in a later update.

The engine service area is right next to McKennon Arch.

The layout as it looks today. I got so tired of looking at pink styrofoam that I went ahead and painted almost everything with my scenery base color. Much better.

That about wraps it up for this month. I've been working on the railroad pretty steadily lately and new updates might be coming down the track a little more frequently in the future. Stay tuned!

Update 9/7/13:
A few things have changed since this original posting. The layout has expanded, the engine shed has been removed from this area, and the Mercantile has moved to the top of the mesa and no longer functions as the depot. Most importantly, all structure plans are now available online as downloadable PDF files. Click the Plans & Graphics tab at the top of the page to download.
Related Posts Plugin for WordPress, Blogger...