Hooray! The benchwork, wiring and track is now complete over the entire mainline from San Lorenzo to Thunder Mesa and trains are running! Here's an overhead view from the mocked-up engine service area to the Hanging Rock and Coyote Canyon sections.
Greetings from Thunder Mesa!
I'm back from my summer break and just spent the last week finishing up track laying and wiring on the new sections of the layout. About 30' of Peco On30 flextrack was installed across the Hanging Rock and Coyote Canyon sections, and over 40 soldered connections now bring DCC power to the rails. This is a major milestone toward completing the layout expansion and I'm very happy to have it done. Check out this month's video log for more details and a first-ever excursion over the entire mainline!
Shiny new rail above Coyote Canyon. The plywood bridges are temporary and can be easily removed. They'll be replaced with detailed models after I decide just what kind of bridges I want here. The 16" radius turn-back curve will be hidden in a tunnel below the portable On18 Calico layout. The breaker box will be hidden behind Calico Mountain itself. Installing an around-the-walls backdrop here is also high on the old to-do list.
Here's the Hanging Rock section. Devil's Garden balancing rocks will be at lower left and the whistle stop depot at Hanging Rock will be at right, just before the tunnel portal. In between will be three bridges deep and narrow Horse Thief Canyon. The stub-ended uppermost track is the start of the branchline up to Big Thunder Camp.
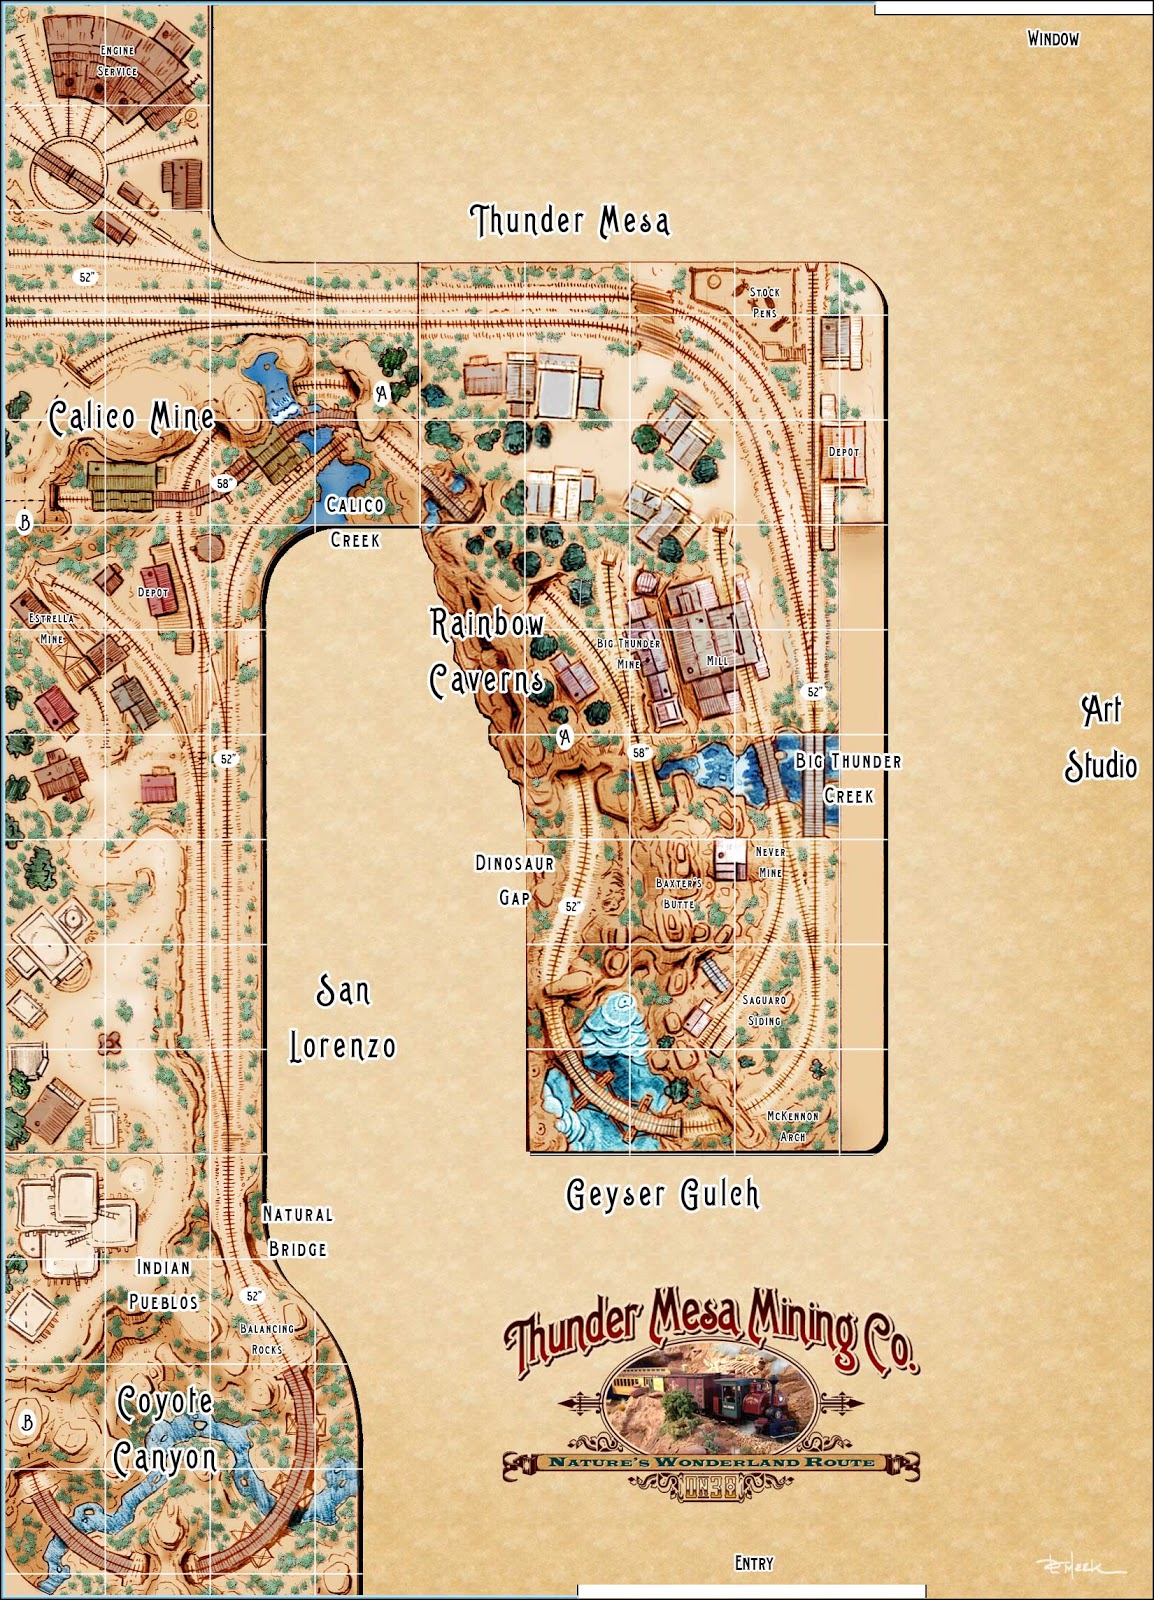
The new Coyote Canyon and Hanging Rock sections are at upper left on the above plan. Sharp eyed viewers might notice that I've already deviated from the plan by swapping the turnout and spur directions at Hanging Rock and San Lorenzo. Things always change during construction and this just made more sense for fluid operations.
One thing I'm most excited about is the new sight-lines and deep views that are being created with this expansion. When completed, the canyon scenery in this view will create an unbroken vista nearly 12' deep. Try that on a shelf layout.
With the mainline track laid and operating well, I'll probably turn my attention to the branchline up to Big Thunder Camp next. I'm also itching to build some scenery and structures and might just dive right in to the scene at Hanging Rock. Time will tell. Thanks for stopping in for a visit, amigos. There's much more to come. Adios for now!
I'm trying something new this month, a video log bringing everything up to date on Thunder Mesa's expansion progress. If people enjoy it, I'll try to do a new one each month as the layout progresses. Don't forget to subscribe to the Thunder Mesa Youtube Channel!
It's been six months since the last aerial view update and a lot has happened on the layout since then. Much progress has been made in the Big Thunder Creek area and new benchwork has been added to the Thunder Mesa section to bring it in line with the new plan. Work has also begun on a new design for the town of Thunder Mesa, along with all of the necessary wiring for the lights and sound effects in that scene. Let's stoke the boiler in our imaginary airship and take a flight high over Thunder Mesa to see what's new.
Six months ago: May 2, 2014. That pesky Calico section was just starting construction. Good thing I didn't get too much further.
This morning: November 8, 2014. Old benchwork for the Calico section has been removed and the Thunder Mesa "island" section moved out 3' from the back wall.
The new "folded dog-bone" style plan that I'm now working from. As well as a new layout for Calico and the addition of San Lorenzo, this plan calls for big changes in the orientation of Thunder Mesa town. For those keeping score at home, this is the third (and hopefully final) location for the town.
Moving in a little closer we can see the recent work done on the Never Mine and Big Thunder Creek. Replacing the paper model mock-up of Thunder Mesa Mill (to the right of the creek) with a finished structure is high on the list of projects to tackle soon.
Flying around the bend we get a view of the new layout for Thunder Mesa town. Six inches of new benchwork was added to the end of this section where it formerly butted against the wall. This created room for a much longer passing siding and a more visually appealing presentation of the town - while still leaving room for a 30" wide aisle.
Just a Little Bit Bigger
The original, central Thunder Mesa section of the layout is now 8.5' long by 4.5' at its widest point. If I ever have to move, that's about as big as it can get and still have any hope of being able to pick it up with a couple other guys and carry it out the door. It started out as 3' x 6' and just hasn't stopped growing. A 54" x 6" chunk of new real estate has been grafted on to the back end to make more room for the town and vastly improved operations.
Extending the benchwork 6 more inches. The rounded end will be covered by a 1/8" masonite fascia. The turntable will be relocated to a new section at the end of the aisle with an expanded yard and engine facilities.
Here the old track and roadbed has been removed and everything scraped clean down to the plywood. I use Elmer's wood glue to affix my cork roadbed, making it easy to remove when soaked with water and pealed up with a putty knife.
New 1/2" plywood top in place. This will act as support for the town and sub-roadbed for the new tracks. The turntable hole will be covered by the base of the town module.
Midwest HO cork roadbed has been glued down and some Peco On30 flex-track laid for the new passing siding. I used Powergrab silicone based adhesive to hold the track in place. The parallel tracks heading off the layout at top will connect to the new yard and turntable section.
The Little Mining Town of Thunder Mesa
My town of Thunder Mesa is based on the little mining town that stands above the queue on Disneyland's Big Thunder Mountain Railroad; structures that were once part of the little mining town of Rainbow Ridge on the old Nature's Wonderland Mine Train. I created plans and built paper model mock-ups for the town structures several years ago when first starting this project and those mock-ups have come in very handy over time in helping to visualize the various incarnations of Thunder Mesa town. Some of the mock-ups are now a little worse for wear and tear, and all will be retired as they are replaced by detailed structure models one by one.
The town is being built as a separate module, much like a stand-alone diorama that plugs into the layout. This will allow much of it to be built and detailed at the workbench and will also minimize the risk of damage should the layout ever need to be moved. Sound and lighting effects are also integral to the town's presentation and will be completely self contained within the module.
A base for the town module was cut to size from 1/4" MDF. A box frame of 1" x 2"s was built on top to add strength and prevent warping.
A power strip was installed to bring current to the LED lights, and to the sound module in Big Thunder Saloon. A mini-plug connects the module to the layout's effects panel and a 9v power source. The red painted screws denote the positive terminal; important to keep track of when working with LEDs.
Here, the contours of town are being roughed in with 1" thick EPF (pink foam) and some foamcore for the more gradual slopes. A retaining wall along the front edge of town will separate it from the tracks below.
Overall view of the town module. A dirt road will cross the tracks at grade and then wind up through the town. Stairs and wooden boardwalks will connect the structures.
Moving the layout out from the wall has created all new vistas and photo-ops. This should make for a dramatic and compelling scene when completed with the backdrop in place.
With the town module roughed in and the new benchwork and track in place on the Thunder Mesa section, I can turn my attention to building the frames and supports for the Calico, San Lorenzo and Coyote Canyon sections. There's also still some work to do finishing up and detailing around Big Thunder Creek and, of course, many, many structures to build. Should be fun! Thanks for checking in, amigos. Adios for now!
Welcome foolish mortals, to the Never Mine! Happy Halloween!
Just beware of hitchhiking ghosts!
At the end of September I described building the shaft house and head-frame of the spooky, abandoned Never Mine. In today's post I'll detail construction of the mine tunnel base, including the addition of a happy haunt who only comes out after dark. Then we'll finish up the scene with a tailings pile, timber crib retaining wall, and all of the final landscaping details. Follow along with the photos and captions to see how it all went together.
The base for the Never Mine was carved from two layers of 1" thick Balsa Foam laminated together with wood glue. Most of the carving was done with #2 and #11 hobby knives and a hard, 5H pencil. A random stone foundation for the shaft house was integrated into the carving. Here I'm test fitting the top beam of the timber framing for the mine adit.
For my happy haunt, I cut some 1mm clear acrylic sheet to size and fogged the surface with fine sandpaper. Then the outline of the ghost was painted from behind with thick black acrylic paint. The acrylic sheet was cemented into place and all of the edges blended with spackle.
A hunk of Baxter's Butte was cut away and a simple power bus made from two strips of thin brass sheet was glued in place. Accessory power from a 9v transformer feeds this bus and all wiring leads from the model were soldered on to it. Special care was taken to keep track of the positive bus as LED lights are polarity specific and will not function if the positive diode receives a negative charge. Here a 5mm green LED has been soldered into place to illuminate the ghost.
A quick check to make sure everything would fit and work properly.
The carving was painted with acrylics to match existing rock-work on the layout and the mine adit was finished with scale 8' x 8' beams and 1" x 12' planks stained with a shoe dye and alcohol mixture. The boards were distressed and broken to look as if they have been there for some time. The nail holes were added with a sharp 5H pencil.
Here is the entire assembly installed on the layout and the lights turned on. The shaft house has a single blue LED and the hoisting shed has a flickering amber LED as described in part I.
The carved base was glued down and blended into the existing scenery with Sculptamold. The mine structures above merely sit in place and can be easily removed if required. A short length of Micro Engineering code 55 N scale bridge track was added to represent O scale 18" gauge mine car tracks emerging from the tunnel.
I had originally planned to build an abandoned ore tipple to go with the Never Mine but later decided that such an imposing trackside structure would detract from the tiny mine above. Instead I opted for a timber crib retaining wall and tailings dump - a very common site around old mines. The first step was to rough in the dump pile with EPF (pink foam).
Here the tailings dump has been smoothed out and blended into the cliffside with Sculptamold. It was then given just a quick coat of Raw Sienna since this base will be entirely covered by scenery materials.
A couple of rickety, broken old ladders were scratch-built from strip-wood to provide a way up to the mine - albeit a hazardous one. It's nothing but fun to build details like this.
The timber crib retaining wall was built in place from 3/16" diameter dowels, stained and distressed to resemble old timbers. Here I'm backfilling behind the cribbing with small rocks and dirt from Sedona, AZ. This was later cemented in place with diluted white glue.
The slope of the tailings pile was textured with Polyblend sanded grout. It was mixed in a paper cup with a small amount of water to form a thick paste and then stippled on with a cheap paintbrush.
The grout was allowed to dry for a couple of days and then it was stained with thin washes of acrylic paints to represent colorful minerals, and to blend it with the surrounding scenery.
Another layer of fine rocks and dirt was sifted over the tailings pile and cemented into place with diluted white glue. Then more rocks, bushes, cacti, weeds, broken boards and other miscellaneous bits of debris were cemented in place to finish up the scene.
Cacti, bushes and other details near the shaft house foundations. You'd have to be pretty brave to climb those ladders!
The boarded-up mine entrance. The ghost is invisible during they day and only appears when the structure lighting is turned on for night operations.
Overall view if the tailings pile. The weedy overgrown look contributes to the story of a mine that has been abandoned for some time.
With the completion of the Never Mine, just about all of the scenery is now finished on this side of Big Thunder Creek. I'm sure that a few more details will be added here and there, but I was happy to get the haunted mine finished just in time for Halloween. I had considered adding a sound module to this project but decided it would be a little too much with the sounds of the creek, mill and town right next door. Hope you've all enjoyed the tale of the Never Mine and following along with the build. As always, any questions or comments are more than welcome below. More to come real soon. In the meantime, here's a video showing the lighting effects and documenting the Never Mine build. Adios for now!
The Pagosa & Southern, version 2.0. The new shelf layout is just 12" x 72" and uses Kato Unitrack.
In the coming months I will be expanding the On30 Thunder Mesa Mining Co. into the space that has, up until recently, been occupied by the N scale Pagosa & Southern. I began work on the P&S early this year and it was originally designed as a simple loop with a couple of sidings, just a diversion from the big layout really. But in the last month or so I've been firming up plans for expanding the TMMC (new track plan coming soon!) and it has become apparent that the P&S in its original location was standing in the way of progress. After searching in vain for a new location for the layout as originally built, I came to the conclusion that "N Scale Colorado" must adapt to what little space was available or face being packed away in boxes once again.
Fortunately I was able to carve out space for a 6' long shelf above my workbench. Just enough room for some moderately interesting N scale switching. I decided to keep the original theme of a 1950's Colorado town, but now the operational focus will be on switching the local industries and moving traffic through an important interchange with the rival Santa Fe.
Looking at the plan above, all trains will enter and exit the layout from a staging shelf at left. Beyond the tunnel, a short section of track will mate with 30" long portable staging "cassettes." Each cassette can hold and turn a complete short train (locomotive, caboose, and about 6 cars). I'll have more on building these cassettes in a future update. After switching the town, the locomotive will swap ends with the caboose using the run-around track and head back out the way it came.
The first P&S was built using bombproof Kato Unitrack and I'm recycling it all again here. I've been nothing but impressed by the trouble free operation provided by this track and feel that the aesthetic trade-offs are more than worth it for a project like this. The black and white plan shown above lists the part numbers for all of the Kato Unitrack used.
There won't be the towering mountain scenery planned for the first P&S, but the tunnel, creek and truss bridge area should make for an interesting scene. Structures will also be front and center here so I'll be taking my time on those with some more craftsman-style kits. A shelf layout like this also really lends itself to a shadowbox type presentation, with an integrated lighting system and a backdrop wrapping around three sides.
The first P&S being disassembled. Luckily, I used Kato Unitrack and never glued it down. Most of the wood and foam will be re-used on the Thunder Mesa layout. Unfortunately the backdrop is glued down and can't be removed. I'll make a new one.
For the new shelf layout, a simple box-frame was built from 1" x 3" select pine. It measures 12" wide by 72" long. The two inch holes drilled through the crosspieces are for running the wiring through.
The sub-roadbed deck is 1/2" plywood. I know it's fashionable these days to use polystyrene foam insulation board for this but I find that it turns the entire benchwork into a resonator and makes the trains really loud. I only use foam for scenery.
The track was positioned on the plywood sub-roadbed according to the plan. Locations for turnouts and wiring holes were marked in pencil. This layout has three more turnouts than the original P&S. All are #6.
The layout is mounted to the wall with 5 of these metal shelf brackets from Home Depot. It was propped up and shimmed with whatever was handy as a 4' bar level was used to keep everything straight and true during installation. The final height of the benchwork is 59" above the floor; just below eye level for me.
I was able to re-use this control shelf which was built for the first P&S. Control can be switched between digital DCC or analog DC. A used Bachmann controller from eBay works okay for now but I'll probably replace it in the future.
The new Pagosa & Southern above my workbench. It shares space with a lot of other stuff.
With the shelf complete and the track installed, I've already been having some fun running trains and switching cars on the layout. So far I'm really enjoying the plan and the greatly enhanced operations over the previous layout. Once the staging cassettes are up and running I'll probably use some type of card order system for operating trains.
It's the 1950's in N scale Colorado and most trains on the P&S are handled by EMD GP7's or Alco RS3's. Both of these Rio Grande locos are from Bachmann. They are DCC equipped and their smooth, dependable running was a major contributing factor in my deciding to turn the P&S into a switching layout. By the way, all of these structures are from old layouts and will probably be replaced.
And speaking of operation, on a switching layout like this, you really need an easy and reliable way to couple and uncouple cars. I've used track mounted magnets in the past and found them to be less than reliable. On the Thunder Mesa layout I use modified bamboo skewers as an uncoupling tool and they work just great. Unfortunately, bamboo skewers are just too big to work in N scale. Here's a quick and easy uncoupling tool I came up with for the P&S:
I cut the head off of a dressmaker's T-pin before mounting it in a handle made from 3/8" doweling. A hole was drilled in the end of the dowel just big enough for a tight press-fit with the pin, then a drop of ACC gel was used to cement it in place. Heat shrink tubing on the handle makes it easy to grip.
To uncouple, just insert the tip between two knuckle style couplers and twist gently. It only takes a very light touch and the cars themselves barely move. It works by slipping into one knuckle coupler and displacing the other. A slight push separates the cars.
It's funny, but every time I think I'm done with N scale and just about ready to throw everything up on eBay, I start fiddling with those little trains again and get drawn back in. It is worth mentioning how far N scale has come and how much better the trains look and run now, versus when I started in the hobby 35+ years ago. The new stuff is a joy to operate and I can see myself continuing to fiddle in 1:160 for many years to come.
That's about it for this week though. Next week I'll have a new post on Thunder Mesa, all about putting the finishing touches on Big Thunder Creek. I'll finish up this Friday's post with a fond look back at the first P&S. Adios, amigos!
The Never Mine. Abandoned to the elements back in '85, some folks claim the old place is haunted.
Legend of the Never Mine
High above Big Thunder Creek, on the rugged slopes of Baxter's Butte, rests the Never Mine. This is old Badwater Baxter's original claim, the oldest developed mine in these wild canyons and the same rich find that started the gold boom in Thunder Mesa Country. According to legend, when Baxter first set out from Fort Wilderness in 1865, the naysayers and local know-it-alls at the fort canteen told him he'd never find anything prospecting in that weird hoodoo country. Old Baxter just grinned beneath his big mustache, slapped his burro on the rump and said, "Never say never!" And the rest, as they say, is history.
Though it was undoubtably a rich find, misfortune and strange goings-on seemed to plague the Never Mine right from the start. Mysterious cave-ins, inexplicable equipment failures, frequent accidents and more than a couple of grizzly fatalities soon gave rise to rumors that the claim was cursed or haunted. Evidence of an old Indian burial ground had been found nearby and it was commonly known that the local Ute people held the entire Mesa as sacred. It's no small wonder then that Baxter became a little addled by all the misfortune and eventually sold the claim in 1877. He drifted west to Discovery Bay where the remainder of his years and his fortune were spent experimenting with outlandish airships. The Never Mine was taken over by the Rainbow Ridge Mining Co. which was later acquired by the TMMC. By all reports, the strange happenings continued until the rich ore finally played out and the mine was abandoned in '85.
Today, the dry desert wind whistles through the timbers of the old head-frame and the mine opening has been boarded up to keep out the curious. Or perhaps, to keep something in. Rumors of hauntings persist. Some foolish mortals say that on certain nights, when clouds obscure the stars and the zephyrs howl down the canyons, strange apparitions and ghostly voices seem to emanate from the long abandoned shaft house and the dark, gaping drift of the Never Mine.
The Model
The shaft house and head frame of the Never Mine; a little less spooky when photographed outdoors in the brilliant Arizona sunshine. The crooked smoke jack is a nod to the original Rainbow Ridge Mine that helped inspire this structure.
Inspiration for the Never Mine came from several sources. The design is loosely based on the Rainbow Ridge Mine, a tiny structure that once stood above the first tunnel on Disneyland's original Mine Train Thru Nature's Wonderland. The overall look and weathering was inspired by scouting trips to southwestern Colorado's Red Mountain Mining District. The name, "Never Mine," is a direct reference to a bit of Imagineering humor: A signpost in the queue area for Disneyland's Big Thunder Mountain Railroad points the way to several local landmarks, including Dinosaur Gap, Coyote Canyon, Busted Flats and Never Mine.
A signpost at Disneyland. 79 miles to the Never Mine? I think it's closer than that.
I began the structure with no real plan, just modeling by the seat of my pants. Generally, I wanted a small and interesting looking abandoned mine to help round out the scenery near Big Thunder Creek. I had long thought that something which looked a little spooky and haunted might be just right for this spot and a paper model mock-up of a generic abandoned mine held the space for a couple of years. Follow along with the photos and captions to see how the shaft house and head-frame for the Never Mine went together.
The available space for a mine was pretty tight, only about 5" wide by 3.5" deep. Fortunately there was a lot of vertical space to play with and my solution was to simply stack all of the mine elements one on top of the other. A shaft house and head-frame sits on a stone foundation directly above a mine adit, which in turn will sit above a trackside ore tipple. The cliff face with the adit, or drift, was carved from Balsa Foam to match the surrounding scenery and the hoist house was laid out with 1/16" thick illustration board. The door and window are styrene Grandt Line catsings.
The tiny shaft house is a scale 8'x8' with a 24" wide catwalk on two sides. The illustration board structure was spray painted flat black.
Coffee stir sticks were distressed with an X-acto knife and razor saw, adding woodgrain, splits and knotholes before being stained with a mix of Kiwi black shoe dye thinned with alcohol. The stir sticks are cheap, readily available, and scale out to about 11" wide in 1:48. They were cut to size and then glued in place over the illustration board with yellow carpenter's glue.
A foamcore jig was created to keep the head-frame supports straight and true during assembly. The head-frame was built up with scale 8"x8" timbers following photos of similar structures I'd seen in Colorado.
The head-frame was glued in place to the side of the shaft house. For added visual interest, the head-frame sits an inch (4 scale feet) lower than the shaft house.
The problem of where to put the hoist mechanism on such a tiny mine was solved by building this simple shed between the legs of the head-frame. I guess there's a little steam hoist in there that must draw its water directly from the nearby creek. The sooty smokestack is a painted soda straw.
After assembly, the shaft house was dry-brushed with acrylic Buff Titanium to simulate old, faded whitewash. The Grandt door and window castings were primed and then dry-brushed to match, and signs were printed out on heavy paper to decorate the structure.
Grandt nut/bolt/washer castings were installed in logical places on the head-frame and watercolors were used to further age and weather the boards. Here rust stains are being added with a #1 sable brush. I mix up a batch of burnt sienna and ultramarine watercolors to create varying shades of warm grey. These are then brushed on to simulate age, rust, soot, water stains and other weathering effects. The watercolors soak right into the wood for a very realistic look and if the color gets too heavy it is easy to scrub off and blend with just a bit more water. If you try this technique though, take care, too much water can dissolve the yellow or white glue on your carefully constructed model.
Here is the rest of the head-frame assembly and the parts hidden by the shaft house roof. The sheave wheel is from a 1:43 Model T truck, turned down with a rotary tool. The brackets holding it in place are painted paper with nut/bolt.washer castings affixed.
Before the roof was installed, lighting effects were added in the form of two 5mm LEDs. A blue LED emits a ghostly glow through the frosted panes of the shaft house window, while a flickering amber LED simulates a mysteriously rekindled firebox glimpsed through the roof of the hoist shack. The LEDs are wired in series with 510 ohm resistors soldered to the positive diodes of each bulb. A pigtail of wires protrudes from the base of the structure to connect to the layout's 9v DC accessory buss.
The shaft house roof was made from illustration board with paper corrugated roofing. The roofing was cut into scale 4'x8' panels and painted with red oxide primer before assembly. Weathering was done with watercolors and brown, black and rust colored chalk powders.
Rafters and rafter ends were created from scale 1"x8" stock. The crooked smoke jack is a Grandt Line casting with the crook created by sawing off the uppermost section, filing at an angle, and then glueing back in place. The jack was airbrushed silver and black and then weathered with powdered chalks.
Another view. The hoist cable is black painted elastic thread.
With the shaft house and head-frame complete I can now turn my attention to the mine adit and ore dump down below. There will be a lot more on how I built those coming in a future post. For now, thanks for checking in. Comments and questions are always welcome. Adios amigos!


