Showing posts with label bushes and trees. Show all posts

Friday, November 14, 2014

Big Thunder Creek: Part IV ~ Trees, Details & Sound

Click here for part I
Click here for part II
Click here for part III

All of the final touches are in and the sound is turned on for Big Thunder Creek. Does that mean the scene is finished? Well, there's always more to add but we'll call it done for now!


Welcome to the fourth and final post chronicling the build of Big Thunder Creek. Its been a fun and rewarding project that has brought a lot of life to the layout. In this installment I'll add the finishing touches to the scene, including some animal life, an old cottonwood tree, and the sound effects of birds and rushing water.

The Cottonwood

Throughout the desert Southwest, the majestic cottonwood has always been a welcome site. Cottonwood trees only grow near reliable sources of water like springs, creeks and stock ponds where they provide shade for weary travelers and habitat for wildlife. The bright green of a cottonwood grove can be seen for miles across the desert and always means life-saving water. When planning Big Thunder Creek I knew that it simply would not be complete without at least a representative sample of the cottonwood.

A Fremont Cottonwood in fall color beside a desert wash. Even if there's no water visible on the surface, a healthy cottonwood means that water can be found just below ground.

Cottonwoods have gray bark and distinctive branching trunks. I created mine using yard clippings from our paradise trees and Super Sage tree material from Scenic Express. The paradise tree clippings do a good job of representing the twisted trunks and thick branches of a typical cottonwood, while the sage is perfect for representing the smaller leaf-bearing branches and twigs. Paradise branches were trimmed and cemented together and a pin was cemented into the base to make it easier to plant on the layout and to work on at the bench. The Super Sage was soaked in diluted matte medium to make it pliable (as per the instructions) and then individual sprigs were cemented to the trunk and branches with fast-setting ACC.

Much has been written about modeling trees so I'll just cut to the chase here. Once the trunk was complete, the crown was sprayed with 3M 45 General Purpose Adhesive and then sprinkled with Noch Spring Green Leaf Flake. The other creekside bushes were made in a similar fashion and all were planted on the layout using Aleene's Tacky Glue.

Ground cover beneath the tree was created with a layer of fine dirt from my Sedona collection and ground up dry leaves from the yard. Everything was held in place with a spray of "wet" water (water with 1-2 drops of dishwashing liquid) and then glued down with diluted matte medium. Various ground foams, sticks, plants and grasses from Woodland Scenics help round out the scene. Good scenery is variety and layers, just like nature.

The finished cottonwood and environs. The challenge here was to build a tree of realistic size that didn't completely overpower the rest of the scene.


Critters and Other Details

Water in the desert attracts animals like a magnet, and while much of that illusion will be conveyed through sound effects, I wanted a few representative critters that would be visible to viewers.

Some ducks and a turtle made from Sculpey II. These were baked for about 15 minutes at 275ยบ and then painted with acrylics. For scale, the pin that makes up the head and tail of the turtle is about an inch long. It was trimmed much shorter before being added to the layout.

The ducks and  turtle in their natural habitat of Big Thunder Creek. For the record, the ducks are named Donald and Daisy. 

Why did the armadillo cross the train tracks? To get to the creek of course! This little guy is a white metal casting from Wiseman Model Services.

More greenery along the creek. This small hill between the bridges was created to help separate the creek from areas to the right.  The cacti are excellent plastic castings from Pegasus Hobbies.

An old Indian trail winds its way down to the creek from the mesa and a pair of Ute braves have stopped to pay their respects to Thunder Falls. The figures are from Woodland Scenics.

Finishing the creek scene meant finishing up the track too. Here, ballast is being spread along the mainline with a small, soft brush. This was then held in place with a spray of "wet" water  and then glued down with diluted matte medium. The mainline ballast is died chick grit and the sidings are red dirt from Sedona.


Adding Sound

As I have on previous projects, I turned to ITT Products when it came time to add sound to Big Thunder Creek. I wanted an ambient effect with the roar of the waterfalls coming from an upper speaker and babbling water and bird sounds coming from a speaker near the layout fascia. Their small sound modules are perfect for adding spot sounds like this to specific locales.

Sound modules and 2" speakers from ITT Products. The modules were wired in series to a panel switch but the speakers were placed farther apart. The speaker for the waterfall sound module was placed directly behind the big falls and the speaker for the brooks and birds was placed closer to the front of the layout.

The wiring for the sound modules is very straight forward and the instructions are quite clear and easy to follow - even for an electronics dummy like me. Here the two modules have been wired in parallel and leads have been added to connect to a 9v power source. Small jumper wires have also been connected on the center on/off terminal to allow for continuous looping sound. The orange disk at lower left on each module is the volume control.

Here the two sound modules have been mounted to benchwork below the layout in a relatively easy to reach location.


The best way to demonstrate the sound modules is with a video. To wrap up the project, here's a short movie on the sights and sounds of Big Thunder Creek. Enjoy!


Thanks for coming along for the Big Thunder Creek project. I hope everyone enjoyed the journey. Of course, there's still lots to do on this side of the layout with Thunder Mesa Mill and other structure projects waiting in the wings. We'll see what I'm in the mood to tackle in the days and weeks to come. In the meantime, thanks for checking in, amigos. Adios for now!

Sunday, May 5, 2013

Modeling Canyon Country: The Utah Juniper

Engine #5, the Ollie Johnston, eases a train out onto Geyser Gulch trestle as the last rays of the setting sun illuminate McKennon Arch and an ancient Utah Juniper.

Even though it is based largly on an amusment park attraction, I still want Thunder Mesa to have a true Canyon Country feel. To that end, I've done a lot of research into the geology, wildlife and flora of the high desert Four Corners region where my mythical little railroad might once have existed. It's a unique region of bitter cold winters and blistering hot summers. A dry place where, if it rains at all, it comes all at once, filling every wash and arroyo with a flood of red mud. Things have to be hardy to survive around here and among the hardiest is the gnarled and twisted Juniper.

I have to admit that Junipers, ofttimes called ceders by the early Mormon settlers, are my absolute favorite kind of trees. They can live a thousand years or more, eking out a humble existence on the mesa tops, hills and canyon rims; sometimes taking root in solid rock, cracking and breaking it with their spreading roots. They don't get very big, a tall Juniper might be 20 feet, but they do develop an enormous amount of character during their long and difficult lives, and anything with that kind of character is just begging to be modeled.


A Utah Juniper, clinging to the rim of Grand Canyon near Hermit's Rest.

I'll be needing quite a few twisted and gnarly old Junipers for Thunder Mesa and there are no commercial products available that look anything like them. What follows is a quick tutorial on the techniques I use for crafting these trees quickly and relatively simply. I hope some readers may find it useful.

Building a Juniper

Note that it is just as easy to make several trees at one time as it is to make one, but for the sake of clarity I'll only be showing the construction of a single tree.

Materials List:
  • Braided steel picture wire (the uncoated kind).
  • Acrylic modeling paste. I use Liquitex but any brand will probably do.
  • Krylon spray paint: Gray Primer, Red Primer, Flat Ivory.
  • Acrylic paint: Burnt Umber, Unbleached Titanium.
  • Woodland Scenics (or other) Dark Green Foliage.
  • 3M 45 All Purpose Spray Adhesive.

Step #1: Using photos as a guide, I build an armature from twisted picture wire. This armature used about ten strands and was twisted and shaped with needle-nose pliers into a tree about 20 scale feet high. I separate the individual strands of wire at the end of each limb to represent branches. Don't forget the roots!

Step #2: Next, I paint the whole thing with Liquitex Acrylic Modeling Paste, taking car to leave the ends of the branches thin and bare. I apply it pretty goopy, hiding and then revealing the twisted wire. This does a fairly good job of representing the dead and living parts of the tree that exist side by side in nature. I let this dry completely before continuing.

Step #3: A base coat of Krylon Gray Primer. Let that dry 

Step #4: A wash of Burnt Umber acrylics, leaving a bit of the gray to show through here and there. Let that dry.

Step #5: Once the brown is dry, I give the ends of the branches a light overspray with the Krylon Ivory. This is an important step as it creates contrast when the foliage is added and adds a bit of old age to the tree. If I overdo it, I go back and tone things down with more Burnt Umber.

Step #6: Next I spray the ends of the branches with the 3M adhesive, taking care not to get too much on the trunk. Then it's a simple matter to apply the clumps of Woodland Scenics foliage here and there, once again using photos for a guide.

Step #7: Using Unbleached Titanium, I now carefully dry-brush some highlights onto the trunk and roots to bring out the detail. Again, if this gets overdone, it's easy to tone it down with another wash of Burnt Umber. 

Step #8: Finally, I give the foliage on the top of the tree a very light overspray with the Krylon Red Primer. This tones down the color of the foliage, which is just a little too blue, and also creates the illusion of Juniper pollen, something these tress are often covered with in the spring.


And there you have it, an ancient desert evergreen clinging to the cliffside. Now I'm off to make more trees. Adios for now!

Tuesday, March 26, 2013

Building Dinosaur Gap


Engine #1, the Marc F. Davis, hauls another load of Leaverite through Dinosaur Gap on a hot, sunny afternoon.  Sky and smoke effects by Photoshop, all else as modeled. There will be more on the story of Engine #1 in a future post.

Bones in the Desert 

"Ya know, I hear tell a long time ago Dinosaurs roamed this area. 'Course all ya find now is cactus, snakes and coyotes... And sometimes the sun-bleached bones of an ancient animal."
So spoke Dal McKennon during the recorded spiel on the old Mine Train Thru Nature's Wonderland at Disneyland, describing the scene as the little yellow trains passed by a fossilized T-Rex in the Living Desert. Later, when the Big Thunder Mountain Railroad replaced Nature's Wonderland, the idea of a fossilized dinosaur was carried over and imbedded in the rock as part of the exciting climax of the attraction.

Big Thunder's dino. © Disney


Since both the Living Desert and Big Thunder Mountain prominently featured a dinosaur skeleton, I knew I just had to include a scene like that in my story of Thunder Mesa.

Dinosaur Gap on the Thunder Mesa Line. The bones came from the local toy department.

Dinosaur Gap is a major scene on my small railroad, one that I've been planning on from the very beginning. I had put off tackling it for a long time since I wasn't sure exactly how I would make the bones. Finally, I had a serendipitous moment when I saw the perfect item while shopping with my son at the toy store. There was an educational kit for building a Tyrannosaurus Rex from the bones up. It was a little more than I wanted to pay but it was just the right size. I bit the bullet and brought one home. Now I had no excuse for not finishing the scene.

Fitting and Sculpting

Once I got Rex home, I picked out the parts I wanted to use from the kit and went to work. I wanted a more naturalistic position for the fossil than what is seen on Big Thunder, and I wanted it to look as if the natural weathering and erosion had only recently exposed the bones from their sixty five million year old hiding place.

Testing the fit. I had to "break" a few bones to get everything where I wanted it.

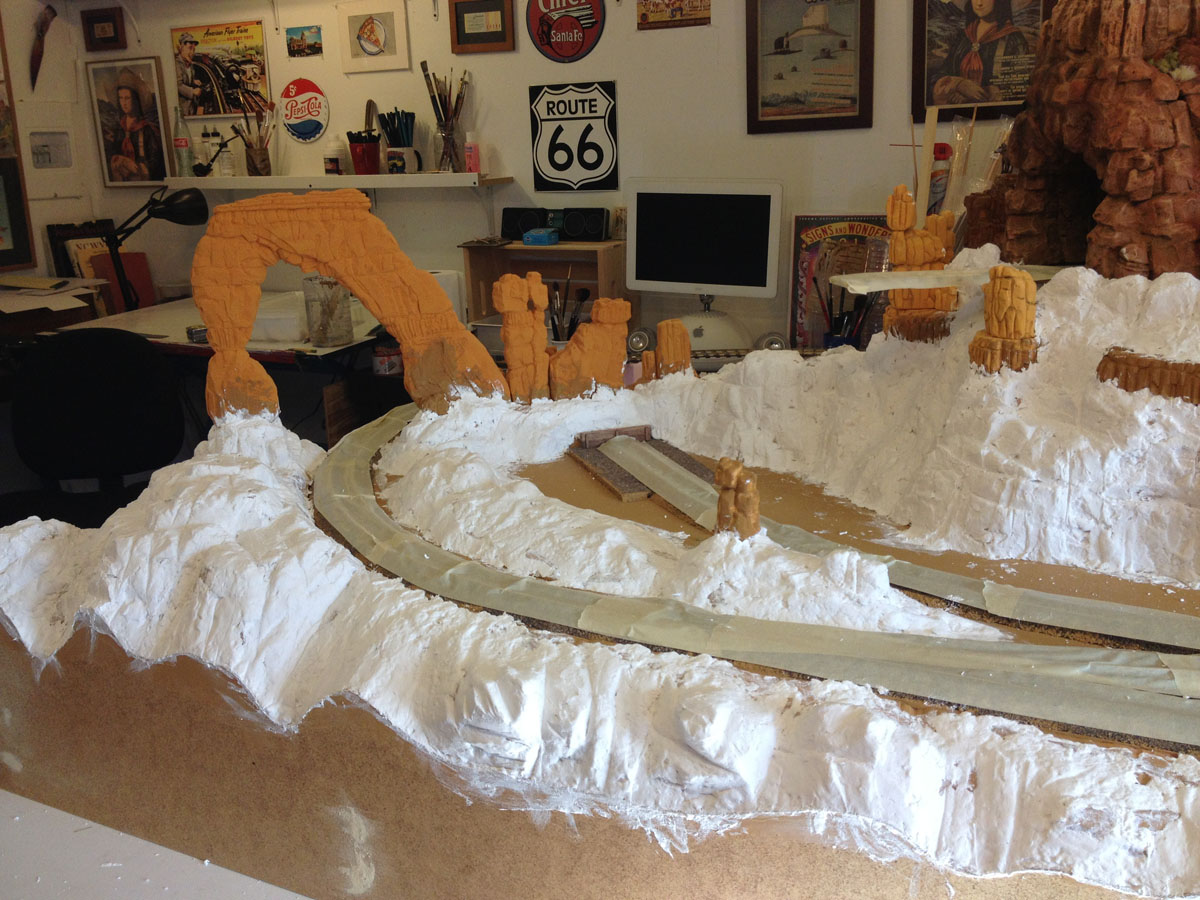
Carving away a little of the existing scenery.

A bed of fresh Sculptamold for the bones to rest in. The mixture had to be pretty stiff to stay where I wanted it.

The bones were then pushed into the wet Sculptamold and a clay modeling tool was used to work the paste up around them and sculpt the rock.


Ballasting the Rails

While waiting for the Sculptamold to set up, I decided to go ahead and ballast all of the track in the scene. I had already painted the track awhile back using Floquil paint pens, mostly Rail Brown for the the ties and Rust for the rails (with a few ties dry-brushed with unbleached titanium here and there for a little variety). Yet, I always seem to put ballasting off for some reason. It must have something to do with a traumatic N scale experience long ago. Anyway, ballasting in On30 is a lot easier given the size of things. I used Chick Grit from the local feed store for my ballast. It's just the right size and has a nice, uneven texture compared to most commercial model railroad ballast. The only problem is that it is a white granite and I wanted a ballast with more the look of buff limestone. My solution was to die the ballast with diluted acrylic paint.


Pouring some Purina Chick Grit into a soupy mixture of raw sienna acrylic paint. The paint has to be diluted by just the right amount for this to work; too thick and the grit will all glue together, too thin and the color won't take. No, I have no idea what ratio I used. I eyeballed it as usual. After soaking in the paint for two days, I strained the grit through an old t-shirt and let it dry in the sun. The result was a nice, varied buff color ballast.

The ballast was applied in the usual way, spread out with a soft brush, wetted down with "wet" water and held in place with diluted matte medium (1:1). The masking tape is a dam to keep the ballast in place on the steep slope while the glue dries. 


Painting and Finishing

Both the ballast and the Sculptamold were allowed to dry for a couple of days and then it was time for the final paint job. The bones and the rocks were finished using my usual colors and methods. The bones, technically, are rock, fossils that is, and I didn't want them to stand out too much or look garish.


First, a coat of the scenic base color, Glidden "French Mustard."

A wash of diluted India ink. 

The final paint job - using mostly raw sienna, burnt umber and unbleached (buff) titanium acrylics, dry-brushed on with a light touch.


Once the paint job was done it was time to bring some life to the Living Desert with plants, rocks and ground cover. One of the keys to good model scenery, I believe, is a variety of textures. With that in mind I use a mix of commercial products, scratch built trees and cacti, sticks from the yard and real dirt and rocks from nearby Sedona, AZ.


Some of the scenic elements here include rocks and red dirt from Sedona, hand-built balsa cacti, Silflor grass tufts and flowers, Woodland Scenics Course Turf and Field Grass, dead branches from our rose bush, and some excellent prickly-pear cactus castings from Pegasus Hobbies.

Overall view of the finished scene. The scraggly juniper trees are made with rose bush twigs and Woodland Scenics Dark Green Foliage.


Okay! That should do it for this update. Next time I'll tell the detailed story of Engine #1. Thanks for checking in. Adios for now!


Thursday, March 14, 2013

McKennon Arch & The Cactus Forest


Under threatening skies, a daily mixed train passes beneath McKennon Arch. Porter #2 chugs through the Cactus Forest on its way to Thunder Mesa as a wily coyote looks on. 

Sky and smoke effects added in Photoshop, all else as modeled.

The latest section of scenery to be completed on the TMMC is a large swath of the Living Desert that includes the Cactus Forest and majestic McKennon Arch. The arch is named for the late Dallas McKennon, beloved character actor and voice of both the Big Thunder Mountain Railroad and its Disneyland predecessor, the Mine Train Thru Nature's Wonderland.

Cactus Forest on the original Disneyland Mine Train. Many of the cacti assumed human and humorous shapes on the attraction, including the Seven Dwarves. I decided to go a little more naturalistic on my version. Photo © Disney.


The Cactus Forest was an area of the Living Desert on the old Nature's Wonderland attraction that was not carried over when Big Thunder was created. Nevertheless, I have many fond memories of the old Mine Train ride and wanted to include a version of the Cactus Forest on my Thunder Mesa Line.

Finishing McKennon Arch and the Scenery Base

McKennon Arch is part of a ridge that forms a scenic divider on the layout, visually separating the Geyser Gulch scene from the Cactus Forest and engine service area. I knew I wanted to finish this ridge and blend it in with Baxter's Butte before I tackled the Cactus Forest. This is just a quick "what I did," for a complete "how I did it" rock tutorial, please see my Rock Work 101 series.

Nothing to see here, just some painted polystyrene foam. Things will be getting messy from here so I protected the track with masking tape.

Slathering on some Sculptamold with  my preferred sculpting tool, a butter knife. 

Letting the Sculptamold dry after it has been shaped and blended with the Balsa Foam carvings. 

Sanding excess Sculptamold off of the profile board once it has dried.

Scenery painted with my standard base color.

Darkened with a spray of diluted India Ink.

The finished paint job.

Detail of McKennon Arch.

Adding Ground Cover and Desert Plants

Once the rock work and scenery base was painted and allowed to dry it was time to add the ground cover and details. Once again I used real dirt and rocks collected in Sedona, AZ and near Moab, UT. For the greenery, I used a variety of products from Woodland Scenics and Scenic Express, plus my own, scratch built saguaro cacti. I made about fifteen cacti, using John Olson's tried and true method of carving them from balsa wood. These large cacti were intermixed with some smaller castings from Woodland Scenics. Small bushes are Woodland Scenics Extra Course Turf, and the clumps of grass and flowering plants are Silflor Tufts from Scenic Express.

Sprinkling on real dirt and small rocks.

Wetting everything down with a spray of "wet" water: water with a few drops of liquid detergent added to break the surface tension.

Flooding everything with a generous amount of white glue diluted 1:1 with water.  Diluted matte medium also works.

Gluing down larger rocks and boulders. 

After all the rocks and dirt have been added. 

I construct all of my cacti and trees with a small nail sticking out the bottom for planting. When everything is still wet, it's easy to push them right into the base. A dab of full strength white glue holds it in place.

Adding a Silflor Tuft to a dab of white glue. These tufts are an excellent product from Scenic Express and can produce very realistic looking scenery. I highly recommend them.

There are always flowers in bloom at Disneyland, so when it came time to decide on a season for Thunder Mesa there was never any question that it would be springtime to early summer. The Sonoran Desert in bloom can be an astoundingly beautiful place and I wanted to capture some of that on the layout. The flowers are "Early Spring" and "Late Spring" wildflower tufts from Silflor.

The Living Desert.

Desert Critters

The Living Desert will be full of wildlife and here are a just few that have found homes there so far.

This curious raven sits atop a cactus. He's made from acrylic modeling paste over a wire armature.

The coyote or desert wolf, carved from balsa wood.

And what would paradise be without a few serpents? This diamondback rattlesnake is a painted bit of solid core copper wire.

What's Next?

Track through the Cactus Forest has been painted but still needs to be detailed with ballast and weeds. I'm waiting on some Woodland Scenics medium buff ballast via mail order.

Trackside view of the completed area. I still need to balast the track and build a tailings trestle for the high-line track at right.

As for the next major scenery project, I'll probably finish Geyser Gulch next, then it's on to Big Thunder Creek and the rest of the town area. Stay Tuned!

Adios for now!

Related Posts Plugin for WordPress, Blogger...