The scenery at Hanging Rock might only be half finished but that's not going to stop me from having a little fun with Photoshop! Creating images like this helps me to envision the story behind a scene.
Ready or not, here comes an end of the month update from Thunder Mesa! I haven't had much time for updates this month but scenery work has been progressing on the Hanging Rock section of the layout, and I'm nearly finished with the structure build for Olson & Furlow's Saloon. Even with several things half done, I wanted to share an update and video log on how things are coming along.
Hanging Rockwork
Rockwork and coloring has been completed in the little canyon nook where Olson & Furlow's will find its home. It still needs ground cover, vegetation and other details but here's a quick rundown on how the scene has come together so far.
The canyon walls and rocky ledges of Hanging Rock were built up with layers of 1" thick polystyrene foam insulation - the pink stuff from your local home center. Here the foam has been painted with my scenery base color to better help envision the final scene. There's also a view of the original paper mock-up of Olson & Furlow's, a structure that has evolved a lot from this plan during construction.
Once I was satisfied with the basic shapes, the foam was skinned with a layer of Sculptamold to further texture and define the rocky canyon walls. Sculptamold is a mixture of plaster and cellulose available from American Art Clay Co. at better stocked hobby and craft stores.
After the Sculptamold dries it's time for a coat of my scenery base color: Glidden "French Mustard" flat interior latex paint.
Then I darken the rocks with a spray of diluted black, letting it flow down into all of the cracks and crevices.
The final paint job is completed using artists' acrylics. The main colors used are Raw Sienna and Unbleached Titanium, with just a little Burnt Sienna and Burnt Umber here and there for variety. The colors are lightly dry-brushed on right out of the tube, catching the rough texture of the rocks and letting the under-color and darkened shadows show through. The wooden retaining wall is a hydrocal casting from Woodland Scenics.
Olson & Furlow's
The main structure in Hanging Rock is Olson & Furlow's Saloon and Store, an appropriately character filled establishment built as a tribute to two of may favorite model railroad authors of the past. I'll be writing much more about this scratch-built model for an upcoming column in Model Railroad Hobbyist Magazine so I don't want to give away too much here. Suffice to say that I wanted something with a lot of texture, charm and visual appeal to act as a focal point for the scene.
To show a long and storied history, I chose to design the structure with a Victorian wooden upper story built atop an older adobe base. Both the wooden walls and the adobe are modeled with illustration board. The base of the structure is 1/4" thick MDF, carved with a Dremel tool to simulate flagstone.
The colorful vintage signs and posters are a hint at the final super-detailing to come.
The old tarpaper roof on the store section has seen better days. The tarpaper was modeled using strips of 220 grit sandpaper painted flat black. The nail heads are tiny dabs of gray acrylic paint.
There's More on Facebook
I'm so humbled and flattered by those who choose to follow my efforts here on this site and also on social media. Thunder Mesa's Facebook page recently surpassed 500 likes and that's not bad for a quirky little hobby like this. If you like this site I hope you'll also come over and join the conversation on Facebook. There's a lot of new stuff posted there first, mostly about this model railroad, but also interesting stuff about the larger worlds of railroading, model building, themed design and Disney. Thank you.
That's all for this time, amigos. Thanks for checking in. Adios for now!
Calico Gold Company #2, the Walter Knott, fresh from the paint shop and on its way to the CGC facilities for final outfitting. Building this little On18 mine locomotive is the subject of today's post.
Before I start building benchwork and laying track on my On18 Calico Gold Company layout, I wanted a relatively simple On18 locomotive to pull some trains with. After doing a little research, I decided on a vertical boiler design that starts with a 3D printed shell from Tebee Models at Shapeways.com, atop a smooth running and reliable Kato 11-103 drive unit. This is my first real build in On18 and my first time using 3D printed parts. Despite the learning curve, the little steamer is coming together quickly.
The two axel Kato 11-103 drive unit is 2.125" long by 0.6875" wide. I'm using my N scale Pagosa & Southern switching layout as a test track.
The 3D printed shell from Tebee Models is made from polyamide nylon, what Shapeways calls their "White, Strong and Flexible Plastic." It is white and strong, but comes unfinished with a rough, sandpaper like texture. It fits perfectly over the Kato mechanism.
My first modification to the shell was to add a new stack. I cut off the top of the cap-stack on the printed body and replaced it with a taller HO diamond stack and some plastic tubing from my scrap-box. Here the new stack has been painted with grey primer. It's a snug press-fit over the original stack.
I'm not planning on adding a decoder to this tiny model so I filled the hollow spaces of the boiler and water tank with about 1.5 oz of BBs for additional weight. I mixed up some 2-part epoxy resin and carefully poured it over the BBs to cement them in place. I wanted to do this before painting the shell so any spills could be more easily cleaned up or covered. I let the epoxy cure overnight before going on to the next step.
The next challenge was to smooth out the rough 3D printed surface and make it look more like metal. Conventional wisdom says this should be done with primer and repeated sanding but I was concerned that too much sanding would wear away the details. Acetone vapor smoothing has been recommended for 3D printed parts but that only works for ABS plastics and not for polyamide nylons. I found a technique online for using several coats of plastic primer to smooth the surface so I decided to give that a try.
First I cleaned the shell thoroughly with a wash of 70% isopropyl alcohol. Next, I took the model outside for painting using Krylon Satin Finish Plastic Primer. Several coats are necessary because the surface is so porous. A second heavy coat was applied 20 minutes after the first. Then a third coat was applied 30 minutes after that. A fourth coat was applied an hour later and a fifth coat about 5 hours later. After drying for 24 hours, the shell had taken on a smoother, cast iron appearance.
More or less satisfied with the smoother surface, I masked off the black areas an sprayed the tank and bunker with satin finish Hunt Club Green. This is the "official" green for all CGC equipment.
Diving back into the scrap-box I was able to find the shell of an old MDC HO Consolidation and cut the smoke-box out from the backhead with a razor-saw. Then I wrapped some 220 grit sandpaper around the barrel of a marker and sanded a curve into the back of the piece so it would snug up to the boiler. The next step was making a new throttle from a paperclip and drilling a #61 hole above the firebox to receive it. The paperclip/throttle was ACC'd into place and the assembly painted flat black.
While I still had the flat black paint out, I masked off the green water tank and bunker and gave everything else a coat of the flat black to dull it down.
Looking at some photos online of similar historic locomotives made me want to add some brass bands to the boiler. These were cut about 4 scale inches wide from very thin sheet brass. I taped them down at the ends and sprayed one side with 3M 45 All Purpose Adhesive. After letting this set up for several minutes to get tacky, the bands were then applied to the boiler like tape, with just a small drop of ACC to keep the ends from curling up.
With the brass bands in place, the firebox and throttle assembly were glued to the boiler with thick ACC.
After looking long and hard at the model, I came to the conclusion that the stack was too tall. As a fellow modeler pointed out (thanks AJ!), a mine loco working in low clearance tunnels would likely have a shorter stack. So I went back and cut a scale 12 inches from the height and I'm pleased with the less cartoony look. I was also curious to see how well decals would adhere to the "smoothed" 3D printed surface so I went ahead and applied Walter's numbers and nameplate. A couple drops of Micro-Sol really helped the decals snug down onto the surface.
At this point, the Walter Knott is starting to look less like a collection of parts and more like an elegant early steamer. There are still many details to add: steam pipes, gauges, a headlight, bells and whistles, and link and pin couplers among other things. I also need to decide on whether to add a cab or not. There is much more still to be done but it will have to wait until more parts arrive. That's going to wrap it up for this time. Thanks for checking in, amigos. Adios for now!
All of the final touches are in and the sound is turned on for Big Thunder Creek. Does that mean the scene is finished? Well, there's always more to add but we'll call it done for now!
Welcome to the fourth and final post chronicling the build of Big Thunder Creek. Its been a fun and rewarding project that has brought a lot of life to the layout. In this installment I'll add the finishing touches to the scene, including some animal life, an old cottonwood tree, and the sound effects of birds and rushing water.
The Cottonwood
Throughout the desert Southwest, the majestic cottonwood has always been a welcome site. Cottonwood trees only grow near reliable sources of water like springs, creeks and stock ponds where they provide shade for weary travelers and habitat for wildlife. The bright green of a cottonwood grove can be seen for miles across the desert and always means life-saving water. When planning Big Thunder Creek I knew that it simply would not be complete without at least a representative sample of the cottonwood.
A Fremont Cottonwood in fall color beside a desert wash. Even if there's no water visible on the surface, a healthy cottonwood means that water can be found just below ground.
Cottonwoods have gray bark and distinctive branching trunks. I created mine using yard clippings from our paradise trees and Super Sage tree material from Scenic Express. The paradise tree clippings do a good job of representing the twisted trunks and thick branches of a typical cottonwood, while the sage is perfect for representing the smaller leaf-bearing branches and twigs. Paradise branches were trimmed and cemented together and a pin was cemented into the base to make it easier to plant on the layout and to work on at the bench. The Super Sage was soaked in diluted matte medium to make it pliable (as per the instructions) and then individual sprigs were cemented to the trunk and branches with fast-setting ACC.
Much has been written about modeling trees so I'll just cut to the chase here. Once the trunk was complete, the crown was sprayed with 3M 45 General Purpose Adhesive and then sprinkled with Noch Spring Green Leaf Flake. The other creekside bushes were made in a similar fashion and all were planted on the layout using Aleene's Tacky Glue.
Ground cover beneath the tree was created with a layer of fine dirt from my Sedona collection and ground up dry leaves from the yard. Everything was held in place with a spray of "wet" water (water with 1-2 drops of dishwashing liquid) and then glued down with diluted matte medium. Various ground foams, sticks, plants and grasses from Woodland Scenics help round out the scene. Good scenery is variety and layers, just like nature.
The finished cottonwood and environs. The challenge here was to build a tree of realistic size that didn't completely overpower the rest of the scene.
Critters and Other Details
Water in the desert attracts animals like a magnet, and while much of that illusion will be conveyed through sound effects, I wanted a few representative critters that would be visible to viewers.
Some ducks and a turtle made from Sculpey II. These were baked for about 15 minutes at 275º and then painted with acrylics. For scale, the pin that makes up the head and tail of the turtle is about an inch long. It was trimmed much shorter before being added to the layout.
The ducks and turtle in their natural habitat of Big Thunder Creek. For the record, the ducks are named Donald and Daisy.
Why did the armadillo cross the train tracks? To get to the creek of course! This little guy is a white metal casting from Wiseman Model Services.
More greenery along the creek. This small hill between the bridges was created to help separate the creek from areas to the right. The cacti are excellent plastic castings from Pegasus Hobbies.
An old Indian trail winds its way down to the creek from the mesa and a pair of Ute braves have stopped to pay their respects to Thunder Falls. The figures are from Woodland Scenics.
Finishing the creek scene meant finishing up the track too. Here, ballast is being spread along the mainline with a small, soft brush. This was then held in place with a spray of "wet" water and then glued down with diluted matte medium. The mainline ballast is died chick grit and the sidings are red dirt from Sedona.
Adding Sound
As I have on previous projects, I turned to ITT Products when it came time to add sound to Big Thunder Creek. I wanted an ambient effect with the roar of the waterfalls coming from an upper speaker and babbling water and bird sounds coming from a speaker near the layout fascia. Their small sound modules are perfect for adding spot sounds like this to specific locales.
Sound modules and 2" speakers from ITT Products. The modules were wired in series to a panel switch but the speakers were placed farther apart. The speaker for the waterfall sound module was placed directly behind the big falls and the speaker for the brooks and birds was placed closer to the front of the layout.
The wiring for the sound modules is very straight forward and the instructions are quite clear and easy to follow - even for an electronics dummy like me. Here the two modules have been wired in parallel and leads have been added to connect to a 9v power source. Small jumper wires have also been connected on the center on/off terminal to allow for continuous looping sound. The orange disk at lower left on each module is the volume control.
Here the two sound modules have been mounted to benchwork below the layout in a relatively easy to reach location.
The best way to demonstrate the sound modules is with a video. To wrap up the project, here's a short movie on the sights and sounds of Big Thunder Creek. Enjoy!
Thanks for coming along for the Big Thunder Creek project. I hope everyone enjoyed the journey. Of course, there's still lots to do on this side of the layout with Thunder Mesa Mill and other structure projects waiting in the wings. We'll see what I'm in the mood to tackle in the days and weeks to come. In the meantime, thanks for checking in, amigos. Adios for now!
Welcome foolish mortals, to the Never Mine! Happy Halloween!
Just beware of hitchhiking ghosts!
At the end of September I described building the shaft house and head-frame of the spooky, abandoned Never Mine. In today's post I'll detail construction of the mine tunnel base, including the addition of a happy haunt who only comes out after dark. Then we'll finish up the scene with a tailings pile, timber crib retaining wall, and all of the final landscaping details. Follow along with the photos and captions to see how it all went together.
The base for the Never Mine was carved from two layers of 1" thick Balsa Foam laminated together with wood glue. Most of the carving was done with #2 and #11 hobby knives and a hard, 5H pencil. A random stone foundation for the shaft house was integrated into the carving. Here I'm test fitting the top beam of the timber framing for the mine adit.
For my happy haunt, I cut some 1mm clear acrylic sheet to size and fogged the surface with fine sandpaper. Then the outline of the ghost was painted from behind with thick black acrylic paint. The acrylic sheet was cemented into place and all of the edges blended with spackle.
A hunk of Baxter's Butte was cut away and a simple power bus made from two strips of thin brass sheet was glued in place. Accessory power from a 9v transformer feeds this bus and all wiring leads from the model were soldered on to it. Special care was taken to keep track of the positive bus as LED lights are polarity specific and will not function if the positive diode receives a negative charge. Here a 5mm green LED has been soldered into place to illuminate the ghost.
A quick check to make sure everything would fit and work properly.
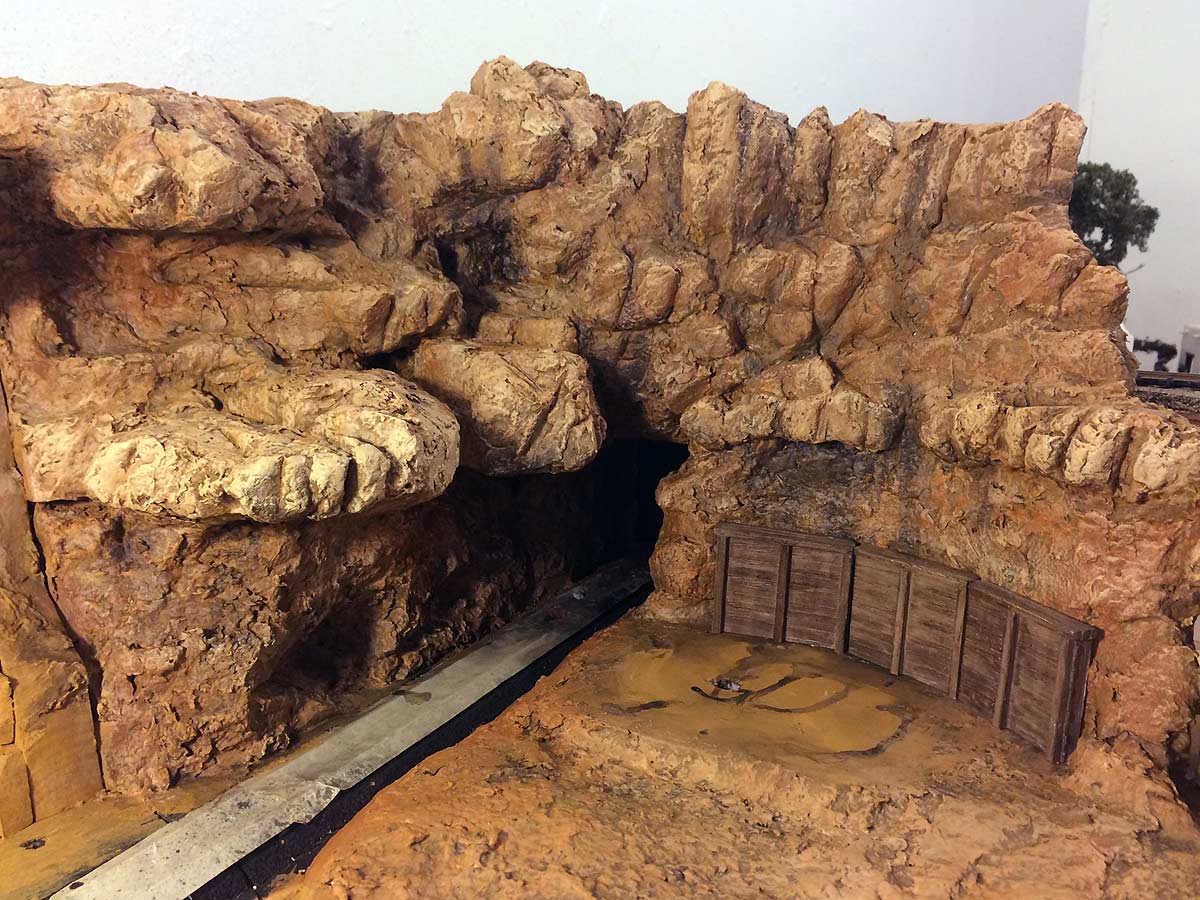
The carving was painted with acrylics to match existing rock-work on the layout and the mine adit was finished with scale 8' x 8' beams and 1" x 12' planks stained with a shoe dye and alcohol mixture. The boards were distressed and broken to look as if they have been there for some time. The nail holes were added with a sharp 5H pencil.
Here is the entire assembly installed on the layout and the lights turned on. The shaft house has a single blue LED and the hoisting shed has a flickering amber LED as described in part I.
The carved base was glued down and blended into the existing scenery with Sculptamold. The mine structures above merely sit in place and can be easily removed if required. A short length of Micro Engineering code 55 N scale bridge track was added to represent O scale 18" gauge mine car tracks emerging from the tunnel.
I had originally planned to build an abandoned ore tipple to go with the Never Mine but later decided that such an imposing trackside structure would detract from the tiny mine above. Instead I opted for a timber crib retaining wall and tailings dump - a very common site around old mines. The first step was to rough in the dump pile with EPF (pink foam).
Here the tailings dump has been smoothed out and blended into the cliffside with Sculptamold. It was then given just a quick coat of Raw Sienna since this base will be entirely covered by scenery materials.
A couple of rickety, broken old ladders were scratch-built from strip-wood to provide a way up to the mine - albeit a hazardous one. It's nothing but fun to build details like this.
The timber crib retaining wall was built in place from 3/16" diameter dowels, stained and distressed to resemble old timbers. Here I'm backfilling behind the cribbing with small rocks and dirt from Sedona, AZ. This was later cemented in place with diluted white glue.
The slope of the tailings pile was textured with Polyblend sanded grout. It was mixed in a paper cup with a small amount of water to form a thick paste and then stippled on with a cheap paintbrush.
The grout was allowed to dry for a couple of days and then it was stained with thin washes of acrylic paints to represent colorful minerals, and to blend it with the surrounding scenery.
Another layer of fine rocks and dirt was sifted over the tailings pile and cemented into place with diluted white glue. Then more rocks, bushes, cacti, weeds, broken boards and other miscellaneous bits of debris were cemented in place to finish up the scene.
Cacti, bushes and other details near the shaft house foundations. You'd have to be pretty brave to climb those ladders!
The boarded-up mine entrance. The ghost is invisible during they day and only appears when the structure lighting is turned on for night operations.
Overall view if the tailings pile. The weedy overgrown look contributes to the story of a mine that has been abandoned for some time.
With the completion of the Never Mine, just about all of the scenery is now finished on this side of Big Thunder Creek. I'm sure that a few more details will be added here and there, but I was happy to get the haunted mine finished just in time for Halloween. I had considered adding a sound module to this project but decided it would be a little too much with the sounds of the creek, mill and town right next door. Hope you've all enjoyed the tale of the Never Mine and following along with the build. As always, any questions or comments are more than welcome below. More to come real soon. In the meantime, here's a video showing the lighting effects and documenting the Never Mine build. Adios for now!