Hooray! The benchwork, wiring and track is now complete over the entire mainline from San Lorenzo to Thunder Mesa and trains are running! Here's an overhead view from the mocked-up engine service area to the Hanging Rock and Coyote Canyon sections.
Greetings from Thunder Mesa!
I'm back from my summer break and just spent the last week finishing up track laying and wiring on the new sections of the layout. About 30' of Peco On30 flextrack was installed across the Hanging Rock and Coyote Canyon sections, and over 40 soldered connections now bring DCC power to the rails. This is a major milestone toward completing the layout expansion and I'm very happy to have it done. Check out this month's video log for more details and a first-ever excursion over the entire mainline!
Shiny new rail above Coyote Canyon. The plywood bridges are temporary and can be easily removed. They'll be replaced with detailed models after I decide just what kind of bridges I want here. The 16" radius turn-back curve will be hidden in a tunnel below the portable On18 Calico layout. The breaker box will be hidden behind Calico Mountain itself. Installing an around-the-walls backdrop here is also high on the old to-do list.
Here's the Hanging Rock section. Devil's Garden balancing rocks will be at lower left and the whistle stop depot at Hanging Rock will be at right, just before the tunnel portal. In between will be three bridges deep and narrow Horse Thief Canyon. The stub-ended uppermost track is the start of the branchline up to Big Thunder Camp.
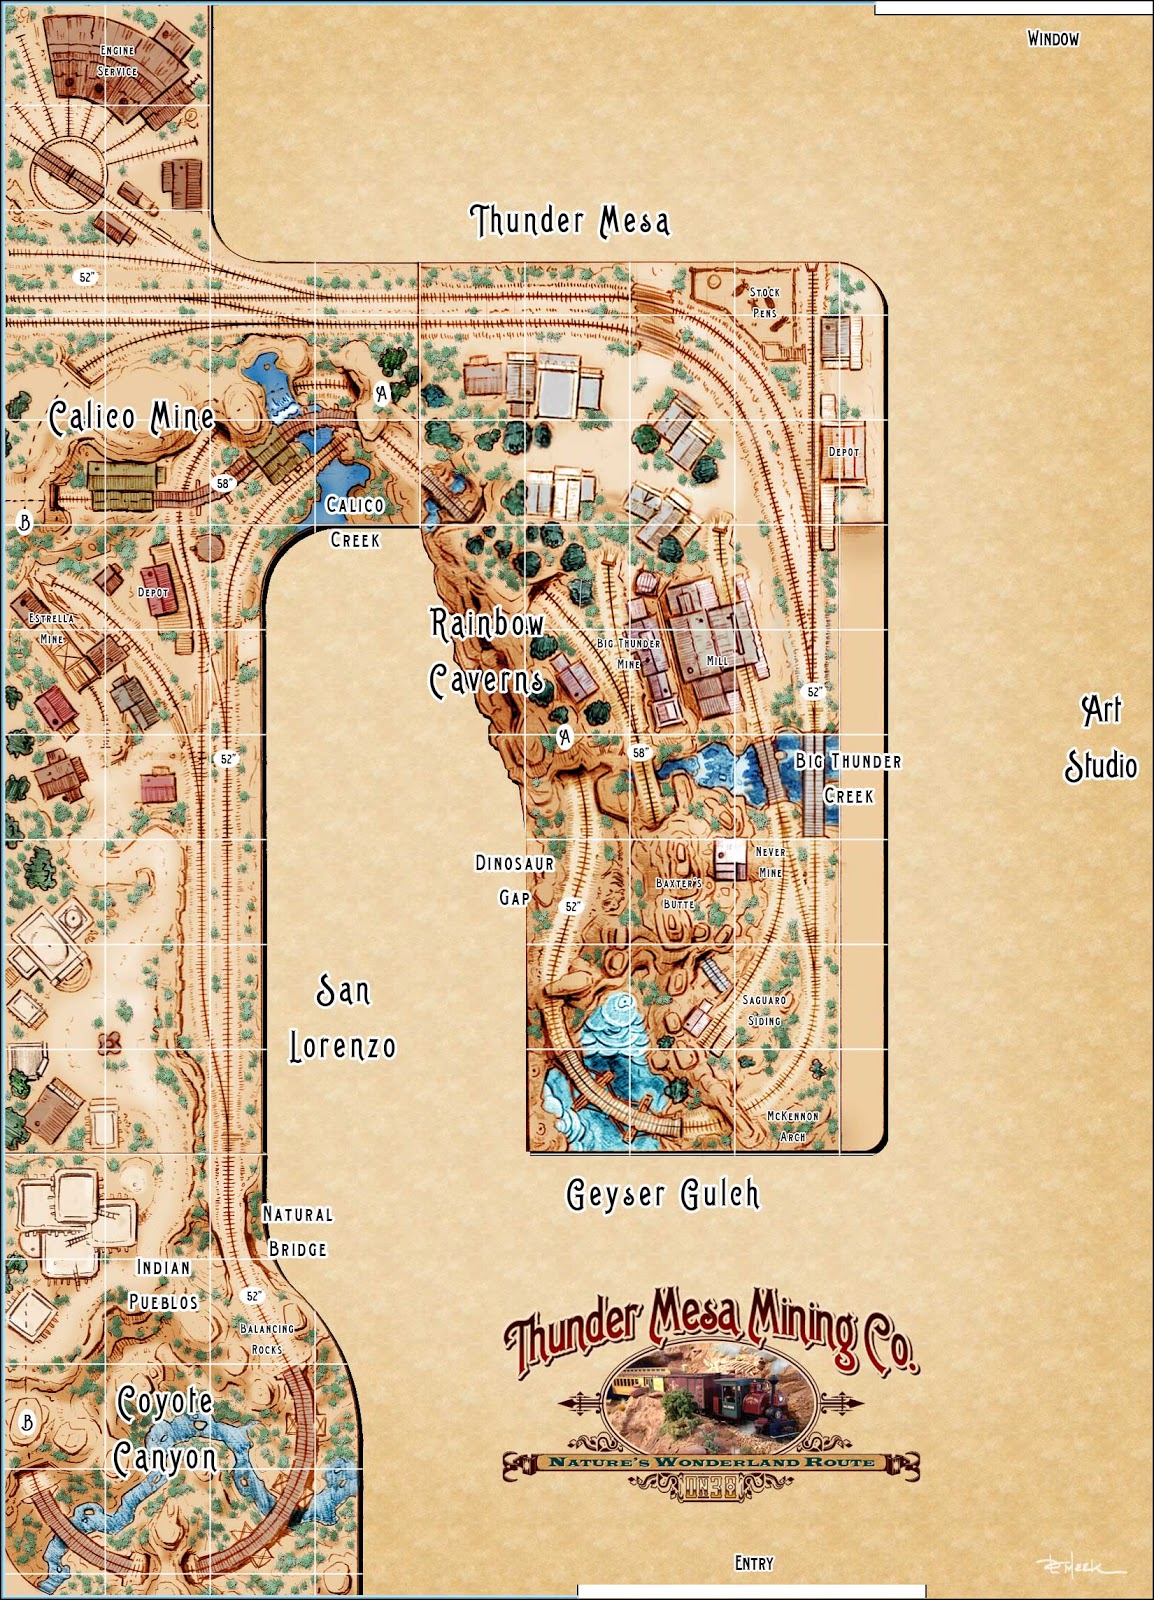
The new Coyote Canyon and Hanging Rock sections are at upper left on the above plan. Sharp eyed viewers might notice that I've already deviated from the plan by swapping the turnout and spur directions at Hanging Rock and San Lorenzo. Things always change during construction and this just made more sense for fluid operations.
One thing I'm most excited about is the new sight-lines and deep views that are being created with this expansion. When completed, the canyon scenery in this view will create an unbroken vista nearly 12' deep. Try that on a shelf layout.
With the mainline track laid and operating well, I'll probably turn my attention to the branchline up to Big Thunder Camp next. I'm also itching to build some scenery and structures and might just dive right in to the scene at Hanging Rock. Time will tell. Thanks for stopping in for a visit, amigos. There's much more to come. Adios for now!
I'm trying something new this month, a video log bringing everything up to date on Thunder Mesa's expansion progress. If people enjoy it, I'll try to do a new one each month as the layout progresses. Don't forget to subscribe to the Thunder Mesa Youtube Channel!
Verne Niner's Gazette Award winning San Lorenzo diorama has arrived at its new home in Thunder Mesa Country! The 18"x30" scene fits snugly into a new corner of the layout and will represent one end of the line in operations.
Back in October of last year, my friend Verne Niner announced that he would be dismantling his legendary Estrella & Sonora Grande layoutin order to move on to new projects. When he began to sell off the structures and equipment, I was lucky enough to call dibs on his wonderful San Lorenzo Village diorama. After months of planning, and a couple furious weeks of benchwork construction, I'm happy to report that the sleepy border town of San Lorenzo has been safely settled into its new home. The village now resides in a corner of the layout room on its own custom-built layout section. Physically, it's just down the aisle from Thunder Mesa town, but in operations, it will represent the far end of the railroad.
Here's an overhead view of the new 48"x66" San Lorenzo section. This piece of benchwork acts as a literal bridge between the central Thunder Mesa section and the Hanging Rock and Calico sections along the wall. Changes always happen during construction and I've altered the plan somewhat by changing the orientation of San Lorenzo. Now the track enters the village from the opposite direction via a wye, a much more logical arrangement if this is meant to represent the "far end of the line." This change also allows for the San Lorenzo track to connect to a narrow staging shelf that will be built along the wall. What I'll lose in aisle width should be more than made up for in enhanced operations.
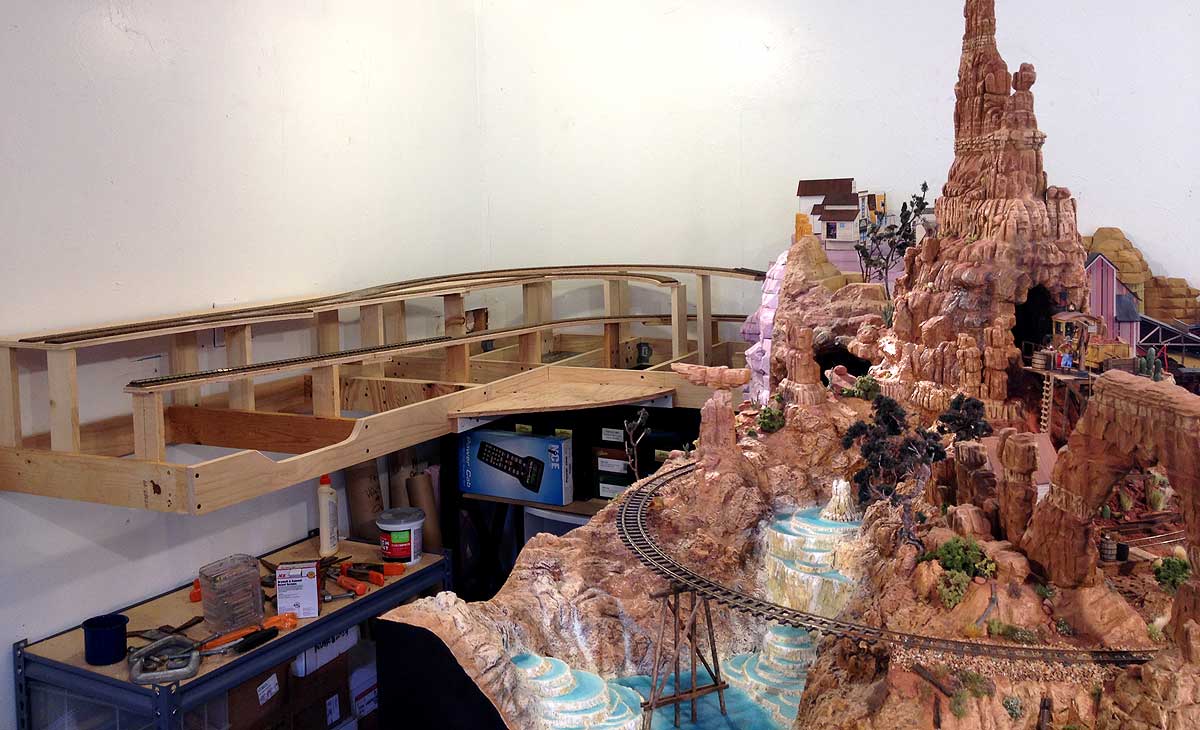
This section of benchwork will also house a large chunk of Rainbow Caverns. The foreground track will curve through three cavern scenes before emerging at Hanging Rock.
Here the existing layout joins the new benchwork and the new route through Rainbow Caverns. Passing trains will be viewed through rugged cave openings and the largest scene will feature some dramatic subterranean waterfalls.
I use what I call the "box and stilts" method for building benchwork. Basically, that consists of a box-girder frame made from 1"x4" lumber and 1/2" plywood subroadbed atop 1"x3" risers or "stilts." Here, the subroadbed top has been cut out and positioned but risers have yet to be added. I find this to be a simple, flexible, and somewhat economical method that has served my needs well on a number of projects.
I cut the 1/2" plywood to size and then layout the track centerlines with a straightedge, bar compass, and actual track components like turnouts. Then, allowing at least1.5 to 2 inches on either side of the track centerline, I cut everything out with a jigsaw.
Here's the San Lorenzo depot area before cork roadbed and track were laid. The airspace between the roadbed and the box-frame makes it easier to add scenery below track level. Everything is held together with drywall screws.
That should bring everything up to date for this week. Now I'm just waiting for some more Peco On30 track components to arrive so I can finish up this section and get everything wired. As always, questions or comments are welcome below. Thanks for checking in, amigos, Adios for now!
All those shots of bare plywood benchwork can get a little tedious so here's some eye-candy. In addition to San Lorenzo Village, the TMMC also acquired E&SG Porter #3, the Rattler, along with Lytum & Hyde Explosives Co. boxcar #66 (I designed the decals and Verne Niner painted and detailed the Bachmann car). With its handsome red livery, the TMMC shop crews may never get around to repainting the three spot.
It's been nearly 5 months since the last aerial view update so it must be high time for another one! As of today, all of the basic benchwork for new sections of the layout have been completed and I'm ready to start laying down some 1/2" plywood sub-roadbed. Here's the before and after aerial views:
Almost 5 months ago, November 8, 2014: A new plan had just been decided on and the layout moved out from the wall. The change of plan necessitated dismantling of the previously built Calico benchwork.
Today, March 28, 2015: The layout has now grown too large to capture in one overhead photo. 1"x4" pine box-girder benchwork is now in place for three new sections of the layout. Note how the layout base drops down in stair-step fashion to accommodate deep canyons in the Hanging Rock and Coyote Canyon sections. The floor of Coyote Canyon will be 24" or 96 scale feet below track level.
The individual layout sections are joined together with 1/4" bolts and thumb-screws, allowing them to be separated should a move ever prove necessary. The lowered sections of Hanging Rock and Coyote Canyon are supported by sturdy metal shop shelves that also provide handy storage below the layout. The San Lorenzo section creates a literal bridge between the Thunder Mesa "island" and the new parts of the layout, allowing for maintenance access via a duck-under. Next steps include sheathing the walls with 1/8" Masonite for the backdrop, building risers and sub-roadbed, and creating the sturdy shelf structure to support the portable Calico On18 layout on the Coyote Canyon section.
The current plan for Thunder Mesa shows the new shape of the layout and illustrates the labeled areas in the photos above.
It's great to be moving ahead with the expansion and I'm really looking forward to seeing these new sections of the layout take shape. Right now trains can only shunt back and forth between Thunder Mesa and Rainbow Caverns so I'm determined to get some more track laid soon. The San Lorenzo section will probably be tackled first, along with the turntable and engine service area. Lots to do! Thanks for checking in. Adios for now, amigos!
It's been six months since the last aerial view update and a lot has happened on the layout since then. Much progress has been made in the Big Thunder Creek area and new benchwork has been added to the Thunder Mesa section to bring it in line with the new plan. Work has also begun on a new design for the town of Thunder Mesa, along with all of the necessary wiring for the lights and sound effects in that scene. Let's stoke the boiler in our imaginary airship and take a flight high over Thunder Mesa to see what's new.
Six months ago: May 2, 2014. That pesky Calico section was just starting construction. Good thing I didn't get too much further.
This morning: November 8, 2014. Old benchwork for the Calico section has been removed and the Thunder Mesa "island" section moved out 3' from the back wall.
The new "folded dog-bone" style plan that I'm now working from. As well as a new layout for Calico and the addition of San Lorenzo, this plan calls for big changes in the orientation of Thunder Mesa town. For those keeping score at home, this is the third (and hopefully final) location for the town.
Moving in a little closer we can see the recent work done on the Never Mine and Big Thunder Creek. Replacing the paper model mock-up of Thunder Mesa Mill (to the right of the creek) with a finished structure is high on the list of projects to tackle soon.
Flying around the bend we get a view of the new layout for Thunder Mesa town. Six inches of new benchwork was added to the end of this section where it formerly butted against the wall. This created room for a much longer passing siding and a more visually appealing presentation of the town - while still leaving room for a 30" wide aisle.
Just a Little Bit Bigger
The original, central Thunder Mesa section of the layout is now 8.5' long by 4.5' at its widest point. If I ever have to move, that's about as big as it can get and still have any hope of being able to pick it up with a couple other guys and carry it out the door. It started out as 3' x 6' and just hasn't stopped growing. A 54" x 6" chunk of new real estate has been grafted on to the back end to make more room for the town and vastly improved operations.
Extending the benchwork 6 more inches. The rounded end will be covered by a 1/8" masonite fascia. The turntable will be relocated to a new section at the end of the aisle with an expanded yard and engine facilities.
Here the old track and roadbed has been removed and everything scraped clean down to the plywood. I use Elmer's wood glue to affix my cork roadbed, making it easy to remove when soaked with water and pealed up with a putty knife.
New 1/2" plywood top in place. This will act as support for the town and sub-roadbed for the new tracks. The turntable hole will be covered by the base of the town module.
Midwest HO cork roadbed has been glued down and some Peco On30 flex-track laid for the new passing siding. I used Powergrab silicone based adhesive to hold the track in place. The parallel tracks heading off the layout at top will connect to the new yard and turntable section.
The Little Mining Town of Thunder Mesa
My town of Thunder Mesa is based on the little mining town that stands above the queue on Disneyland's Big Thunder Mountain Railroad; structures that were once part of the little mining town of Rainbow Ridge on the old Nature's Wonderland Mine Train. I created plans and built paper model mock-ups for the town structures several years ago when first starting this project and those mock-ups have come in very handy over time in helping to visualize the various incarnations of Thunder Mesa town. Some of the mock-ups are now a little worse for wear and tear, and all will be retired as they are replaced by detailed structure models one by one.
The town is being built as a separate module, much like a stand-alone diorama that plugs into the layout. This will allow much of it to be built and detailed at the workbench and will also minimize the risk of damage should the layout ever need to be moved. Sound and lighting effects are also integral to the town's presentation and will be completely self contained within the module.
A base for the town module was cut to size from 1/4" MDF. A box frame of 1" x 2"s was built on top to add strength and prevent warping.
A power strip was installed to bring current to the LED lights, and to the sound module in Big Thunder Saloon. A mini-plug connects the module to the layout's effects panel and a 9v power source. The red painted screws denote the positive terminal; important to keep track of when working with LEDs.
Here, the contours of town are being roughed in with 1" thick EPF (pink foam) and some foamcore for the more gradual slopes. A retaining wall along the front edge of town will separate it from the tracks below.
Overall view of the town module. A dirt road will cross the tracks at grade and then wind up through the town. Stairs and wooden boardwalks will connect the structures.
Moving the layout out from the wall has created all new vistas and photo-ops. This should make for a dramatic and compelling scene when completed with the backdrop in place.
With the town module roughed in and the new benchwork and track in place on the Thunder Mesa section, I can turn my attention to building the frames and supports for the Calico, San Lorenzo and Coyote Canyon sections. There's also still some work to do finishing up and detailing around Big Thunder Creek and, of course, many, many structures to build. Should be fun! Thanks for checking in, amigos. Adios for now!
The Pagosa & Southern, version 2.0. The new shelf layout is just 12" x 72" and uses Kato Unitrack.
In the coming months I will be expanding the On30 Thunder Mesa Mining Co. into the space that has, up until recently, been occupied by the N scale Pagosa & Southern. I began work on the P&S early this year and it was originally designed as a simple loop with a couple of sidings, just a diversion from the big layout really. But in the last month or so I've been firming up plans for expanding the TMMC (new track plan coming soon!) and it has become apparent that the P&S in its original location was standing in the way of progress. After searching in vain for a new location for the layout as originally built, I came to the conclusion that "N Scale Colorado" must adapt to what little space was available or face being packed away in boxes once again.
Fortunately I was able to carve out space for a 6' long shelf above my workbench. Just enough room for some moderately interesting N scale switching. I decided to keep the original theme of a 1950's Colorado town, but now the operational focus will be on switching the local industries and moving traffic through an important interchange with the rival Santa Fe.
Looking at the plan above, all trains will enter and exit the layout from a staging shelf at left. Beyond the tunnel, a short section of track will mate with 30" long portable staging "cassettes." Each cassette can hold and turn a complete short train (locomotive, caboose, and about 6 cars). I'll have more on building these cassettes in a future update. After switching the town, the locomotive will swap ends with the caboose using the run-around track and head back out the way it came.
The first P&S was built using bombproof Kato Unitrack and I'm recycling it all again here. I've been nothing but impressed by the trouble free operation provided by this track and feel that the aesthetic trade-offs are more than worth it for a project like this. The black and white plan shown above lists the part numbers for all of the Kato Unitrack used.
There won't be the towering mountain scenery planned for the first P&S, but the tunnel, creek and truss bridge area should make for an interesting scene. Structures will also be front and center here so I'll be taking my time on those with some more craftsman-style kits. A shelf layout like this also really lends itself to a shadowbox type presentation, with an integrated lighting system and a backdrop wrapping around three sides.
The first P&S being disassembled. Luckily, I used Kato Unitrack and never glued it down. Most of the wood and foam will be re-used on the Thunder Mesa layout. Unfortunately the backdrop is glued down and can't be removed. I'll make a new one.
For the new shelf layout, a simple box-frame was built from 1" x 3" select pine. It measures 12" wide by 72" long. The two inch holes drilled through the crosspieces are for running the wiring through.
The sub-roadbed deck is 1/2" plywood. I know it's fashionable these days to use polystyrene foam insulation board for this but I find that it turns the entire benchwork into a resonator and makes the trains really loud. I only use foam for scenery.
The track was positioned on the plywood sub-roadbed according to the plan. Locations for turnouts and wiring holes were marked in pencil. This layout has three more turnouts than the original P&S. All are #6.
The layout is mounted to the wall with 5 of these metal shelf brackets from Home Depot. It was propped up and shimmed with whatever was handy as a 4' bar level was used to keep everything straight and true during installation. The final height of the benchwork is 59" above the floor; just below eye level for me.
I was able to re-use this control shelf which was built for the first P&S. Control can be switched between digital DCC or analog DC. A used Bachmann controller from eBay works okay for now but I'll probably replace it in the future.
The new Pagosa & Southern above my workbench. It shares space with a lot of other stuff.
With the shelf complete and the track installed, I've already been having some fun running trains and switching cars on the layout. So far I'm really enjoying the plan and the greatly enhanced operations over the previous layout. Once the staging cassettes are up and running I'll probably use some type of card order system for operating trains.
It's the 1950's in N scale Colorado and most trains on the P&S are handled by EMD GP7's or Alco RS3's. Both of these Rio Grande locos are from Bachmann. They are DCC equipped and their smooth, dependable running was a major contributing factor in my deciding to turn the P&S into a switching layout. By the way, all of these structures are from old layouts and will probably be replaced.
And speaking of operation, on a switching layout like this, you really need an easy and reliable way to couple and uncouple cars. I've used track mounted magnets in the past and found them to be less than reliable. On the Thunder Mesa layout I use modified bamboo skewers as an uncoupling tool and they work just great. Unfortunately, bamboo skewers are just too big to work in N scale. Here's a quick and easy uncoupling tool I came up with for the P&S:
I cut the head off of a dressmaker's T-pin before mounting it in a handle made from 3/8" doweling. A hole was drilled in the end of the dowel just big enough for a tight press-fit with the pin, then a drop of ACC gel was used to cement it in place. Heat shrink tubing on the handle makes it easy to grip.
To uncouple, just insert the tip between two knuckle style couplers and twist gently. It only takes a very light touch and the cars themselves barely move. It works by slipping into one knuckle coupler and displacing the other. A slight push separates the cars.
It's funny, but every time I think I'm done with N scale and just about ready to throw everything up on eBay, I start fiddling with those little trains again and get drawn back in. It is worth mentioning how far N scale has come and how much better the trains look and run now, versus when I started in the hobby 35+ years ago. The new stuff is a joy to operate and I can see myself continuing to fiddle in 1:160 for many years to come.
That's about it for this week though. Next week I'll have a new post on Thunder Mesa, all about putting the finishing touches on Big Thunder Creek. I'll finish up this Friday's post with a fond look back at the first P&S. Adios, amigos!
Across the aisle from Thunder Mesa, the Calico section is starting to take shape.
Although this past week was busy with 1:1 scale projects out in the real world, I was still able to carve out a little time for work on the railroad. With the new plan for Calico fixed firmly in mind and the power tools still in hand, a couple of enjoyable afternoons were spent finishing up the benchwork and roadbed for this corner of the layout.
Following the new plan, 1/2" plywood sub-roadbed was installed atop risers of 1x3" pine. The flat area at left will be home to the Calico mine, a major shipper on the TMMC.
Midwest HO cork roadbed was laid down along the track center lines and cemented in place with yellow carpenter's glue. The thumbtacks are handy for keeping everything aligned while the glue dries.
After the glue dried overnight, spackling paste was used to fill any gaps.
The final step was to sand everything smooth with a sanding block. The goal is to have a nice, even surface for track laying.
Ready for track! The large gap in the roadbed above the curved benchwork at center will be home to a dramatic trestle, completing the reverse loop. In this view you can begin to see how the tracks will weave in and out of Calico Mountain.
Here's another look at the plan for Calico. Note the track elevations and location of the trestle bridges.
Next up I'd like to tackle the remaining benchwork for the Canyon section, then I can start laying track and actually get to run some trains up the grade to Calico! Looks like I won't be putting those tools away anytime soon. That's about it for this week. Thanks for checking in. Adios for now!
The nice thing about plans on paper is that they are easy to change.
Last Friday's post on Knott's Calico Mine Train inspired me to go back and take another look at the expansion plans I have for the TMMC, and especially at the corner Calico section. To be honest, I was never fully satisfied with the plans for that corner and taking a fresh look at Calico had me wanting to incorporate more of the look and feel of the Knott's original in my layout. To that end, I spent a couple of days figuring things out and now have a revised plan for the Thunder Mesa expansion.
The upper lefthand corner has been completely reworked with a much more spectacular presentation of Calico Mountain, its waterfalls and dramatic trestle. Now trains will pass in and out of the mountain on multiple levels, much like the Knott's attraction, and a reverse loop will send them back toward Thunder Mesa. Gone are the engine shed and turntable once planned for this corner, but the long spur up to Big Thunder Mine still remains.
On the left is the old version of Calico with its engine shed and turntable. A functional scene but not one that really captures what I'm going for. On the right is the updated plan for Calico, a scene with much more bang for the buck and the added interest of a reverse loop. I was sorry to loose the engine house but it's easy to pretend those facilities are just over on the other side of the mountain somewhere.
I've had to give up a wee bit of aisle space with this new scheme but the trade off in scenic potential should be more than worth it. A 3% grade still brings trains up to Calico, and the natural bridge, balancing rocks, deep canyon and Indian pueblo are largely unchanged. I did change the size of the Calico section from 3'x4' to 6'x4', and this in turn now makes the canyon section 5'x3' instead of 8'x3'. It just seemed to make more sense to have two medium sized sections.
Construction has officially begun on the Calico section, with the benchwork already completed and the 1/2" plywood sub-roadbed well underway. And that bring us to this month's aerial views.
Last month: April 4, 2014.
Today: May 2, 2014.
Here you can see the new 6' length of the Calico section and the beginning of the 3% grade. A cutout in the benchwork marks the future location of Natural Bridge. Calico Mountain will occupy most of the far corner and should make a nice balance with Baxter's Butte.
In the next section of benchwork, the scenery will plunge dramatically as the trains cross Bright Angel Canyon on their way up to Calico. With any luck I'll be able to get that built later this month and can start looking forward to running trains through the new sections. Stay tuned! Thanks for checking in, folks. Adios for now!


