Friday, January 30, 2015

Planning Calico: A Portable On18 Layout

The Calico Gold Company will be a 24" x 60" portable layout in On18 scale. Based loosely upon the Calico Mine Train at Knott's Berry Farm, the layout will also act as a feeder line connecting to the TMMC. Minimum radius on this plan is 10" and the ruling grade is 5%.


For a long time, I've been mulling over ideas for a small, portable layout or module that could be taken on the road to shows and modeling exhibitions as a representative sample of what Thunder Mesa is all about. I've also been toying with the idea of doing something in On18 that could act as a feeder line for the main railroad. And regular readers of this blog will know that I'm a huge fan of the Calico Mine Train at Knott's Berry Farm in California, having pretty much spent my youth there when I wasn't just down the road at Disneyland. Well, all of those ingredients have finally come together in a new 2' x 5' layout project that will showcase the style of Thunder Mesa while paying tribute to some of its Knott's/Calico inspirations.

A 1960's vintage postcard of the Calico Mine Train at Knott's. Just as the TMMC attempts to imagine a prototype for Big Thunder and Natures' Wonderland, the new Calico mini-layout will appear as something that could have, if it existed, inspired the attraction. The idea is for a model that shares visual cues with the Knott's attraction while not trying to be a slavish copy.


What the Heck is On18?

On18 is a funny scale/gauge combination that is intriguing to a dyed-in-the-wool rubber gauger like myself. It uses N gauge track and mechanisms as a starting point for 1/4" scale models in one of the slimmest of slim gauges. The 9mm gauge N scale track works out very close to 18" in 1:48, happily, a rather common track gauge for industrial and mining railways. The resulting models can have a lilliputian charm and character that really appeals to my sense of whimsy.

Concept illustration for a freelanced On18 locomotive inspired by the Knott's Calico Mine Train. This tiny drivered 0-6-0 will measure just 3" long in O scale and be powered by an N scale Atlas 2-6-0 mechanism. As a point of comparison, a diminutive Bachmann 0-4-0 Porter in On30 is a good inch (four scale feet) longer.


I've gone back and forth on the idea of an On18 feeder line several times; adding it and then removing it from subsequent track plans. Experience has taught me that if an idea keeps coming back around again and again, it's probably solid and eventually I'll have to do something with it. Well, the time has come and my long delayed plans for Calico will at last be moving forward with tiny trains on some very slim rails.

Refining the Concept

Designing the simple over-and-under figure eight track plan was the easy part. Figuring out where and how it will fit into the larger scheme of things on Thunder Mesa was the real challenge. Not only do I want the layout to be light and portable, I also want it to "plug-in" to the main layout as seamlessly as possible when not out on the road. It took some creative engineering and more than a few major tweaks to the TMMC plan to get all 10 lbs of both railroads to fit into the 5 lb sack of my art studio. I'll explain the changes to the TMMC plan in another post in the near future.

I still draw my plans the old fashioned way, with pencil and paper. I went through a lot of both figuring out where to place the Calico module within the larger scheme of the layout. There will be more on the updated overall plans for the TMMC in a future post.


Parts from Other Scales

Working in an oddball, niche scale like this means that just about everything needs to be scratch-built, kit-bashed, adapted or modified from materials, models or details in other scales. That's a big part of the fun as far as I'm concerned. Figuring out which bits and pieces from the smaller scales that can be useful is an interesting challenge. For example, I'll be using Peco HOn30 track and turnouts since the big, chunky ties and spike detail will look right at home in On18. Many carefully selected HO scale items can come in handy, especially things like locomotive detail parts and freight car frames. 18" gauge trains are small, so the roughly half-sized HO parts should work fairly well. Of course, N scale wheals and mechanisms will be used to model rolling stock. The trick is to find donor mechanisms that run reliably and that can be modified into something somewhat believable. I've already begun tinkering with a smooth running Atlas N scale 2-6-0 mechanism, removing the pony truck and mocking up ideas for the frame and cab. This may form the basis for Calico's first locomotive as illustrated above.

The 1:48 scale mechanics aren't quite sure where to start, but some HOn30 track, N scale mechanisms, HO parts and O scale details all get thrown into the mix when modeling On18.


Scenery and Structures

Naturally, figures, scenery and structures will be built at 1:48 scale, though since most buildings will be "smaller than life" caricatures, they will need to be scratch-built as well. Some structures, like the Calico Mine Co. warehouse below, will be modeled directly after the originals at Knott's, while others will be designed to fit the available space.

Color elevation plan of the Calico Mine Co., drawn from photos of the loading area at Knott's Berry Farm.


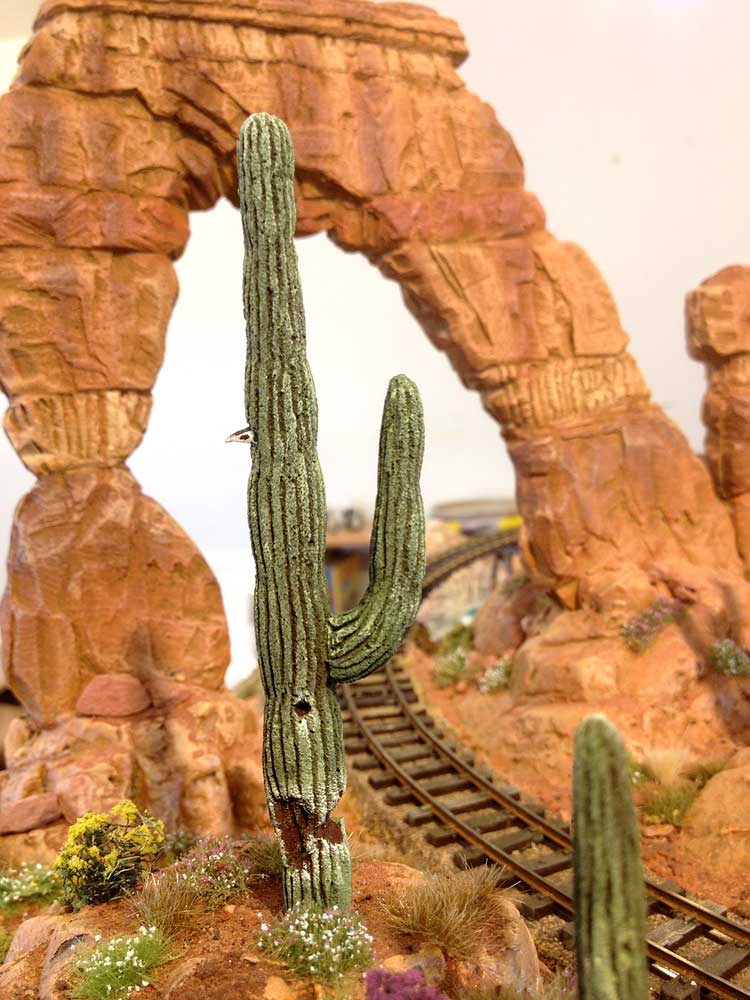
The scenic highlight of the layout will be Calico Mountain with its distinctive rock spire and waterfalls. No attempt will be made to replicate the interior scenes from the attraction but the dramatic high trestles and mine tunnels will be there, along with a truncated version of Calico Ghost Town - now very much alive with lighting, animation and sound effects.

Another vintage postcard from Knott's showing the spectacular sandstone spires of Calico Mountain along with the loading platform for the Mine Train.


Lightweight Construction

Since the layout will be portable, I'll be building it as tough and light as possible, using mostly polystyrene foam and very little wood. I developed a method for "cookie-cutter" foam benchwork for an N scale layout built some years ago and I'll be reprising that technique again here. The technique uses polystyrene foam sheet cut and fit very much like dimensional lumber for benchwork that is strong, sturdy and mostly air. Sub-roadbed is then cut from foam, cookie-cutter style, and glued into place with foam risers for elevation. I'll go much more deeply into detail on this lightweight construction method in a future post.

The Calico Gold Company will be built almost entirely from polystyrene and urethane foams. The integrated backdrop will be stretched canvas. The goal is a finished layout that can be lifted off of the larger Thunder Mesa pike and then travel to shows. A simple, folding stand will be constructed for the layout to sit on when it is away from home.


For the backdrop I'm hoping to use stretched canvas on a light wooden frame, very similar to the way theatrical scenery flats are made. The backdrop will be integral to the layout, both as an extension of the scenery and as additional structural support. If all goes well, it should be much lighter and more flexible than Masonite and will also serve as proof-of-concept for the entire backdrop system on the larger Thunder Mesa layout.

Much More to Come

With a plan I'm finally happy with it's time to get modeling and move forward. I'm not sure how long building Calico will take me, but as it's integral to the overall scheme of Thunder Mesa, it will be worth the time and effort to get it well started. No doubt there will be side projects and distractions along the way, and there is still so much to be done on Thunder Mesa proper that I should be very busy well into the future. Thanks for checking in, amigos. January has already raced by with a load of fun projects and the rest of 2015 looks like it will be a humdinger. Adios for now!

Wednesday, January 28, 2015

Nature's Wonderland Route


From the very beginning, TMMC management and investors saw potential for additional revenues that could be generated by offering tourist excursions on the line. The route to the Big Thunder and Calico Mines was indeed spectacular, being filled with curiosities and scenic wonders that defied description and challenged the imaginations of eastern city dwellers. Elias Homage, the companies founder and first president is credited with coining the term "Nature's Wonderland" to describe the area. In addition to being a clever businessman and promoter, Homage was something of an amateur naturalist in his spare time and made a hobby of cataloging the wonders along the line with an eye towards preservation. It wasn't long before colorful posters like the one above began to appear along main streets and depot platforms, extolling the amazing sites to be seen in Thunder Mesa country. With connections to the midwest via the Santa Fe Denver & Carolwood RR, curious travelers soon began to make their way west to see the marvelous canyon-lands for themselves. In later years, as mining revenue began to decline, excursion traffic became even more important to the continued survival of the narrow gauge line.

Illustration created in Adobe Photoshop with photos from the Lone Rock diorama.

Saturday, January 24, 2015

Lone Rock: A Canyon Country Diorama

The Lone Rock diorama was built to demonstrate rock carving and coloring techniques, and also to serve as a model stand for outdoor photography.


The Lone Rock diorama began with an email from Joey Ricard over at Trackside Scenery. When Joey's not working on his fantastic On30 Spruce Coal & Timber Co. layout, he's producing an awesome series of how-to modeling videos that you can watch over on YouTube. So when Joey asked if I might be interested in contributing to an upcoming video about modeling rocks, I was more than happy to agree. Joey's videos are always fun and informative, focusing on both tried-and-true and new-and-innovative techniques. Just my kind of project.

The idea for a stand-alone diorama that could be taken outdoors for photographing models had been percolating in the back of my mind for some time. Joey's video suggestion was just the push I needed to dust off the idea and get to building. I could document the build with video and photos as I went along, and wind up at the end with the photo-diorama I'd been daydreaming about. I wanted something simple and scenic, with a short length of track and one distinctive rock formation as center of interest. Most of the build is covered in the resulting video (below), so today's post will focus mostly on additional details. Here's how it all went together.

The 12" x 24" diorama started with a simple frame of 1" x 2" MDF and three layers of 1.5" white polystyrene bead-board. Some 1" thick gold polyurethane foam (Balsa Foam) was roughly shaped to form a single, towering butte. 1/2" plywood was cut to shape for track sub-roadbed and glued in place atop the foam. The white foam was shaped with a hot-wire cutter, and a small stone culvert made from Balsa Foam was created to bridge the gully. I used Loctite Power Grab construction adhesive to glue everything together.

The butte was carved from hard density Balsa Foam. This is a commercial version of the same gold urethane carving foam used by Walt Disney Imagineering and Hollywood special effects model builders. It's available through better stocked art and craft dealers.

A short section of the 1/2" plywood sub-roadbed was cut away and a chunk of 1" thick Balsa Foam was used to form a small stone culvert. The arch was created with sandpaper wrapped around a small bottle, and the stones were carved with a hard 5H pencil.

Using photos of rocks from Monument Valley, Moab and Sedona, Lone Rock Butte was carved from Balsa Foam using mostly a #2 hobby knife. The butte was then glued to the base with Loctite Powergrab adhesive. Four bamboo skewers between the butte and the base add additional strength. See the video for more details on the carving process. My part starts at about the 8:40 mark.

Sculptamold was used to blend the butte into the base and to form an embankment along the sub-roadbed right of way. A soft, wet brush is handy for smoothing things out.

Since there would be scenery below it, the stone culvert was finished early and installed flush with the sub-roadbed. It was painted with acrylics and the mortar lines were filled with spackling paste.

Midwest HO scale cork roadbed was glued down with yellow carpenter's glue before just about everything on the diorama was given a base coat of golden-tan flat latex house paint. Then a length of Peco On30 flextrack was cemented in place with Powergrab adhesive.

A wash of diluted India ink was sprayed onto the butte to darken cracks and crevices before final painting was done. Inexpensive craft acrylics were used to complete the paint job. Colors like raw sienna, red oxide, burnt umber and unbleached titanium were applied wet into wet, working from darker to lighter tones. See the video for a more complete rundown on the painting process. Painting and finishing starts at about 12:45 on the video.

The track was painted and weathered using Joey Ricard's easy techniques featured in this video from TracksideScenery.com. First the track is painted flat black. I masked off the diorama for this and did the painting outside with some Krylon spray paint. Next the ties are painted with a light tan acrylic. I used Apple Barrel "Khaki." Then the rails are painted with rust colored chalks suspended in 70% isopropyl alcohol. The final step is to give everything a good dusting with black and dark brown chalks. There's no power going to this track so I didn't bother to clean the paint off of the railhead. On powered track I'd use a Bright Boy or paint thinner to clean the railhead after painting.

The basic ground cover is Polyblend Sanded Grout. I mixed it up with a little water to form a thick paste and then just stippled it on with a cheep paintbrush (don't use a good brush for this! You'll never use it again). The erosion lines were pressed in with a pencil. The grout does a good job of representing soil while also filling and smoothing any remaining gaps in the foam base. This color is called "Sandstone," appropriately enough, and it dries a couple of shades lighter than it goes on. The wet grout generally stays where you put it but I also wet it down with a misting of diluted matte medium to lock it in place.

Once the grout had set overnight, the final coloring was done with light washes of acrylics to blend and unify the grout layer with the rock carving.

Real dirt and rocks were sprinkled on and then glued in place with white glue and diluted matte medium.

The track was ballasted with local sandstone, held in place with diluted matte medium.

Woodland Scenics "Field Grass" was used to make clumps of desert grasses and weeds, held in place with dabs of Aleene's Tacky Glue. Any loose fibers were later cleaned up with a shop vac.

A few more bushes and desert plants finish the diorama. The juniper bushes are Super Trees from Scenic Express covered in Noch dark green foliage. Clumps of gray sage were made with Woodland Scenics medium green bushes, lightly sprayed with gray primer. The prickly-pear cacti are castings from Pegasus Models. Lastly, the 1" x 2" frame was painted flat black to match the fascia on the Thunder Mesa layout.


Building the Lone Rock diorama was a quick, fun and rewarding project. Even if you don't have room for a full layout, I encourage anyone to try their hand at a small diorama like this. It can be finished in a week or so, and it's a great way to learn new techniques or to experiment with scenery ideas. I'll close out today's post with the finished video that Joey and I put together, and with a few photos taken outdoors in beautiful Sedona, AZ.


Set-up for photos in Sedona, AZ.

A small diorama like this is great for photographing models outside in natural light.


That's it for this project. Questions and comments are welcome below. Adios for now, amigos!

Wednesday, January 21, 2015

The Rainbow Desert

Headed back to the mines, a load of empty ore cars passes below McKennon Arch as twilight comes to the desert.  A raven croaks atop his favorite saguaro while a sleepy diamondback rattlesnake soaks up the last of the day's warmth held in the rocks. Though intent on his business, the gruff old engineer steals a moment to take in the view from the open cab of engine #6. With a contented sigh, he understands why some folks call this piece of country the Rainbow Desert.

Backdrop and atmospheric effects added in Adobe Photoshop. All else as modeled.

Friday, January 16, 2015

Scenes and Transitions

McKennon Arch serves as both set-piece and scenic transition, creating a visual terminus for the scenes on either side of it while providing a smooth transition between the two. Memorable scenes do more than just add visual interest, they contribute to story while making a small layout seem larger as trains pass and transition through vignettes in the modeled environment.


A model railroad can be many things. It can be a relaxing pastime and an artful hobby that teaches new skills. It can offer a lesson in history or flights of fancy. It can recreate a transportation system in miniature down to the last rivet or it can invent imaginary railways built upon what-ifs and might-have-beens. If planned well and built with care, a model railroad can entertain, transporting the viewer to another time and place, inviting them into the story just as a good book or movie would. To that end, a model railroad is a show. A magic show of smoke, mirrors and wondrous illusions. A show needs a theme or a story; it needs performers, props and set pieces. It needs scenes and transitions.

I have sometimes been asked why I draw such elaborate track plans with the details of so many scenic elements sketched in along with the right-of-way. Wouldn't a more simple plan showing only the track, wiring and other engineering needs suffice just as well? I draw them that way because I'm thinking in terms of both engineering needs and the needs of the show. Grades, clearances and wiring are important, yes, but of equal importance to me are the scenes and transitions.

In a built environment, be it a model or a theme park, a scene is an area of visual interest that helps to establish theme or to move the story along. A transition is a bridge between scenes; a place for the eye to rest that then leads naturally into the next scene. Classic examples of this can be found at any Disney park. The scene of Main Street USA ends at the visual terminus of the castle. The castle then draws the viewer onward and transitions to the land of fantasy beyond.

Scenes and transitions at Walt Disney World. Walt called big set pieces like the castle a "weenie," something to draw the eye and compel the viewer forward into the next scene. Weenies are used everywhere in Disney parks and besides being iconic, they often act as transitions between larger show scenes. Other times transitions are more subtle, using a blend of architectural details, landscaping and color to ease from one scene to the next.


Planning Scenes

When working out scenes for the Thunder Mesa layout I often think in cinematic terms of establishing shots, medium shots and close-ups. I find this to be a handy way to break things down and it is more useful and story specific than just talking about scenery, structures and details.

Establishing Shots

An establishing shot is the big picture, usually everything that can be seen in a single view when standing a typical distance from the layout. Generally for me that works out to be about 2 - 3 square feet of scenery. The establishing shot is an introduction, it sets up the story with visual cues as to theme, era, mood and locale. Here we have an establishing shot of the desert scene between McKennon Arch and Big Thunder Creek. The rock formations tell us we're in the desert southwest while the structures indicate mining activity. The color palette, scenic exaggeration and whimsical mood help set the tone.


Medium Shots

Moving in closer we come to the medium shots, scenes within the scene that are really the heart of the layout and what most people think of when they think of model railroad scenery. The medium shots are where we focus attention on structures and other scenic elements to reinforce and build upon themes presented in the establishing shot. Within the establishing desert scene shown above we have Saguaro Siding, the Never Mine, the Cactus Forest and Baxter's Butte, all contributing to the overarching story of a southwestern desert mining district and the wild country it inhabits.


Close-ups

All the way down at the detail threshold we have the close-ups. This where all of those tiny detail parts end up, hopefully doing even more to sell the story. Most of the detail in close-ups can't even be seen in the establishing or medium shots but a model railroad is not a movie. In a 3-D environment the close-ups need to be built in to every scene or the model loses integrity when people interact with it. Plus, all of those tiny details in the close-ups add up to more character, texture and depth to the overall scene.


Planning scenes means understanding what you want to say and knowing how to say it. This requires research, an eye for detail and the ability to spot and eliminate visual contradictions. Everything in a scene should support and enhance the story you want to tell, from the big picture down to the closest view. Detail for detail sake is merely visual clutter. Detail that supports the story sells the illusion of a miniature world. There is an important difference between realism and believability. A series of well planned and executed scenes can make even the most outlandish concept into a believable and entertaining show. We pick and choose only the bits of reality needed to sell the illusion.


Making Transitions

Moving from one scene to the next can be tricky, especially if there is a change in tone or locale. Transitions should be invisible; they should seem merely to be another part of the scenes on either sides of them. It should be difficult to put one's finger on precisely where the transition occurs and it should only be evident when one is then immersed in the next scene. There are some tried and true ways to accomplish this. Some use a form of misdirection by leading the eye to a scenic feature that draws attention to itself and away from the transition, while others employ a mini-scene that overlaps and blurs the lines between larger scenes while complementing both. Regardless of method, the goal is a 3-D version of the cinematic cross dissolve. In film parlance, a cross dissolve is where ones scene fades out as another scene fades in. On a model train layout or other built environment this needs to be done by carefully blending one scene into the next.

The Cross Dissolve

Water features are an excellent way to smooth transitions since they naturally divide areas of the layout while making interesting scenes in themselves. On Thunder Mesa, Big Thunder Creek works as a cross dissolve between the desert mining scene discussed above and the mill and town scenes being built to the right. The railroad bridges connect the two scenes both literally and visually and help to ease the transition. The creek also uses a bit of distraction since it draws attention to itself and away from the fact that we are moving between scenes.

Tunnels also make for excellent cross dissolve transitions but they should be used sparingly. Deep cuts, bridges and even dense trees can also be effective,

Here, Ambush Rock divides the Geyser Gulch scene from Dinosaur Gap beyond. This is a subtle transition since the formation can only be seen distinctly from certain viewpoints and fades into the background from others.

The arch is a classic "weenie" in the Disney sense. It distracts from the transition by drawing attention to itself while blending well with the scenes on either side. It draws the eye forward into the next scene while providing a visual terminus for the present one. Plus, there's just something really cool about seeing a train pass through a natural arch.


A View from Above

As an example, the Thunder Mesa section of the layout has several major scenes, establishing shots, which are broken up into smaller scenes or medium shots. Then there are the close-ups or mini-scenes that fill in all of the details. The rules of scenes and transitions apply to all of them.

In this overview plan, only the major scenes are called out. The scenes themselves are in color while the transitional areas are black and white. Keep in mind that the transitions are really scenes too, but their main role is to blend the areas where major scenes come together.


Wrapping Up

Hopefully, thinking in terms of scenes and transitions rather than just structures and scenery will help some modelers give their layouts more visual punch. Focusing on establishing shots, medium shots and close ups, certainly helps me to keep my overall goal of telling stories with trains and modeling firmly in mind.

As always, questions and comments are welcome below. Thanks for following along. Adios for now, amigos!

Wednesday, January 14, 2015

Down by the Station

It's just past noon down at Thunder Mesa Depot on a hot, dry summer's day. Once the engineer of #6 finishes swapping boxcars at the SFD&C interchange track, the crew can break for lunch over at Cordelia's Cafe. Problem is, things are running a tad behind schedule so Cordelia's famous fried chicken and berry pies will just have to wait. 


Backdrop and smoke effects added in Adobe Photoshop, all else as modeled.


It's a little cold here today for Arizona so guess I'm daydreaming about summer!

Friday, January 9, 2015

Building a Better Cactus

Down by McKennon Arch, a pair of cactus wrens are building their nest high in an old saguaro. These giant cactus can stand for centuries and provide homes for many desert creatures. The holes are made by gila woodpeckers and later get used as nesting spots by wrens and other birds. The birds are made from polymer clay and the saguaro cacti are carved and painted Balsa Foam.


I must admit that I'm cheating a little by including a forest of giant saguaro cacti on my canyon country themed layout. In nature, saguaros are usually found down in the lower country of the Sonoran Desert and not up on the high plateaus around Four Corners. I've always had a soft spot for these bristly sentinels of the desert, so I hope I'll be forgiven for including a patch of them growing here or there. Also, the Cactus Forest was a feature of the Living Desert on Disneyland's original Nature's Wonderland Mine Train, and Thunder Mesa draws a lot of inspiration from that old attraction. And nothing says "Wild West" quite like the sight of mighty saguaro on the landscape.

Saguaro have been part of Thunder Mesa from the very beginning, but I've changed the way I model them over time. Originally, the Cactus Forest was populated with carved balsa wood succulents made with the old John Olson method, alongside some plastic monstrosities from Woodland Scenics. After a while, these no longer satisfied me and I began looking around for a better way to model them.

The Cactus Forest as originally modeled with John Olson style balsa wood saguaros and some funny looking little plastic things from Woodland Scenics.


I tried Travis Handschug's method of making saguaros from polymer clay but since I enjoy carving more than sculpting I finally ended up making most of my cactus from Balsa Foam, the same polyurethane carving foam that Thunder Mesa's rock formations are carved from. I use the higher density Balsa Foam II for cacti since it is less fragile and holds detail better than the softer foam. With a razor saw, I cut the foam into rods that are 1/2" square and about 6 or 7 inches long. Then they are sanded into a basic cigar-type shape before lines are scribed in with a hobby knife. Naturally, the crooked and bent arms are shaped from angled pieces of foam.

Balsa Foam from American Art Clay Co., and some of the tools used to work with it.

Here's a craved Balsa Foam saguaro before painting. Along with some strong adhesive, small lengths of wire help hold the arms in place. The pointy end of a bamboo skewer is inserted into the base to serve as a handle during painting and to help plant the cactus on the layout.


Now, everyone thinks they know what these cactus look like from movies and TV shows but it is very instructive to do some actual research into these plants. First of all, they grow a lot bigger than many people realize and a mature saguaro can tower 40' or more. That would be 10" tall in O scale! They can also have as many as 25 arms. It would take some real time and dedication to model a cactus like that.

Real saguaros are big!


Obviously, if I modeled them to scale they would dwarf everything else on the layout and throw off the carefully constructed false perspective illusion created by the buttes above. The only choice then was to caricature the saguaro. My cactus are at a smaller scale than the real thing (who knows? maybe they are a rare, "dwarf" subspecies that only grows at higher elevations), and they have just enough arms to get the idea across.

Another cactus wren pokes her head out of a finished saguaro. After carving, the cactus are painted with dark brown acrylic craft paint. Once that dries, Olive Green, Moss Green and Ivory are dry-brushed on to complete the paint job. The chewed away part of the cactus down below is evidence of javelina in the area. Javelina are bristly pig-like critters that enjoy chowing down on cactus.

The Cactus Forest today, sans backdrop. I'm much happier with the way it looks now and will be using the same techniques to add a few more saguaro here and there on the layout as things progress.


That's the story of building a better cactus. Admittedly, today's post was more of a "what I did" than a "how to do it" and if I glossed over any details or if anyone has any questions, please feel free to ask in the comments section below. I've got several big new projects on the back burner and I look forward to sharing all of those as the new year goes on. As always, thanks for checking in, amigos. Adios for now!

Wednesday, January 7, 2015

Day's End at Big Thunder Falls

The last rays of a setting sun illuminate Big Thunder Falls as engine #1, the Marc F. Davis hauls a load of supplies to the mines above. Meanwhile, a pair of Ute braves are working their way down the old Indian trail to the sacred pools below. Backdrop and atmospheric effects added in Adobe Photoshop, all else as modeled.


Today's photo is the first of a new feature on the blog, a simple "one shot" post featuring a brief story and scenic photography. Hopefully this will grow into a semi-regular feature, posting early to mid-week, with the longer how-to's and progress reports still showing up on Fridays or Saturdays. I have a lot of fun composing these shots and photo-illustrations and I hope you all enjoy them too.

Thursday, January 1, 2015

Related Posts Plugin for WordPress, Blogger...