Wednesday, May 23, 2012

A New Home for the TMMC

"Helicopter view" from the studio ceiling.

Exciting news in Thunder Mesa Country, the TMMC has officially moved to its new home in my refurbished art studio! The studio is a cosy 16'x16' outbuilding on my property with one large corner dedicated entirely to trains. I knew that I wanted to get the layout moved to this new (and hopefully permanent) location before work got any further along. Fortunately, the layout was designed to be portable and the top detaches easily from the supports. In addition, the legs for the trestle-like base are fitted with castors so it was a simple matter for my oldest son and I to carry and roll the whole shebang from our dusty garage to its bright new home.

Primary viewing angle. That white wall will soon be covered
with a blue sky backdrop.
The layout is lit by compact fluorescent bulbs in six adjustable fixtures, giving plenty of light for good photography. And speaking of photography, once the backdrop is installed, castors will allow the layout to be rotated so that blue sky, rather than studio clutter, always shows up behind the scenery.

View from the Rainbow Caverns side with my workbench and
some memorabilia visible beyond.
Of course, the exterior of my studio still has much work to be done on it, including replacing some rotted wall boards and repainting. When all is said and done though, "Dave's Barn" should be a great place to work, play and run some trains!

Wednesday, April 18, 2012

Rock Work 101: Part II


Okay, enough theory! Let's carve some rocks!

The formation I'm currently working on is one I call Baxter's Butte, roughly modeled after all the different versions of the Big Thunder spires. When completed it will tower 100 scale feet above the railroad bed and should serve as a striking central scenic feature for the railroad. Follow along with the photo captions  and the video to see how I go about making it.

Here are most of the basic tools and materials I use to make my foreground rock formations. The main ingredient is a polyurethane carving media called Balsa Foam. This stuff comes in different densities but I prefer the soft version for sandstone rock work. I find the 9x12x1" sheets to be most flexible since I like to work on small sections and then build up a formation from several pieces.

The coping saw is used for cutting out basic shapes in the foam and the good old #11 X-Acto knife is the primary carving tool.

The stuff in the caulking gun is Loctite Power Grab all-purpose adhesive, the best thing I have found for sticking foam to foam or to anything else. It grabs hold instantly but still allows a working time of 15 -20 minutes. For laminating two or more slabs together though, I still use yellow carpenter's glue and pile some heavy books on overnight.


This photo illustrates the sectional nature of the butte and also the rock layers that are being simulated. Three, 9x12x1" sheets of Balsa Foam have been used to construct the butte so far and it narrows from a roughly 1" (4 scale feet) thickness at the top to about 5" (20 scale feet) at the base. This was achieved by building downward in sections from the top and adding more laminated slabs for thickness toward the bottom. When completed, the Butte will sit atop a sloping base of polystyrene foam, built up in layers to achieve the desired height. It should be noted the pink polystyrene foam insulation is much less expensive than Balsa Foam which costs about $10 a 9x12" sheet!

My preferred rock carving tool is a #11 X-Acto knife. The good news is that it doesn't need to be particularly sharp so now I have a use for all of those old dull blades I've been saving. Balsa Foam has a texture that is very similar to actual sandstone and it is an absolute pleasure to carve. I usually work on one small area at a time, bringing it to a near state of completion before moving on to the next. There are a few simple techniques and tricks to this that anyone can master. It all starts with a downward carving motion as shown above.

Then I use a side to side scraping motion to create facets in the rock. It's important to remember that sandstone is basically a crystalline structured rock and therefore breaks and splits at right angles. Over time, weathering wears some of these angles smooth and we get the myriad facets of rock that we see throughout canyon country. From a distance, these facets often look like lines, but when carving them you should always try to get a dimensional look where the different facets meet, with one sticking out a little more or a little less than the other. That's what makes the rocks look real.

Cutting and whittling is used to define specific line breaks in the rocks, like where two layers come together. This gives you something to carve down to when creating the rock facets. I always measure and lay these important horizontal lines out in pencil before carving so that they stay uniform throughout. At the same time though, you don't always want these horizontal lines to be perfect. They should be lost and found, broken in places by rock falls or crevices. When carving rocks it's important to remember that you're not making a brick wall, things should look a little chaotic and random. This is Nature after all. It can be a challenge. Humans tend to look for and create patterns and often times I've found that the row of brocken rocks I've just created all look a little too perfectly spaced. If that happens, just break it up some more, remembering to be as random as you can.

A medium sanding block is used to smooth and flatten surfaces, remove large bits of material quickly, and to remove mistakes and prepare an area for re-carving. 

The last tool in the box is spackel. I use it to fill gaps between slabs and to smooth transitions between separate pieces of foam. Woodland Scenics sells a product they call "Foam Putty" to do this very thing. As far as I can tell it is exactly the same stuff as painter's spackling compound except for twice the price. I use Patch N Paint from Home Depot.
Here's a quick video demo showing a little rock carving.


In the next part of this series I'll be showing how I paint the rocks with artists acrylics and prepare to install them on the layout. If you have any questions, just leave them in the comments section or come join the conversation over at Burnsland.com.

Click here for part III of this series.

Tuesday, April 10, 2012

Rock Work 101: Part I


The first hand carved rock formation on the TMMC, McKennon Arch
My Thunder Mesa Mining Company may be only 18 square feet but a large portion of that space will be covered entirely with hand-sculpted rock work. There are many tried and true techniques for making rocks for model railroads and most of them involve using molds and heavy plaster. While that might work fine for modeling Pennsylvania shale or  Rocky Mountain cliff faces, it's really not the best way to depict the spectacular buttes, arches, hoodoos and mesas of Southwestern Canyon Country. These unique, stand alone formations call for a different set of techniques and in the next few posts I'll be detailing how I go about creating them.

Modeling Geology

First off, what we're really modeling here is a specific type of geology - not just random "rocks." One thing that makes the artificial rocks at Disney parks so convincing is the Imagineers basic understanding of the geologic features required for place-making in their story. In the case of the Big Thunder attractions Tony Baxter and his team did a great deal of research into places like Monument Valley and Bryce Canyon to make their make-believe formations look and feel believable.

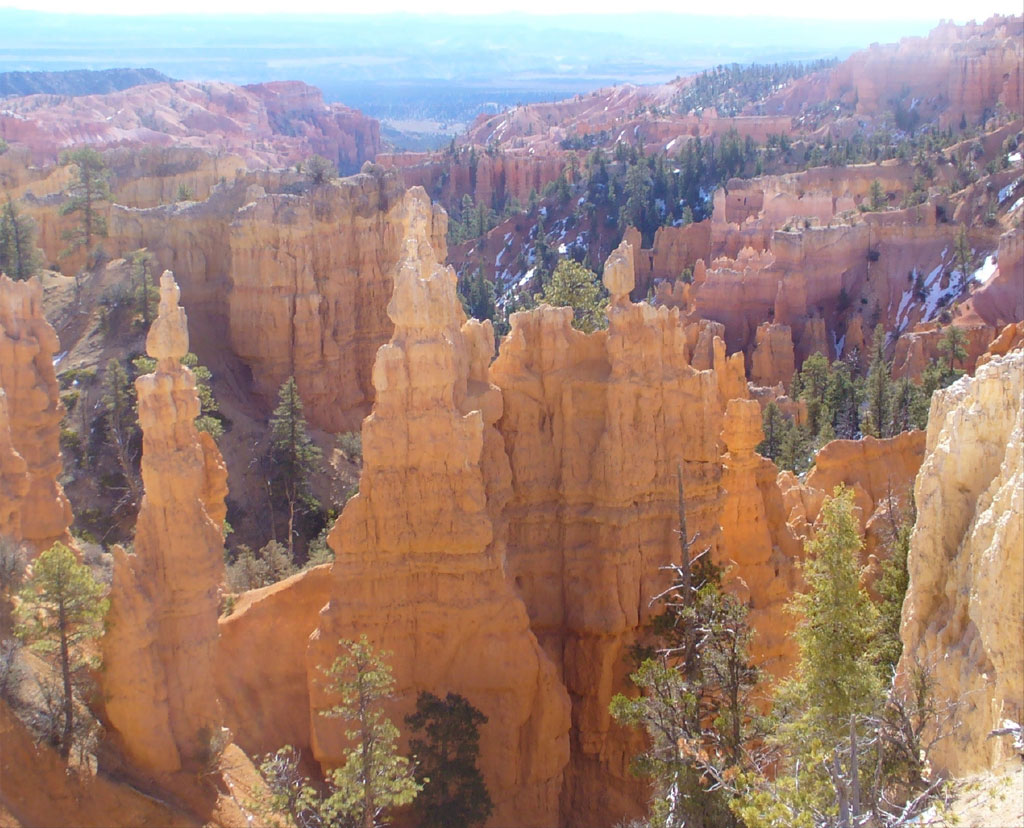
Bryce Canyon National Park, UT

Big Thunder Mountain, Disneyland, CA.
See the resemblance?
While the buttes and hoodoos of Big Thunder at Disneyland reflect a strong Bryce Canyon influence, the Walt Disney World, Paris, and Tokyo versions, while slightly different from each other, all have more of a Monument Valley flavor.

Monument Valley, AZ-UT

Walt Disney World Magic Kingdom

Tokyo Disneyland

Disneyland Paris
What they all have in common is an attempt to artistically recreate the eroded layers of sedimentary rock that are so emblematic of the American Southwest. This region has been alternately inundated by inland seas and windblown sand over the eons, leaving behind the remarkable, colorful layers of sandstone, limestone and shale that have been exposed and sculpted by erosion. Erosion, by the way, is nothing but a fancy word for weather and a whole lot of time. To model these rocks convincingly then, one must attempt to imitate the effects of erosion on layers of sedimentary rock. But which rocks?

Going Back to the Source

While I could just attempt to recreate what exists in the parks, I find it more fun and interesting to do a little "imagineering" of my own and try to design things with the same sort of process that WDI uses. That means going back to the original sources of inspiration and building from there. Personally, my favorite formations in the southwest are located in and around Arches National Park near Moab, Utah, an area in which I've spent a lot of time and know fairly well. 

Park Avenue, Arches National Park

The Organ, Arches National Park

Delicate Arch, Arches National Park
Doesn't get much more spectacular than that does it? The only thing missing is a train ride!

So, now, with the geology of a specific region chosen the job of recreating it in miniature can really begin. The Moab area has several thick layers of red sandstone known collectively as the Entrada formation. These layers erode into fanciful fins, balancing rocks, arches and bridges. Just below the Entrada is the lumpy, limestone Carmel formation which often resembles stacked blocks of stone and forms pedestals for the balanced rocks and hoodoos above. Below the Carmel formation is the cream colored Navajo Sandstone, a dome forming layer which is actually the petrified remains of an ancient blowing sand desert. Understanding where these layers are in relation to each other and how they characteristically erode brings a unified design to the entire model and a certain believability that just randomly placing rocks could never duplicate.

Building a Butte


Baxter's Butte (so far) on the TMMC.

I like the fact that each of the parks has its own unique version of Big Thunder Mountain. My goal for the TMMC is to design and build yet another version; something with a strong "family resemblance" to what's at the parks while still being a little different. With that in mind I went to work, sculpting in polyurethane foam. Right away I deviated from my chosen geology and added in an extra layer of rock about halfway up Baxter's Butte (aka Big Thunder Mt.) Oh, well, it's an artist's prerogative to tweak nature here and there until things look right! Right now things are looking a little too flat to my eyes and I'm not at all sure about the natural bridge and might just lose it. One nice thing about working in foam is that it is very easy to make changes.

I'll go into the details of how I construct and carve these rocks, including the tools and materials used, in my next post in this series. Stay tuned!

Click here for part II of this series.
Click here for part III of this series.

Wednesday, April 4, 2012

A Plan for Thunder Mesa

Now that I'm well into construction it might not be a bad time to work up a track plan. I simply love drawing track plans and have probably done hundreds of them over the years. This one is fairly elaborate and focuses primarily on the scenic treatment. Grid spacing is 12".


The basic track plan was drawn with XTrackCad, a free open source track planning software. Once I'm happy with the track layout, I import a screenshot of the plan into Adobe Photoshop to do the final rendering.
Related Posts Plugin for WordPress, Blogger...