
Thursday, January 31, 2013
January Update
For January I've put together a short video showing progress on the layout so far. I'm looking forward to getting a lot done on the railroad this year and updates should be rolling out with a little more regularity in the future. In the meantime, enjoy the movie! (I highly recommend watching in full-screen mode.)
Monday, January 28, 2013
November ~ December Update
Why am I posting a November - December update at the end of January? Because I'm behind, that's why! Sure, I could backdate it, but that wouldn't be very honest now would it? Anyhoo, here's what I've been working (or playing) on:
 |
| This is a Photoshop render of a tiny little steamer currently in the works. If all goes according to plan, this will be Thunder Mesa #1, the "El Dorado." It's a Disney-esque caricature all the way. I'm building it up on an older Bachmann Porter Chasis. |
Making Stone Foundations, Bridges and Abutments
I've started detailing the right of way here and there with some stonework carved from Balsa-Foam. Here are a few examples:
 |
| First, I cut a chunk of Balsa-Foam to the right shape and size and then lightly lay out horizontal lines with a straight edge for the rows of stones. Then I carve around the edges of each stone with a hard lead pencil. |
 |
| Once the pieces are carved, the next step is to paint and seal them with artists acrylics. My favorite color for this is a tannish white called Buff Titanium. Note that this color will serve as mortar between the stones so if you want a dark mortar, use a darker base coat. |
 |
| When the base color is dry, I dry-brush the stone colors using a stiff brush, taking cae to only get color on the "stones" and not down in the mortar lines. |
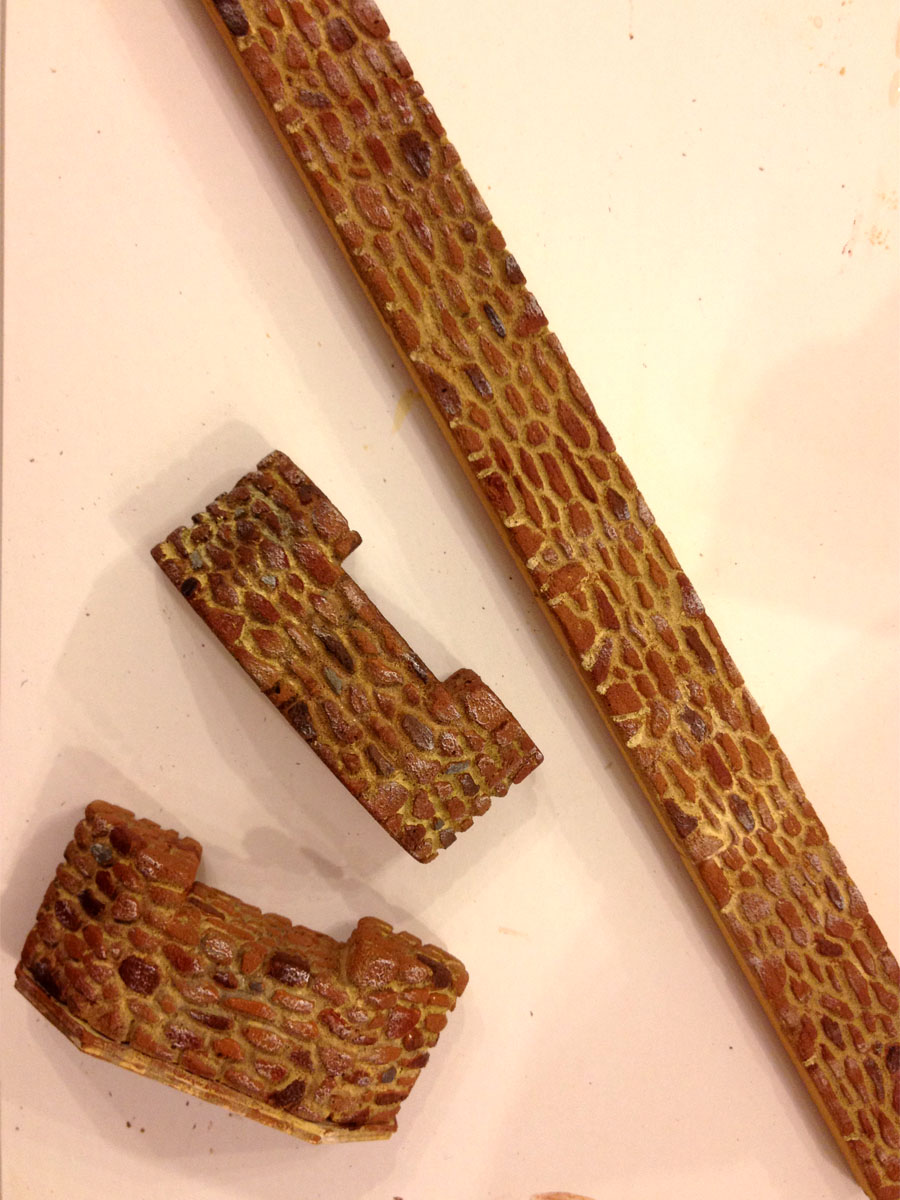 |
| Lastly, I pick out individual stones with a few contrasting colors for variety. After a little weathering with powdered chalks the pieces are ready to install on the layout. |
 |
| This long skinny piece will serve as the stone foundation for the Thunder Mesa Station. |
 |
| One of the abutments under the truss bridge. |
 |
| Last but not least, I created this little stone arch bridge for the high-line, using some medium grit sandpaper wrapped around a small plastic bottle to hollow out the arch. |
That's about it for now. With any luck, future updates will be posted in a more timely manner. Thanks for checking in.
Sunday, October 28, 2012
September ~ October Update
I've fallen a bit behind in updating the blog but the good news is that a lot has been happening out in Thunder Mesa Country!
 |
| Overall view of the layout as it looks today. |
 |
| Geyser Gulch still needs a lot of work, including its trestle bridge, but just beyond in Dinosaur Gap the final rock work is starting to take shape. |
Building Dinosaur Gap and a base for Baxter's Butte
Much of the work over the last two months has been centered around the left side of the layout where the track makes a sweeping S-curve before plunging into Rainbow Caverns. I'm calling this scene "Dinosaur Gap" because of the T-Rex skeleton that will be exposed just above the track grade, somewhat similar to the scene below at Disneyland.

My dino hasn't been installed yet, but I've laid the groundwork for the scene, while at the same time finishing the tunnel entrance to Rainbow Caverns and adding a solid base for the removable upper section of Baxter's Butte (AKA Big Thunder Mt). Here's a photo progression of the scene as it takes shape.
 |
| The first step was to cut and install a piece 1/4" masonite in the exact shape of the butte's footprint. It was then glued into place and the track for the new mine spur was laid over the top. The 1/4" masonite is the same height as the HO scale cork roadbed I am using. |
 |
| Next, plaster cloth was used to blend the masonite "footprint" with the layers of pink insulation foam below. |
 |
| Scultamold was applied over the plaster cloth and pink foam, adding texture, filling gaps and blending everything together. More rock facets and faces were carved into the Scultamold at this time. |
 |
| Additional detail rock carvings were sculpted from Balsa Foam and blended in with Spackle and Scultamold. |
 |
| After drying for about 48 hours, the entire area now ready for paint. |
 |
| I paint everything with a coat of tan latex paint, this seals the foam carvings and helps blend everything together. I use a foam brush for this, dabbing paint into all of the nooks and crannies. |
 |
| After painting. |
 |
| After the base coat is dry, diluted India ink is applied with a spray bottle to darken all of the cracks and crevasses. |
 |
| Here's how it looks after the India ink flows into the texture and dries. |
 |
| Now it's time for the fun part, painting with acrylics! These are the basic colors and brushes I use. |
 |
| This is where things get creative. First I use Raw Sienna, dabbing and dry-brushing over the surface of the rocks but leaving the India ink shadows to show through. |
 |
| Next I rub in some Burnt Umber, using it sparingly and only where I want the darkest shadows. |
 |
| Now highlights a dry-brushed on with Buff Titanium, keeping in mind which layers of rock I want to be lighter than the others |
 |
| Last are the final details, scrubbing and blending the colors together, adding more highlights where needed and dry-brushing in some darker streaks where water has stained the rocks. |
 |
| And here is the finished paint job with a few details added. |
 |
| Next the track will be painted and ballast and ground cover added, along with more details to complete the scene. |
 |
| The area just above the track on the right is where the dinosaur bones will be located. The flat, pedestal looking rocks on the left are for teetering boulders. |
Mock-Up Land
I'm a firm believer in using paper mock-ups to test structure size and placement. It's a lot easier to make changes to a scene at this stage than after detailed structures have been built and placed. |
| A paper and foamboard mock-up of Big Thunder station. |
 |
| Station and water tower. |
 |
| On the left will be an open air engine shed, on the right is a mock-up for an ore bin. |
Designing an Excursion Car
Since my railroad represents a fictional prototype for the Big Thunder attractions it frees me up to design things that look as if they could have inspired Disney Imagineers without being direct copies of what is found at the parks. My goal is to create designs with a strong "family resemblance" to the Disney trains while still looking as if they could actually have existed on a real world railroad somewhere.
In my universe, the Thunder Mesa line was a down-on-its-luck ore carrier that was discovered and saved by railfans and tourists. While it still moves ore from the mines from time to time, its main business has shifted to providing scenic rail excursions through the spectacular natural wonders of the Thunder Mesa area. So, my thinking goes, how would an old mining line shift to carrying tourists? Well, by converting old ore cars to excursion cars of course!
 |
| Here's my first pass at designing a 12' ore car converted to excursion service. Note that this is not an actual model but was created through the magic of Photoshop. |
 |
| And here is the final design (for now). I decided a 14' car would be more practical and also added a canopy version to provide deluxe, first class service for my 1/4" scale guests. The cars will be built on cut-down Bachmann flatcar frames. |
Next Update:
Well, that's enough for this time. Next update I'll be painting track, adding some line-side details and who knows what else. 'Till then, happy trails!
Saturday, August 18, 2012
August Update
I haven't had much time to work on the railroad this summer, but here's an update on the small amount of progress that has been made since June.

The final shape of things is starting to come together with a bit more scenery roughed in and a new upper level mining spur added.

This new line tunnels right through the heart of Baxter's Butte to feed an ore tipple above the main tracks. Once completed, this track will feature the same back and forth automation as the lower line in town, using the same Circuitron electronics described in the last post.

And last but not least, The TMMC has acquired some new rolling stock in the form of Bachmann's excellent side dump ore cars. These cars are die-cast metal and the side dump mechanism works very smoothly. They'll be repainted 'Thunder Mesa Gold' before all is said and done.
That's about it for now, hope everyone is having a great summer and I look forward to getting more work done on the railroad once things slow down in the fall.
Update 9/7/2013:
The upper level line has been converted to On18 and will soon connect to a Calico Gold Mining diorama on the expanded TMMC.
Subscribe to:
Posts (Atom)